Hackaday Links: April 2, 2017

Toorcamp registration is open. It’s June 20-24th on Orcas Island, Washington.

Hey, you. The guy still using Mentor Graphics. Yeah, you. Siemens has acquired Mentor Graphics.

CNC knitting machines are incredibly complicated but exceptionally cool. Until now, most CNC knitting machines are actually conversions of commercial machines. Beginning with [Travis Goodspeed] and  [Fabienne Serriere] hack of a knitting machine, [Becky Stern]’s efforts, and the Knitic project, these knitting machines are really just brain transplants of old Brother knitting machines. A few of the folks from the OpenKnit project have been working to change this, and now they’re ready for production. Kniterate is a project on Kickstarter that’s a modern knitting machine, and basically a 2D woolen printer. This is an expensive machine at about $4500, but if you’ve ever seen the inside of one of these knitting machines, you’ll know building one of these things from scratch is challenging.

There was a time when a Macintosh computer could play games. Yes, I know this sounds bizarre, but you could play SimCity 2000, Diablo, and LucasArts adventure games on a machine coming out of Cupertino. [Novaspirit] wanted to relive his childhood, so he set up a Mac OS 7 emulator on a Raspberry Pi. He’s using Minivmac, beginning with an install of OS 7.1, upgrading that to 7.5.3, then upgrading that to 7.5.5. It should be noted the utility of the upgrade to 7.5.5 is questionable — the only real changes from 7.5.3  to 7.5.5 are improved virtual memory support (just change some emulator settings to get around that) and networking support (which is difficult on an emulator). If you’re going to upgrade to 7.5.5, just upgrade to 8.1 instead.

It’s getting warmer in the northern hemisphere, and you know what that means: people building swamp coolers. And you know what that means: people arguing about the thermodynamics of swamp coolers. We love these builds, so if you have a swamp cooler send it on in to the tip line.

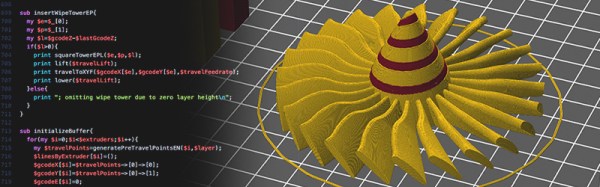
The Prusa edition of Slic3r is out. The improvements? It’s not a single core app anymore (!), so slicing is faster. It’s got that neat variable layer slicing. Check out all the features.

It takes at least a week to delete your Facebook account. In the meantime, you can lawyer up and hit the gym. Additionally, we’re not really sure Facebook actually deletes your profile when you disable your account. Robots to the rescue. [anerdev] built a robot to delete all his content from Facebook. It’s a pair of servos with touchpad-sensitive pens. Add an Arduino, and you have a Facebook deleting machine.

Hands On With Variable Layer Height

3D printers are an exercise in compromise. Generally, you don’t want a lot of mass on your tool head, as that can lead to ringing and other mechanical artifacts on your print. However, direct drive extruders are better for many filaments, and the decision on what printer to build ultimately comes down to a choice between speed, build area, and the ability to print in exotic filaments.

Even in slicing a 3D model, a 3D printing enthusiast must balance the quality of a print versus how long the print will take to squirt out of a nozzle. Now, just about any printer can produce fantastic models at a very high layer height, but no one wants to wait several days for the print to finish.

This balance between print time and print quality has, for the last few years, been completely ignored. One of the best solutions to this we’ve seen is variable layer height slicing. Basically, if you’re printing something without much detail, you don’t need small layers in your 3D print. Think of it as printing the neck of a bust at 0.3mm layer height, and the face at 0.1mm.

Yes, there were a few papers from a decade ago laying the conceptual foundations of variable layer height slicing. 3D printers weren’t exactly common back then, though. Recently, Autodesk’s Integrated Additive Manufacturing Team released Varislice for automatic generation of variable layer heights on a 3D printed object. So far, though, there’s no good automated solution for variable layer height slicing, and the tools for manual configuration of variable layer height slicing are terrible.

For the past few months, Prusa Research has been working on their own edition of Slic3r that includes an easy to use interface for variable layer height slicing. This version of Slic3r was just released, and now it’s time for the hands-on. Does variable layer height slicing work?

Continue reading “Hands On With Variable Layer Height”

Liar’s 3D Printing: Multiple Colors With One Extruder

Good 3D printers now have multiple hot ends. You ought to be able to print in different colors or print support material. However, a lot of us don’t have multiple hot ends. Turns out, you don’t have to have multiple hot ends to print in multiple colors. To accomplish that you need a lot of patience and the willingness to tell bald-faced lies. Don’t worry, though, you’ll only be lying to some computer hardware and software, so that doesn’t count.

You may have seen people talk about putting a pause between layers to switch from one color to another. That works, but it limits your options. For example, if you want to put some colored text on a different colored background, you have to either have the text poke out, or it has to be “under” the background. It can’t be flush if you only have a single extruder and hot end. My method is a lot more trouble, but it can generate good results.

Keep in mind, with hobby-grade printers, multiple color printing has a lot of problems even if you do have multiple extruders. This isn’t a panacea. But you can get results on par with a similar printer that has multiple heads.

Bottom Line Up Front

Here are a few pictures of test prints that use this technique. A Monoprice Mini printer with the stock extruder and hot end created them using different PLA filament. On the left is a test cube, with a color spot in the middle of the layers (as well as some spots on the top surface you can’t see). To the right is a plate with my call sign in a contrasting color. It is hard to tell in the picture, of course, but there is one surface. The text is at the same height as the yellow surface.

I didn’t spend a lot of time making these prints since I was more focused on perfecting the methodology. The layer heights aren’t very fine, the infill is sparse, and the print speed was fast. However, you could invest time into making better-looking prints. You can also use the usual techniques that you use with a “real” multi-extrusion printer (such as priming towers, ooze shields, etc.).

Continue reading “Liar’s 3D Printing: Multiple Colors With One Extruder”

Hackaday Links Column Banner

Hackaday Links: October 23, 2016

It’s the Hack ‘O Lantern edition! First up, Slic3r is about to get awesome. Second, Halloween is just around the corner, and that means a few Hackaday-branded pumpkins are already carved. Here’s a few of them, from [Mike] and [yeltrow]:

The latest edition of PoC||GTFO has been released. Holds Stones From The Ivory Tower, But Only As Ballast (PDF and steganography warning). This edition has a reverse engineering of Atari’s Star Raiders, [Micah Elisabeth Scott]’s recent efforts on USB glitching and Wacom tablets, info on the LoRa PHY, and other good stuff. Thanks go to Pastor Manul Laphroaig.

Oh cool, we can be outraged about something. The Freetronics Experimenters Kit is a neat little Arduino-based ‘Getting Started In Microcontrollers’ kit. This kit was sold by Jaycar. Recently, Jaycar ripped off the kit and sold it under the Duiniotech name. The box was copied, the instruction manual was copied, and there’s a lot of IP being violated here. Can Freetronix do anything? Legally, yes, but it’s not worth it.

[Oscar] broke his phone, but it still works great as an SMD soldering camera/microscope thing.

Pobody’s Nerfect in Australia so here’s a 3D printed didgeridoo. What’s a didgeridoo? It’s an ancient instrument only slightly less annoying than bagpipes. It’s just a tube, really, and easily manufactured on any 3D printer. The real trick is the technique that requires circular breathing. That’s a little harder to master than throwing some Gcode at a printer.

[Chris Downing] is the master of mashed up, condensed, and handheld game consoles. His latest is another N64 portable, and it’s a masterpiece. It incorporates full multiplayer capability, uses an HDMI connector for charging and to connect the external breakout box/battery, and has RCA output for full-size TV gameplay. Of note is the breakout board for the custom N64 chip that puts pads for the memory card and a controller on a tiny board.

3D Printering: Non-Planar Layer FDM

Non-planar layer Fused Deposition Modeling (FDM) is any form of fused deposition modeling where the 3D printed layers aren’t flat or of uniform thickness. For example, if you’re using mesh bed leveling on your 3D printer, you are already using non-planar layer FDM. But why stop at compensating for curved build plates? Non-planar layer FDM has more applications and there are quite a few projects out there exploring the possibilities. In this article, we are going to have a look at what the trick yields for us.

Continue reading “3D Printering: Non-Planar Layer FDM”

3D Printering: G-Code Post Processing With Perl

Most of our beloved tools, such as Slic3r, Cura or KISSlicer, offer scripting interfaces that help a great deal if your existing 3D printing toolchain has yet to learn how to produce decent results with a five headed thermoplastic spitting hydra. Using scripts, it’s possible to tweak the little bits it takes to get great results, inserting wipe or prime towers and purge moves on the fly, and if your setup requires it, also control additional servos and solenoids for the flamethrowers.

This article gives you a short introduction in how to post-process G-code using Perl and Slic3r. Perl Ninja skills are not required. Slic3r plays well with pretty much any scripting language that produces executables, so if you’re reluctant to use Perl, you’ll probably be able to replicate most of the steps in your favorite language.

Continue reading “3D Printering: G-Code Post Processing With Perl”

Better 3D Prints By Mixing Slicing Techniques

Most 3D printing projects start with a 3D model of some kind. Slicing programs transform the model into gcode. The gcode file contains the commands that actually drive your printer. There are different ways to slice a model and sometimes you want to use more than one on a single model. I’ve been working on a way to make that easier.

When you slice a 3D printing model, you can select different attributes for the resulting gcode file. For example, you might set the slicer to produce different infill density, temperatures, or print speeds. These settings can have a big impact on your printing results. For example, a piece that needs high strength might require a denser infill  than some trinket or key chain. You might want an artistic piece to have a finer layer height than some internal part for some gadget no one will ever see.

One Size Fits All?

The problem is that for most open source slicers, these settings will apply to the entire model. Cura has some plugins that can change settings at different Z heights, and Slic3r can vary layer height, but in the general case, what you set for the slicer will apply to the entire model. Of course, a gcode file is nothing more than a text file, so if you are industrious, you can manually merge two or more files into one.

A manual merge is a pain, which is why I wrote gblend. It can stitch together gcode files to get various effects. The program takes multiple gcode files in as inputs and can combine them in different ways. The most useful feature allows you to get a certain number of layers from each source file and combine them into a single print. Measurements are in millimeters, so you don’t have to worry about layer numbers. The entire process is much easier than anything else I’ve come across.

Continue reading “Better 3D Prints By Mixing Slicing Techniques”