Miniature Motorized RC Car Is Massively Impressive

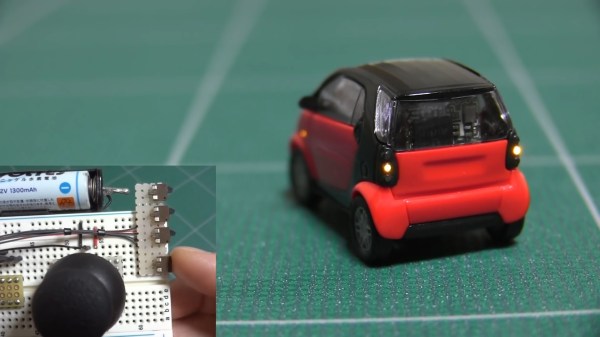
Small is often subjective. For example, a school bus is small compared to an Airbus A380. But other things are just small all on their own and need no comparison to make the point. Such is the case with this micro RC car in the video below the break. It’s an RC model of the Smart Car, that when compared to other vehicles on the road, is quite diminutive, both subjectively and absolutely. But the outward appearance of [diorama111]’s project only tells half the story.

Starting out as a static display model, [diorama111] fully disassembled the 1/87 scale Smart Car and got to work. Fully proportional steering is attained with a very, very small stepper motor that drives custom knuckles attached to handmade suspension. They are works of art in their own right.

Do your projects need tweezers for assembly?

Drive is supplied by another small stepper motor. If [diorama111] had stopped there, it would have been every bit as noteworthy to see a 1/87 Smart Car doing figure eights around small bottles of model paint. Instead, [diorama111] kept going! The car has working turn signals, brake lights (including the 3rd taillight in the back window!) and headlights. There is even a function for hazard lights.

The electronics are all hand built using enameled wire and SMD components on perf board, and are a study in miniaturization all their own. An ATtiny processor seems right at home in this design. We admire [diorama111]s steady hands and patience to build such a small RC car, never mind one with such fine attention paid to all the details.

If downsized hacks like this float your thimble-sized boat, you might also appreciate this precious little PDP-11 and terminal.

Continue reading “Miniature Motorized RC Car Is Massively Impressive”

Pick and place reels

Pick And Place Hack Chat

Join us on Wednesday, February 9 at noon Pacific for the Pick and Place Hack Chat with Chris Denney!

We in the hacker trade are pretty used to miracles — we make them all the time. But even the most jaded among us has to admit that modern PCB assembly, where components that could easily hide under a grain of sand are handled by robots, borders on witchcraft. The pick and place machines that work these wonders not only have to hit their marks accurately and precisely, but they also do it at blinding speeds and for days on end.

join-hack-chatLuckily, even those of us who design circuits for a living and depend on PCB assembly services to realize those designs can, at least to some degree, abstract the details of the pick and place phase of the process away. But making it “just work” isn’t a trivial task, and learning a little bit about what it takes to do so can make us better designers. Plus, it’s just plain cool to watch a pick and place do its thing. And to dive a little deeper into pick and place, Chris Denney, CTO of Worthington Assembly and co-host of “Pick, Place, Podcast” will stop by the Hack Chat. If you’ve ever wondered about the inner workings of PCB assembly and the role pick and place plays in it, or if you’re looking for tips on how to optimize your layouts for pick and place, this is one you won’t want to miss!

Our Hack Chats are live community events in the Hackaday.io Hack Chat group messaging. This week we’ll be sitting down on Wednesday, February 9 at 12:00 PM Pacific time. If time zones have you tied up, we have a handy time zone converter.

Continue reading “Pick And Place Hack Chat”

Acid-Damaged Game Boy Restored

The original Game Boy was the greatest selling handheld video game system of all time, only to be surpassed by one of its successors. It still retains the #2 position by a wide margin, but even so, they’re getting along in years now and finding one in perfect working condition might be harder than you think. What’s more likely is you find one that’s missing components, has a malfunctioning screen, or has had its electronics corroded by the battery acid from a decades-old set of AAs.

That latter situation is where [Taylor] found himself and decided on performing a full restoration on this classic. To get started, he removed all of the components from the damaged area so he could see the paths of the traces. After doing some cleaning of the damage and removing the solder mask, he used 30 gauge wire to bridge the damaged parts of the PCB before repopulating all of the parts back to their rightful locations. A few needed to be replaced, but in the end the Game Boy was restored to its former 90s glory.

This build is an excellent example of what can be done with a finely tipped soldering iron while also being a reminder not to leave AA batteries in any devices for extended periods of time. The AA battery was always a weak point for the original Game Boys, so if you decide you want to get rid of batteries of any kind you can build one that does just that.

Continue reading “Acid-Damaged Game Boy Restored”

Solder stencil vacuu assist jig

Stencil Vacuum-Assist Helps Avoid The Heartbreak Of Smeared Solder Paste

While using a stencil should make solder paste application onto PCBs a simple affair, there are a number of “gotchas” that make it more art than science. Luckily, there are tools you can build, like this 3D-printed vacuum-assist stencil jig, that take a little of the finesse out of the process.

For those who haven’t had the pleasure, solder paste stencils are often used to make the job of applying just the right amount of solder paste onto the pads of a PCB, and only on the pads. The problem is that once the solder paste has been squeegeed through the holes in the stencil, it’s not easy to remove the stencil without smearing. [Marius Heier]’s stencil box is essentially a chamber that attaches to a shop vac, along with a two-piece perforated work surface. The center part of the top platform is fixed, while the outer section moves up and down on 3D-printed springs.

In use, the PCB is placed on the center fixed platform, while the stencil sits atop it. Suction pulls the stencil firmly down onto the PCB and holds it there while the solder paste is applied. Releasing the suction causes the outer section of the platform to spring up vertically, resulting in nice, neat solder-covered pads. [Marius] demonstrates the box in the video below, and shows a number of adapters that would make it work with different sized PCBs.

If you think you’ve seen a manual vacuum stencil box around here recently, you’re right — we featured one by [UnexpectedMaker] not too long ago.

Continue reading “Stencil Vacuum-Assist Helps Avoid The Heartbreak Of Smeared Solder Paste”

Kamehameha!! PCB Badge

PCB Art has surely captivated us over the past few years and we’re ever intrigued with the intricate detail the community puts into their work. We’re no strangers to [Arnov]’s work and he has impressed, yet again, with his Kamehameha PCB badge.

Unfortunately, no 555 timer was used in the making of this project, but don’t let that turn you away. Instead, we have an ATtiny84 microcontroller for implementing the logic to control the LEDs, a MOSFET-based driver for driving current through the LEDs, and, of course, the LEDs to give the “turtle destruction wave” its devastating glow. Pay really close attention to the detail [Arnov] put into the silkscreen as you can see that’s a pretty crucial part of this build.

Aside from marveling at [Arnov]’s work, fans of the OrCAD PCB designing software will learn how to import an image file into their project as [Arnov] walks through that step in his tutorial. He even has some pretty good reflow soldering tips if you’re looking to try your hand at SMD soldering.

Another cool build [Arnov]. Keep it up!

Continue reading “Kamehameha!! PCB Badge”

Fail Of The Week: Hackaday Writer Attempts XBox Repair

Like a lot of Hackaday readers, I pride myself on being “the fix-it guy” in my family. When something breaks, I get excited, because it’s a chance to show off my skills. It’s especially fun when something major breaks, like the fridge or the washing machine — repairs like that are a race against time, since I’ve got to get it fixed faster than it would take to hire someone to do it. I usually win the race; I can’t remember the last time I paid someone to work on something. Like I said, it’s a point of pride.

And so when my son came home on Thanksgiving break from his first semester away at college, eager to fire up his Xbox for some mindless relaxation from his biochemistry studies, only to be greeted with a black screen and no boot-up, it was go-time for me. I was confident that I’d be able to revive the dead box in time for him to have some fun. The fact that he’s back at school and the machine is still torn apart on my bench testifies to my hubris, but to be fair, I did get close to a fix, and may still yet get it done. But either way, the lessons I’ve learned along the way have been really valuable and worth sharing.

Continue reading “Fail Of The Week: Hackaday Writer Attempts XBox Repair”

Streamline Your SMD Assembly Process With 3D-Printed Jigs

Your brand-new PCBs just showed up, and this time you even remembered to order a stencil. You lay the stencil on one of the boards, hold it down with one hand, and use the other to wipe some solder paste across…. and the stencil shifts, making a mess and smearing paste across the board. Wash, rinse (with some IPA, of course), repeat, and hope it’ll work better on the next try.

openscad window
A PCB jig generated by OpenSCAD

Maybe it’s time to try Stencilframer, a 3D-printable jig generator created by [Igor]. This incredibly useful tool takes either a set of gerbers or a KiCad PCB file and generates 3D models of a jig and a frame to securely hold the board and associated stencil. The tool itself is a Python script that uses OpenSCAD for all 3D geometry generation. From there, it’s a simple matter to throw the jig and frame models on a 3D printer and voilà!– perfectly-aligned stencils, every time.

This is a seriously brilliant script. Anyone whose gone through the frustration of trying to align a stencil by hand should be jumping at the opportunity to try this out on their next build. It could even be paired with an Open Reflow hot plate for a fully open-source PCB assembly workflow.

Continue reading “Streamline Your SMD Assembly Process With 3D-Printed Jigs”