Reverse-Engineering A Smoker

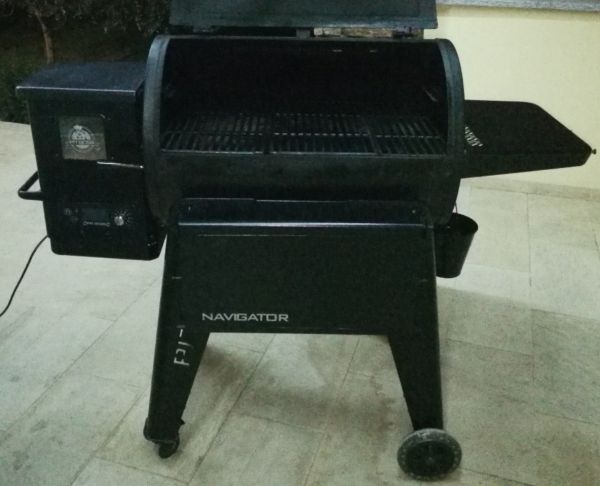
In certain parts of the world, cooking meat in a regionally-specific way is a critical part of the local culture. From barbeque in the American south to boerewors and braaivleis in South Africa to Montréal smoked meat in French Canada, almost every location has its cookout specialty. So much so that various manufacturers of the tools used for these foods include all kinds of gadgets to monitor the sometimes days-long process of cooking various cuts of meat. [megamarco833]’s smoker, though, includes some tools of his own design.

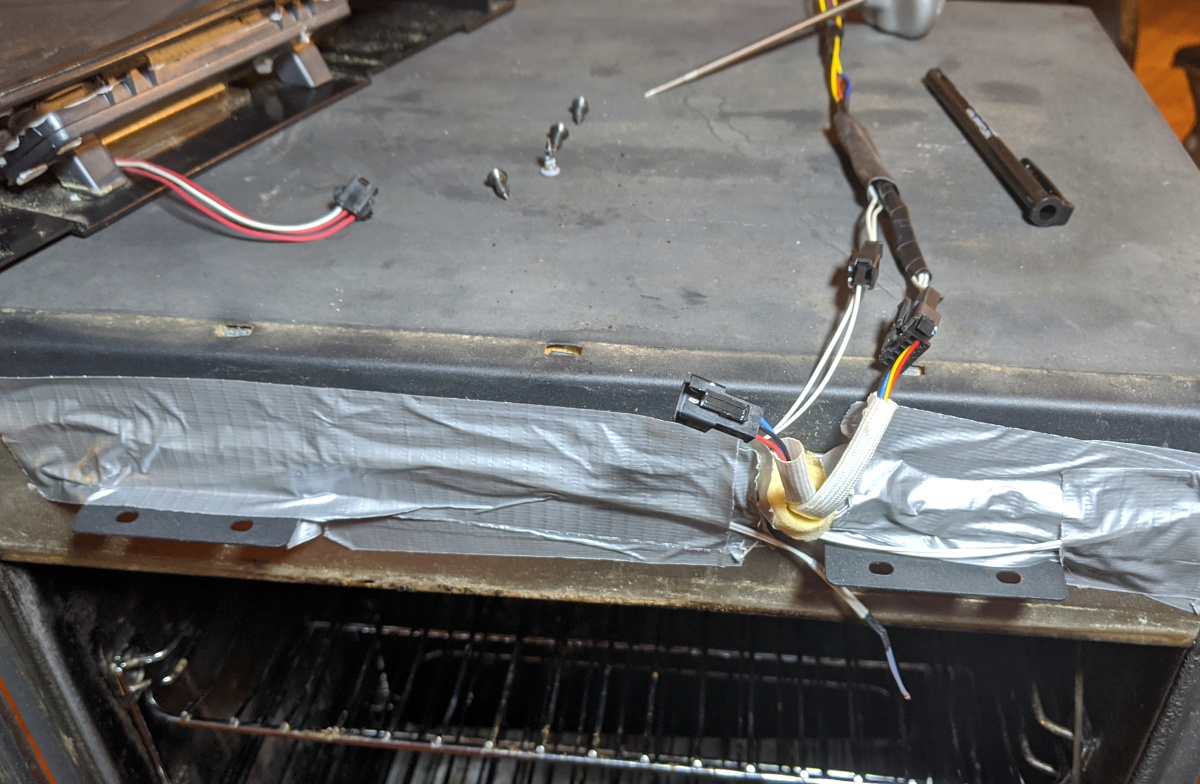
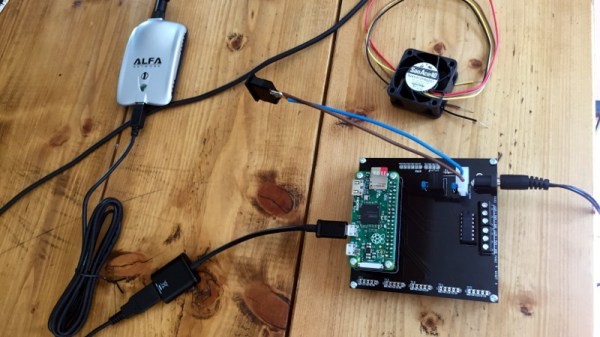
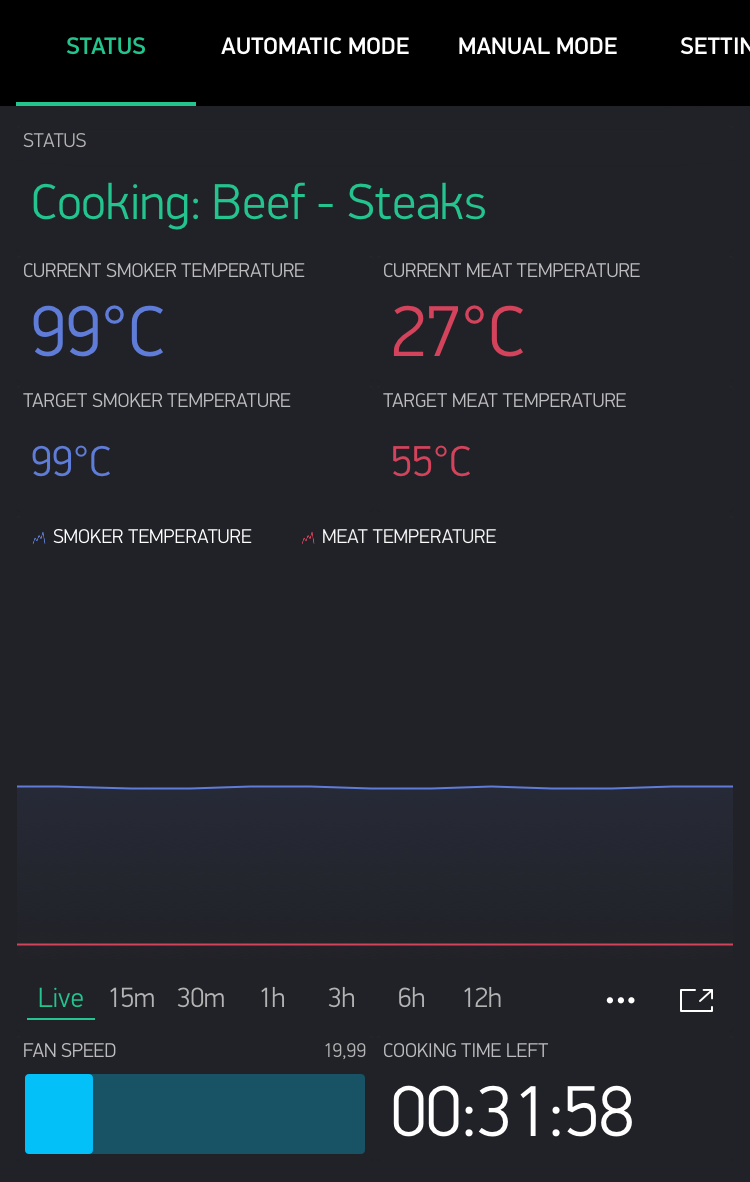
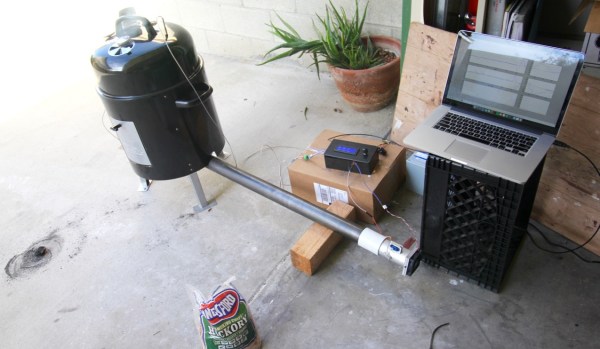
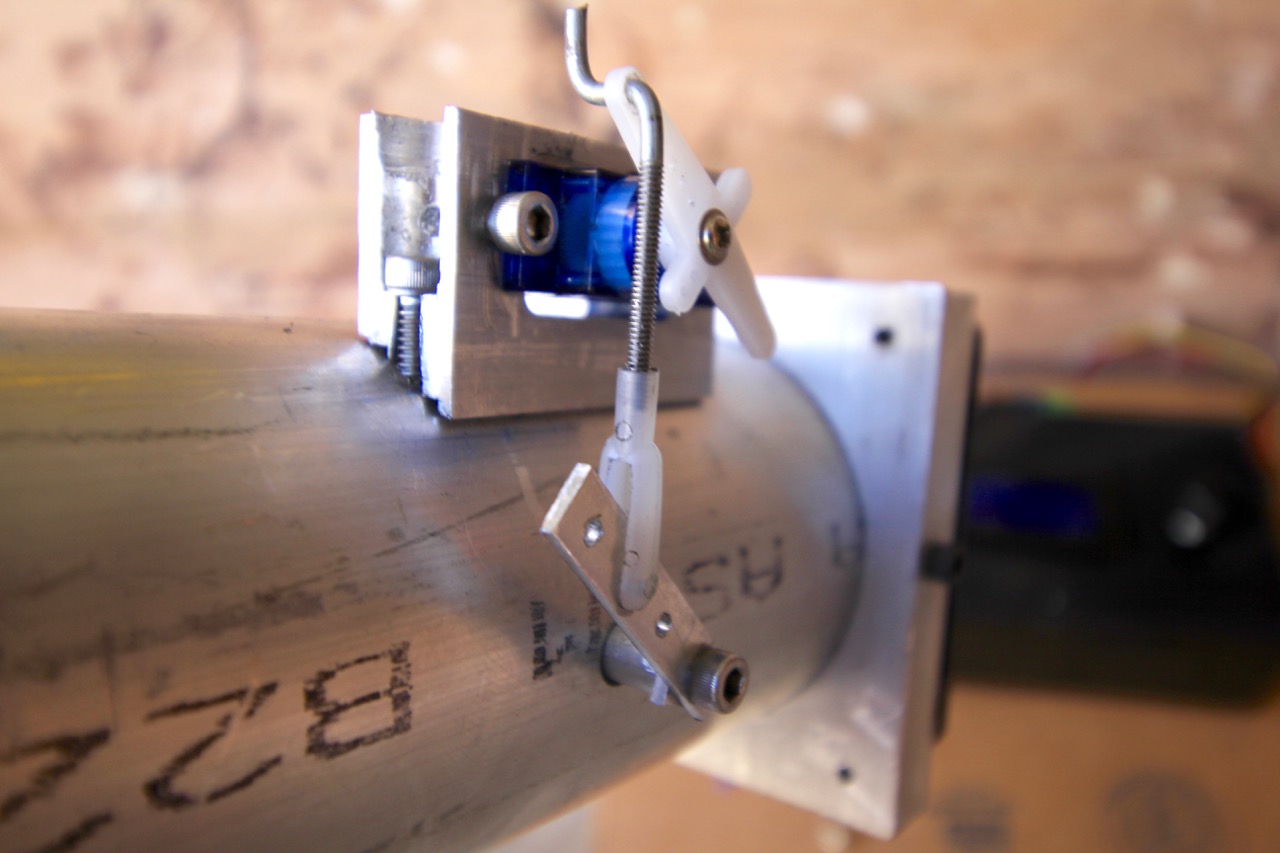
The smoker is made by a company called Pitboss and includes a rotary switch and control board for maintaining a precise temperature in the smoker. The switch works by changing the voltage value sent to a small microcontroller. By interfacing an ESP32 to this switch, [megamarco833] can remotely change the smoke level and temperature of the smoker. On the software side, it uses a combination of Node-RED and Domoticz to handle the automation and control.

For a cookout that can last hours (if not days) a remotely accessible smoker like this is an invaluable tool if you want to do something other than manually monitor the temperature of your meat for that much time. And, if your barbeque grill or smoker of choice doesn’t already have an embedded control board of some type, we’ve seen analog cooking tools adapted to much the same purpose as this one.

Thanks to [Peter] who sent in the tip and also helped [megamarco833] with the reverse-engineering of the control board!

Got A Cardboard Box? Get Into Food Smoking!

We appreciate a good kitchen hack, and we have always liked TV personality and chef [Alton Brown]’s McGuyver-ish approach to these things. So for anyone who hasn’t seen it, let’s take a moment to highlight how to make (and use) Alton Brown’s Cardboard Box Smoker.

[Alton] himself confesses that over the years it has remained his favorite smoker for a few good reasons. The price is certainly right, but there are a few other things that really stand out in the design. It’s easy to assemble and take down, needing very little storage space compared to a purpose-built smoker. It’s also trivial to monitor the temperature inside: just poke a thermometer probe through the side of the box. Finally, it’s a great way to get some additional use out of an old hot plate and cast iron pan. It’s the kind of thing one could put together from a garage sale and a visit to the dollar store.

The cardboard box is perfectly serviceable, but one may be tempted to kick it up a notch with some upgrades. In that case, check out this tech-upgraded flower pot smoker (also based on an Alton Brown design.)

Reusing and repurposing is a great way to experiment in the kitchen without needing to buy specialized equipment. Here’s another example: Kyoto-style cold brew coffee. It’s thick and rich and brings out different flavor profiles. Curious? Well, normally it requires a special kind of filter setup, but it can also be accomplished with cheesecloth, coffee filters, and a couple of cut-up soft drink bottles. Oh, and some rubber bands and chopsticks if things are too wobbly. Just do yourself a favor and use good quality coffee beans, or better yet, roast them yourself. Just trust us on this one.

Smoking Meat With A Commodore 64

When [Deadline] couldn’t find a replacement control module for his Masterbuilt electric smoker, he could have just tossed the thing in the trash. Instead, he decided to come up with his own system to take over for the smoker’s original brain. Basing it around the nearly 40 year old Commodore 64 probably wouldn’t have been our first choice, but it’s hard to argue with the end result.

Connectors to control the smoker’s hardware.

At the most basic level, controlling an electric smoker like this only requires a temperature sensor, a relay to control the heating element, and something to get those two devices talking to each other. But for the best results you’ll also want some kind of a timer, and an easy way to change the target temperature on the fly. Connecting the relay and temperature sensor up to the back of the C64 was easy enough, all he had to do was write the BASIC code to glue it all together.

This hack was made considerably easier thanks to the fact that the Masterbuilt’s original controller interfaced with the smoker by way of a couple relatively well documented connectors. So instead of having to mess with any of the mains voltage electronics, he simply had to bring a wire in the connector high to fire up the smoker’s heating element. This bodes well for anyone looking to replace the controller in a similar smoker, with a C64 or otherwise.

In the past we’ve seen some very impressive custom smoker controllers that look as though they could easily be adapted for use with these commercial units. Though the true smoke aficionados might prefer building the entire thing to their exacting specifications.

Continue reading “Smoking Meat With A Commodore 64”

Open Source Smart Smoker Brings The Heat (Slowly)

Conceptually, cooking on a grill is simple enough: just crank up the flames and leave the food on long enough for it to cook through, but not so long that it turns into an inedible ember. But when smoking, the goal is actually to prevent flames entirely; the food is cooked by the circulation of hot gasses generated by smoldering wood. If you want a well-cooked and flavorful meal, you’ll need the patience and dedication to manually keep the fuel and air balanced inside the smoker for hours on end.

Or in the case of the Smokey Mc Smokerson, you just let the electronics handle all the hard stuff while you go watch TV. Powered by the Raspberry Pi Zero and a custom control board, this open source smoker offers high-end capabilities on a DIY budget. Granted you’ll still need to add the fuel of your choice the old fashioned way, but with automatic air flow control and temperature monitoring, it greatly reduces the amount of fiddly work required to get that perfect smoke.

[HackersHub] has been working on Smokey Mc Smokerson for a few months now, and are getting very close to building the first complete prototype. The initial version of the software is complete, and the classy black PCBs have recently arrived. Some simulations have been performed to get an idea of how the smoke will circulate inside of the smoker itself, built from a 55 gallon drum, but technically the controller is a stand-alone device. If you’re willing to makes the tweaks necessary, the controller could certainly be retrofitted to  commercially available smoker instead.

Ultimately, this project boils down to tossing a bunch of temperature sensors at the problem. The software developed by [HackersHub] takes the data collected by the five MAX6675 thermocouples and uses it to determine when to inject more air into the chamber using a PWM-controlled fan at the bottom of the smoker. As an added bonus, all those temperature sensors give the user plenty of pretty data points to look at in the companion smartphone application.

We’ve actually seen a fair number of technologically-augmented grills over the years. From this automotive-inspired “turbocharged” beast to a robotic steak flipper built out of PVC pipes, we can confidently say that not all hackers are living on a diet of microwaved ramen.

Oil Barrel Smoker

What would you do with a pair of oil drums and a craving for delicious food? Like any sane person, redditor [Kilgore_nrw] made the logical choice and built a smoker.

To make the build easier, he picked up a double barrel stove kit which came with a door, hinges, legs and flue connectors. While fixing the legs and mounting the stove door — high enough for a bed of bricks in the fire barrel — went as planned, he had to improvise the installation of the smoke flue. It ended up being the exact same diameter as the flue connectors, but notching it enough to slide into place made a satisfactory seal.

Not liking the look of having the stack at the ‘front’ of the smoker, he mounted it above the flue at the rear and added two sandstone slabs in the smoking chamber to evenly distribute the heat. Finishing touches included heavy duty drawer slides for the cooking rack — ensuring easy access to deliciousness — and painstakingly grinding off the old paint to apply a new heat resistant coating. For any fans out there, the finished pictures are a sight to behold.

Continue reading “Oil Barrel Smoker”

See A Cheap Smoker Get An Automation Power Up

[Jason] learned a lot by successfully automating this meat smoker. This is just the first step in [Jason’s] smoker project. He decided to begin by hacking a cheaper charcoal-fed unit first, before setting his sights on building his own automatic pellet-fed smoker. With a charcoal smoker it’s all about managing the airflow to that hot bed of coals.

automated-meat-smoker-air-valve
Custom mount for servo was actually one of the more challenging things to get just right.

[Jason] started by making sure the bottom was sealed off from stray airflow, then he cut a hole into the charcoal pan and attached a length of steel pipe. The opposite end of the pipe has a fan. Inside the pipe there is a baffle separating the fan from the charcoal pan. The servo motor shown here controls that valve.

The pipe is how air is introduced into the smoker, with the fan and valve to control the flow rate. The more air, the higher the temperature. The hunk of pipe was left uncut and works fine but is much longer than needed; [Jason says] the pipe is perfectly cool to the touch only a foot and a half away from the smoker.

With the actuators in place he needed a feedback loop. A thermocouple installed into the lid of the smoker is monitored by an Arduino running a PID control loop. This predicts the temperature change and adjusts the baffle and fan to avoid overshooting the target temp. The last piece of hardware is a temperature probe inside the meat itself. With the regulation of the smoker’s temperature taken care of and the meat’s internal temperature being monitored, the learning (and cooking) process is well underway.

There are many, many smoker automation projects out there. Some smokers are home-made electric ones using flower pots, and some focus more on modifying off the shelf units. In a way, every PID controlled smoker is the same, yet they end up with different problems to solve during their creation. There is no better way to learn PID than putting it into practice, and this way to you get a tasty treat for your efforts.

Fubarino Contest: Network Nodes, Door Lock, And Smoker Controller

fubarino-contest-nodes-lock-smoker

Here’s a round-up of three different Fubarino Contest entries; a video of each is available after the break.

On the upper left are the beginnings of a network node monitoring system developed by [Stephane]. When the network checks the weather, it may determine that it’s far too harsh outside and time to go in to see what’s new on Hackaday. There’s only sparse information available on the hardware. Each node uses an ATtiny84 and an RFM12B—different sensors connected to each are used to build up the network’s data collection capabilities.

In the lower left is [Brett’s] Bluetooth door lock controller. The Arduino, a cheap Bluetooth module, and a relay board make up the base station which will eventually connect to an electronic lock. [Brett] uses a smart phone to punch in the access code, and entering “1337” four times in a row unlocks the Easter egg, displaying our URL on the character LCD. Here’s the code repository for his project.

To the right is the display for [Andy’s] smoker controller used for cooking. He already had some hidden features on the controller used to calibrate the thermocouple. For the contest, he simply added an additional button to extend the original menu access method.


This is an entry in the Fubarino Contest for a chance at one of the 20 Fubarino SD boards which Microchip has put up as prizes!

Continue reading “Fubarino Contest: Network Nodes, Door Lock, And Smoker Controller”