DIY Mini Fridge Is Pure Brilliance In Foam

There’s nothing more pleasing on a hot day than an ice-cold beverage. While the vast majority of us have a fridge in the kitchen, sometimes it’s desirable to have a further fridge in the lab, games room, or workshop. To that end, you may find value in this ultra-cheap, low-cost DIY fridge build from [Handy_Bear].

Like many tiny fridge builds, this design eschews complex gas-cycle refrigeration techniques for simple Peltier modules. These are devices that have one cold side and one hot side, because they move heat when electricity is applied. This build uses a Peltier module fitted with a fan to better shift away heat from the hot side, improving the module’s cooling ability.

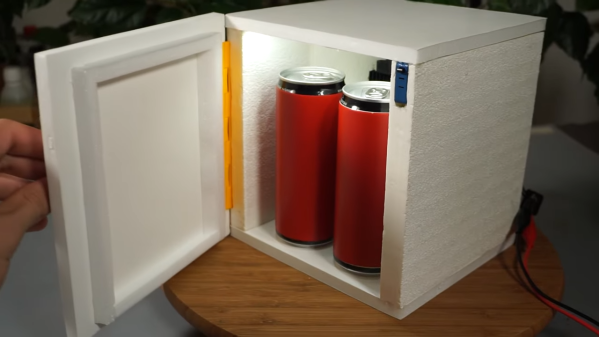
The “fridge” itself is assembled out of thick XPS insulation foam. A hot wire cutter was used to cut several slabs which were then assembled using hot glue. The Peltier module is installed on the back, at the top of the fridge. Thus, air which is cooled in this area will then travel down through the rest of the fridge’s cavity. [Handy_Bear] also goes over how to produce a working hinge and a gasket for the door, which helps with ease-of-use and efficiency. As a nice touch, a set of 12V LED lights are also installed inside, which light when the door is open. Just like the real thing!

The final build is noisy, slow to cool down, and it uses 60 watts of power to cool down just two regulation-sized sodas. Notably, you could fit two standard NATO smoke grenades in the same space, as they’re almost-identically sized (ask us how we know). However, smoke grenades don’t usually need to be refrigerated.

None of that means it isn’t fun though! Plus, [Handy_Bear] notes that adding a second Peltier would greatly aid the fridge’s ability to quickly chill your grenades sodas. You might even like to explore the use of special fan designs to make the fridge even quieter! Video after the break.

Continue reading “DIY Mini Fridge Is Pure Brilliance In Foam”

Beverage Holder Of Science

The folks at [K&J Magnetics] have access to precise magnetometers, a wealth of knowledge from years of experience but when it comes to playing around with a silly project like a magnetic koozie, they go right to trial and error rather than simulations and calculations. Granted, this is the opposite of mission-critical.

Once the experimentation was over, they got down to explaining their results so we can learn more than just how to hold our beer on the side of a toolbox. They describe three factors related to magnetic holding in clear terms that are the meat and bones of this experiment. The first is that anything which comes between the magnet and surface should be thin. The second factor is that it should be grippy, not slippy. The final element is to account for the leverage of the beverage being suspended. Say that three times fast.

Magnets are so cool for anything from helping visualize gas atoms, machinists’ tools, and circumventing firearm security features.

Continue reading “Beverage Holder Of Science”

Build Your Own In-Fridge Soda Fountain

Who doesn’t love an ice cold soda? Lots of people, probably. This one’s not for them. It’s for those of us that are tired of having to go through the arduous process of manually opening a bottle and pouring a drink. Wouldn’t it be cool if you could have your own soda fountain at home? [Kedar Nimbalkar] thought so, and built a soda fountain that you can install right inside a fridge.

The system is based around using small pumps marketed as “6V DC air pumps” on Amazon. [Kedar] uses an indirect method of pumping the soda in this project. It’s a sad fact that it’s hard to find a cheap pump that’s safe to use with fluids for human consumption, and on top of that, many types of pump out there aren’t self-priming. This means the pump needs to be charged with fluid to work, which can make changing empty bottles a real pain.

Instead of pumping the fluid directly, the pumps instead push air into the top of the sealed soda bottles, which forces soda out of another tube in the bottle. This means that the pumps themselves don’t have direct contact with the soda which is a great design when working with stuff you’re going to put in your body. Following on from this careful design, the tubing selected is food safe. Unfortunately, even though the pumps don’t directly touch the soda itself, it’s highly unlikely the pumps chosen (designed for aquariums) are genuinely food-safe themselves.

When you’re building a beer funnel setup for Australia Day/4th of July/Other, using all manner of industrial or agricultural fittings may be a relatively low risk, as it’s a one-off exposure. But if you’re building a system handling products for human ingestion that you’re using on a regular basis, you really do want to make sure that the parts you use aren’t slowly poisoning you. There’s many ways this can happen — parts may corrode or react with substances in the food, plastics may outgas, or there may be lubricants in the parts that have toxic compounds in them. Just look what can happen if you drink wine out of a gun barrel — and that was from a single exposure!

Overall it’s a cool project, and one that would be especially fun and educational to do with children. Young humans are well known for their predilection towards sugary beverages, and have minds ready to be filled with knowledge about pumps, safe food handling practices, and of course, electronics. We also like [Kedar]’s use of commonly available materials, like a plastic food container for the enclosure. The project would be a great starter on your way to building a more complicated cocktail-mixing barbot. Video after the break.

We know peristaltic pumps are the go-to for safe liquid pumping. Anyone know a hacker friendly way of pumping air while ensuring all parts of the system are food safe? The most creative solution we’ve seen is to use breast pumps but it wasn’t ideal. Let us know your own tricks in the comments!

Continue reading “Build Your Own In-Fridge Soda Fountain”

DIY Soda Can Battery

sodaCanBattery

It may not be particularly useful to create some makeshift batteries out of soda and soda cans, but it’s a good introduction to electrodes and electrolytes as well as a welcomed break from lemons and potatoes. The gang at [Go-Repairs] lopped off the can’s lid and temporarily set the soda aside, then took steel wool to the interior of the can to remove the protective plastic coating. The process can be accelerated by grabbing your drill and cramming the steel wool onto the end of a spade bit, although pressing too hard might rip through the can.

With the soda poured back in, you can eek out some voltage by clipping one lead to the can and another to a copper coin that’s dunked into the soda. Stringing along additional cans in series can scale up the juice, but you’ll need a whole six pack before you can get an LED working—and only just. The instructions suggest swapping out the soda for a different electrolyte: drain cleaner, which can pump out an impressive 12 volts from a six pack series. You’ll want to be careful, however, as it’s likely to eat through the can and is one lid away from being dangerous.

Stick around for a quick video after the break, and if you prefer the Instructables format, the [Go-Repairs] folks have kindly reproduced the instructions there.

Continue reading “DIY Soda Can Battery”

A Custom Cooler, Sewing Not Required

soduh

When you go to the beach or on a camping trip this summer, notice how you pack your cooler. Your beverages already come in a box, yet you remove them and put them in a larger, insulated box. [Jason] thought it would be a great idea to just add insulation to a case of soda (or other beverages, we assume) and ended up making a custom soda cooler.

The fabrication of this cooler is actually pretty simple. A layer of flexible foam is sandwiched between two layers of waterproof vinyl with spray glue. After tracing out a pattern, [Jason] then cut this fabric into panels and glued them together into a soda box-sized cooler. Simple, elegant, and something even hackers that didn’t take home ec can put together in a few hours.

As an aside, we at Hackaday seem to forget the ‘softer’ builds of fabric, foam, and paper far too often. That doesn’t mean we eschew these projects; I have a barely post-war Singer 15 sewing machine right above my workbench. Send us a tip if you have one of these soft hacks. We’d love to see it.

Video of the build below.

Continue reading “A Custom Cooler, Sewing Not Required”

Robot Steals Soda From The Vending Machine

robot-steals-soda

It’s very hard to tell from this photo because of the super bright blue LEDs, but this soda machine is being robbed by a robot.

We don’t condone theft, but neither does the creator of the project. [Ioduremetallique] is really just problem solving; doing something because he can. And we’d bet this type of thing will end up landing him a high-paying job some day (we’re assuming he’s currently in school).

The project is shown off in the video after the break. The gist of it is that a compact robot arm is put into the drop area of a vending machine. After the flap is closed the wired remote control is used to raise up the telescoping arm, and grip the soda can with the grippers. It’s brilliant and devious all at the same time. The entire video is in French, but the YouTube captions translator actually worked quite well with this video. To turn it one, use the ‘CC’ icon on the bottom of the video. We had to select the French captions before it would allow us to chose English from the translated captions list. About four minutes in we get a great look at the hardware itself… a super hack!

Continue reading “Robot Steals Soda From The Vending Machine”

PopCARD Vending Machine Enhancement Gets Upgraded

[Alex] wrote in to let us know he just completed a pretty major upgrade to his PopCARD RFID vending machine system. You may remember that earlier this year he added an Arduino based RFID reader to a soda machine so that thirsty patrons could pay with plastic instead of cold hard cash. That system worked, but at the beginning of the video after the break [Alex] goes over some of its flaws. There was a button to add cash from the card to the machine in $1 increments, rather than the system just knowing how much to charge you. Also, if you accidentally selected something that was out of stock you were out of luck and were charged anyway.

The new system does away with the button, and knows what product is sold out. The control hardware was upgraded to an Arduino mega to gain extra I/O pins. The device now sits in between the machine’s buttons and its own controller. When cash is used, the Arduino sits passively and lets the machine do its thing. But when a card is scanned, it takes over control of the buttons, sensing your selection, then simulating coin and button presses to vend accordingly. The new setup also uses an Ethernet shield which allows [Alex] to tell what items are running low without being at the machine itself.

Continue reading “PopCARD Vending Machine Enhancement Gets Upgraded”