TinySA Is A $49 Spectrum Analyzer

The NanoVNA made network analyzers cheap enough for almost everyone. Now you can get a $49 spectrum analyzer to go with it. Is it worth it? Watch [IMSAI Guy]’s video after the break for his opinion. From the tinySA.org website:

  • Spectrum Analyzer with two inputs, high-quality MF/HF/VHF input for 0.1MHZ-350MHz, lesser quality UHF input for 240MHz-960MHz.
  • Switchable resolution bandpass filters for both ranges between 2.6kHz and 640kHz
  • Color display showing 290 scan points covering up to the full low or high-frequency range.
  • Input Step attenuator from 0dB to 31dB for the MF/HF/VHF input.
  • When not used as Spectrum Analyzer it can be used as Signal Generator, MF/HF/VHF sinus output between 0.1MHZ-350MHz, UHF square wave output between 240MHz-960MHz.
  • A built-in calibration signal generator that is used for automatic self-test and low input calibration.
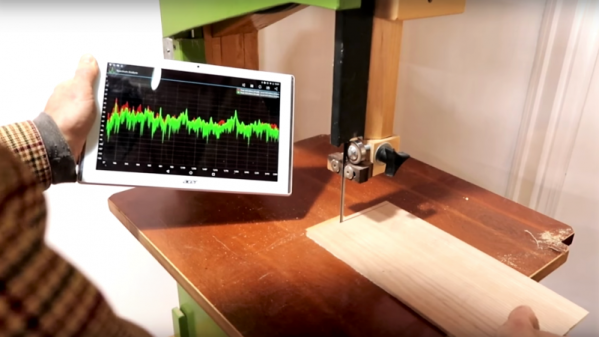
  • Connected to a PC via USB it becomes a PC controlled Spectrum Analyzer
  • Rechargeable battery allowing a minimum of at least 2 hours portable use

A lot of cheap scopes and PC-based scopes can do spectrum analysis, too, of course, so this isn’t as exotic as a VNA. But at this price, having a dedicated instrument might be worth it to you, especially if you don’t care about frequency below 100 MHz.

There are some limitations, of course, but the price is right. [IMSAI Guy] shows a few oddities that he didn’t like, but overall, it seemed like a good value. If you have a modern scope it may already do this function, or you might be able to do a software solution. If you only need audio frequencies and you want novelty, try some ping pong balls Continue reading “TinySA Is A $49 Spectrum Analyzer”

A Spectrum Analyzer For The Smart Response XE

Remember the Girl Tech IM-me? It was a hot-pink clearance rack toy that suddenly became one of the hottest commodities in the hacking world when it was discovered they could be used for all sorts of radio frequency shenanigans. Now they go for triple digits on eBay, if you can even find one. Well, we’re probably about to see the same thing happen to the Smart Response XE.

Thanks to the work of a hacker named [ea], this cheap educational gadget is finally starting to live up to the potential we saw in it back when a teardown revealed it was powered by an Arduino-compatible ATmega128RF chip. With a big screen, a decent QWERTY keyboard, and integrated wireless hardware, it seemed obvious that the Smart Response XE was poised to be the next must-have repurposed piece of kit.

Though as it turns out, [ea] isn’t using the device’s built-in wireless hardware. Step one in this exceptionally well documented and photographed project is to tack a CC1101 transceiver module to the SPI pins on the ATmega128RF. Then with the appropriate firmware loaded up, that nice big screen will show you what’s happening on the 300 MHz, 400 Mhz and 900 MHz bands.

But the fun doesn’t stop there. With the CC1101-modified Smart Response XE, there’s a whole new world of radio hacks you can pull off. As a proof of concept, [ea] has also included a POCSAG pager decoder. Granted the RTL-SDR has already made pulling pager messages out of the air pretty easy, but there’s something to be said for being able to do it on something so small and unassuming.

If you can’t tell, we’re exceptionally interested in seeing what the community can do with the Smart Response XE. At the time of this writing, the going rate on eBay for a good condition unit looks to be about $10 USD, plus the $3 or so for the CC1101 module. But the prices went through the roof when we first posted about it, so get them cheap while you still can.

[Thanks to bburky for the tip.]

Arduino Traffic Light Sings The Song Of Its People

Getting an old traffic light and wiring it up to do its thing inside your house isn’t exactly a new trick; it’s so common that it wouldn’t normally pass muster for these hallowed pages. Even using one up to show the real-time status of your build or system resource utilization would be pushing it at this point. To get our attention, your traffic light is going to need to have a unique hook.

So how did [Ronald Diaz] manage to get his project to stand out from the rest? Interestingly enough, it’s nothing you can see. His traffic light doesn’t just look the part, it also sounds like the real thing. With far more effort and attention to detail than you’d probably expect, he’s made it so his Australian pedestrian traffic light correctly mimics the complex chirping of the original.

Working from a video of the traffic light on YouTube, [Ronald] was able to extract and isolate the tones he was after. Performing spectral analysis on the audio sample, he was able to figure out the frequency and durations of the eleven individual tones which make up the complete pattern. From the 973 Hz tone that only lasts 25 ms to the continuous 500 Hz “woodpecker”, every element of the sound was meticulously recreated in his Arduino code.

The Arduino Pro Mini used to control the traffic light is not only responsible for playing the tones through a piezo speaker, but as you might expect, for firing off the relays which ultimately control the red and green lamps. With everything carefully orchestrated, [Ronald] can now get that authentic Australian side-of-the-road experience without having to leave the comfort of his own home.

If you’d rather your in-home traffic light be more useful than realistic, we’ve got plenty of prior art for you to check out. This traffic light that tells you how the value of Bitcoin is trending is a great example. Or maybe this one that can tell you if the Internet is down.

Continue reading “Arduino Traffic Light Sings The Song Of Its People”

A DIY EMC Probe From Semi-Rigid Coax And An SDR

Do you have an EMC probe in your toolkit? Probably not, unless you’re in the business of electromagnetic compatibility testing or getting a product ready for the regulatory compliance process. Usually such probes are used in anechoic chambers and connected to sophisticated gear like spectrum analyzers – expensive stuff. But there are ways to probe the electromagnetic mysteries of your projects on the cheap, as this DIY EMC testing setup proves.

As with many projects, [dimtass]’ build was inspired by a video over on EEVblog, where [Dave] made a simple EMC probe from a length of semi-rigid coax cable. At $10, it’s a cheap solution, but lacking a spectrum analyzer like the one that [Dave] plugged his cheap probe into, [dimtass] went a different way. With the homemade probe plugged into an RTL-SDR dongle and SDR# running on a PC, [dimtass] was able to get a decent approximation of a spectrum analyzer, at least when tested against a 10-MHz oven-controlled crystal oscillator. It’s not the same thing as a dedicated spectrum analyzer – limited bandwidth, higher noise, and not calibrated – but it works well enough, and as [dimtass] points out, infinitely hackable through the SDR# API. The probe even works decently when plugged right into a DSO with the FFT function running.

Again, neither of these setups is a substitute for proper EMC testing, but it’ll probably do for the home gamer. If you want to check out the lengths the pros go through to make sure their products don’t spew signals, check out [Jenny]’s overview of the EMC testing process.

[via RTL-SDR.com]

Fixing A Crazy Expensive Spectrum Analyser, With Solder

It used to be a spectrum analyzer was an exotic piece of gear. However, these days it is pretty common for a scope to have some ability to do the job — that is, plot amplitude versus frequency. However, a dedicated commercial product will usually have a lot more bandwidth and other features. [Signal Path] picked up an Anrtitsu 7.1 GHz portable spectrum analyzer. An expensive bit of kit — anywhere from around $4,000 to $8,000 on eBay — if it is working, but this one was not. It needed power, but it was also missing the internal flash card that the device uses to boot.

Being portable, there’s a lot of digital and RF electronics crammed into a very small space. The initial tear down didn’t look very interesting because it was mostly an RF shield. However, many tiny screws later, you can finally see the actual electronics.

Continue reading “Fixing A Crazy Expensive Spectrum Analyser, With Solder”

The Tachometer Inside Your Smartphone

It’s the latest in instrumentation for the well-appointed shop — an acoustically coupled fast Fourier transform tachometer. Sounds expensive, but it’s really just using a smartphone spectrum analyzer app to indirectly measure tool speeds. And it looks like it could be incredibly handy.

Normally, non-contact tachometers are optically coupled, using photoreceptors to measure light flashing off of a shaft or a tool. But that requires a clear view of the machine, often putting hands far too close to the danger zone. [Matthias Wandel]’s method doesn’t require line of sight because it relies on a cheap spectrum analyzer app to listen to a machine’s sound. The software displays peaks at various frequencies, and with a little analysis and some simple math, the shaft speed of the machine can be determined. [Matthias] explains how to exclude harmonics, where to find power line hum, isolating commutator artifacts, and how to do all the calculations. You’ll need to know a little about your tooling to get the right RPM, and obviously you’ll be limited by the audio frequency response of your phone or tablet. But we think this is a great tip.

[Matthias] is no stranger to shop innovations and putting technology to work in simple but elegant ways. We wonder if spectrum analysis could be used to find harmonics and help with his vibration damping solution for a contractor table saw.

Continue reading “The Tachometer Inside Your Smartphone”

$2700 EBay Bet Pays Off For This 14 GHz Spectrum Analyzer Repair

The eBay addiction starts small. One night you’re buying $3 buck-boost converters and cheap Chinese USB power packs. The next thing you know you’re spending thousands on dead instruments with no documentation. You’ve got the skills though, and if your bet that you can diagnose and repair a 14 GHz real-time spectrum analyzer is right, you’ll be putting a snazzy instrument on the bench for a fraction of the original $50,000 it cost.

Make some popcorn and get cozy before settling in to watch [Shahriar]’s video below, because it clocks in at just over an hour. But it’s pretty entertaining, and just seeing how Tektronix built the RSA 6114A spectrum analyzer is worth the time. Things are different when you’re piping microwave signals around the chassis of a beast such a this, the interior of which is densely packed with pluggable modules. Tek factory service would no doubt perform a simple module swap to get this machine running again, but [Shahriar] wasn’t having any of that on his $2,700 eBay find. After isolating the problem to the local-oscillator generator module, [Shahriar] takes us on a tour of where the signals go and what they do. We won’t reveal the eventual culprit, but suffice it to say that after a little SMD rework, [Shahriar] has a very fancy new instrument for the shop.

If this repair gives you the itch to get working on microwave circuits, maybe it’s time to build that backyard synthetic aperture radar set you’ve always wanted.

Continue reading “$2700 EBay Bet Pays Off For This 14 GHz Spectrum Analyzer Repair”