An orange and green stained glass robot arm sits on a table with a yellow lace tablecloth. It suspends a teabag over a brown teacup. You can see green leaves outside the window behind the bot.

Glass Robot From A Solarpunk Future

You may have heard of a heart of glass or have a glass jaw, but have you ever seen a glass robot?

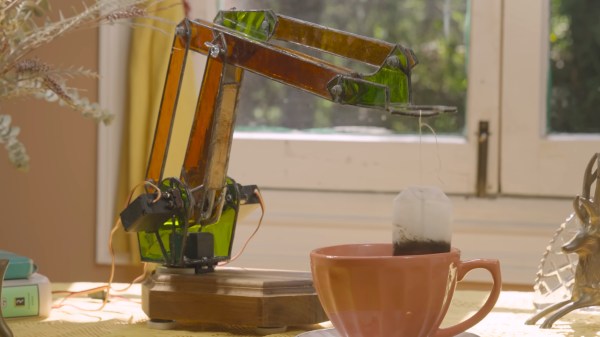
[Simone Giertz], has taken two of her favorite things, stained glass and robotics, and fused them into a single project. Using an existing metal robot arm as a template, she cut and soldered her stained glass panels before reassembling the robot with its new solarpunk limbs. During testing though, one of the glass panels repeatedly failed at a solder joint.

Undaunted, [Giertz] replaced the faulty piece with an original metal component allowing this “grandma cyberpunk-core” bot to prepare tea as intended. We really love when makers bring us through the whole process, mishaps and all, and [Giertz] never disappoints in this respect. We do wonder a bit about the long-term health impacts of making tea with a robot containing leaded solder though.

If you’re interested in more robots made from unusual materials, checkout this gripper made from a dead spider or this work on phase changing robots.

Continue reading “Glass Robot From A Solarpunk Future”

Faux Stained Glass Effect, With 3D Printing And Epoxy

Like the looks of stained glass, but not the amount of work, skill, and materials involved? Well, [Northern Geometry] shows how to sidestep all that nonsense and use a 3D printed frame, epoxy, and some alcohol-based inks to create a pretty good fake stained-glass effect piece of art.

A smooth polypropylene board is the key to a glassy smooth back.

[Northern Geometry] has played with this idea before, but shares some refinements and tips on getting the best results. One suggestion is to begin by securely taping the 3D printed frame to a smooth polypropylene board as a backer. Giving the cured resin a smooth surface is important to get the right look, and since resin will not bond to the polypropylene, it can be used as a backer to get that done.

Once the frame is mounted, pour a small amount of epoxy into each cavity and ensure it gets into every corner, then let it cure. The thin bottom layer of resin will seal things as well as create a glassy-smooth backing that is the perfect foundation for finishing the piece with colored resin as needed.

Once that is done, and everything has had plenty of time to cure fully, just pop the piece off the board. Check it out in the video embedded below, where [Northern Geometry] shows the process from start to finish.

Continue reading “Faux Stained Glass Effect, With 3D Printing And Epoxy”

A Vase Of Ice And Fire

When we first saw [Ginko Balboa]’s vase of ice and fire, we weren’t that impressed. Until we realized that the whole vase was a glass, copper, and solder circuit with LEDs sandwiched in between. The tutorial starts with [Ginko]’s technique for etching a custom board for the base circuit. It gets interesting with the construction of the LED circuit.

First a glass bottle was scored in a pattern and shattered, leaving a jigsaw puzzle. Two differently colored LED light strips were desoldered. Then, from the bottom up, the glass was taped around with an adhesive backed copper tape, and soldered together. Every now and then an LED was soldered between the carefully separated areas of the circuit. Some LEDs were soldered in one way, and some the other. This way the vase could be rotated on its base to select a different color. Once the outside of the vase with the LED circuit inside it was finished, another cut bottle was put in the center and soldered in a final position, making the assembly waterproof.

The final product is really interesting, and we’re scratching our head to figure out if there’s anything else this technique of circuit building could be used for. Ideas?

Iron Man Faux Stained Glass Saves $4k

ironman-faux-stained-glass

Check out how the light hits this piece of artwork. It’s a very convincing piece of stained glass… except it’s fake. [Sdtacoma] figured out a way to mimic stained glass using a single pane. The inspiration for the project came after seeing a real stained glass panel featuring Iron Man which was available on Etsy for $4500.

Due to popular demand [Sdtacoma] posted an album of the technique he used. Starting with some art found online he made it black and white, blew it up to size (this thing’s about five feet tall) and used posterizer to print it out using multiple sheets of paper.

The frame and pane were found at a recycled building goods store. After cleaning it up he used the paper template to lay out the dividing lines between different colored sections using Liquid Lead. The product had dimension to it (kind of like puffy paint for fabrics) which looks like the lead tracks between panes of stained glass. Once dry the color was added using an eye dropper to apply glass paint.

St. Optimus Of Prime

st-optimus-of-prime

We’re pretty sure they’re not canonizing alien robots, but this Optimus Prime stained glass sure looks good enough for a place at the local cathedral. It is [Kobachi’s] very first glass project, but we’d say he’s got a bright future ahead of him. Especially since it’s about ten times more complex than the assignment called for.

The design is based on artwork by [NinjaInkArt] called Optimus Noveau. It is included in the album linked above and shows Optimus with the matrix of leadership behind his head. This of course doubles as the halo you would find around the head of a saint in religious artwork. [Kobachi] started by simplifying the design into rough outlines and colors. He then split those outlines to make for easier cuts and then got down to business assembling the pane. It uses 121 different pieces and took him 80-100 hours to complete the work. We can’t wait to see the landscape follow-up showing Optimus as a semi truck.

If you’re not handy with colored glass you could try making this with colored circuit boards instead.

[via Reddit]

Hackaday Links: June 13, 2010

Painting with light

[Jo0ngle] wanted a fun toy and an easy conversation piece. He painted a square on the back of his door with some glow-in-the-dark paint. Now he can draw on it using a blu-ray laser or a UV flashlight. Either way, the effect is quite pleasing. [Thanks Justin]

Resistor decoder rings

This resistor reference card allows you to spin a wheel and dial in the resistor color code for easy reading. We know, you have the simple act of reading resistor code down cold by now. This is still a fun idea that you might use if you’re ever helping someone get into electronics. [Thanks Osgeld]

Resistor bending template

Speaking of resistors, [Jerome] helped us out by designing a resistor bending template. He’s actually marketing himself at the same time. His bending template is folded from one of his business cards, which he came up with after being inspired by some of the unique business cards we’ve covered in the past.

Fake stained glass using old PCBs

[Agg] floated some old PCBs to his friend [Dan] the mason. [Dan] proceeded to turn out an amazing looking stained glass window unit using the colorful leftovers. The picture above doesn’t do it justice, you have to click through to see the real art.

Monovelo monowheel

[Ernst] asked if we’d heard of the Monovelo monowheel. Well we hadn’t. It’s a human-powered vehicle where you sit inside of one large wheel. We don’t see ourselves building one or riding one, but we enjoyed watching someone else do so. We’d like to catch somebody commuting to work with one of these. Seeing this in the bike lane will brighten up anyone’s day.