TMD-3: Clever Hall Sensor Hack Leads To Better Turing Demo

We’ll beat everyone to the punch: yes, actually building a working Turing machine, especially one that uses a Raspberry Pi, is probably something that would have pushed [Alan Turing]’s buttons, and not in a good way. The Turing machine is, above all else, a thought experiment, an abstraction of how a mechanical computing machine could work. Building a working one seems to be missing the point.

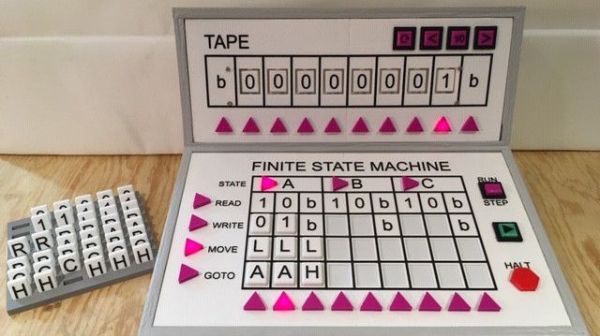
Thankfully, [Michael Gardi] has ignored that message three times now, and with good reason: some people just grok abstract concepts better when they can lay their hands on something and manipulate it. His TMD-1 was based on 3D printed tiles with embedded magnets — arranging the tiles on a matrix containing Hall effect sensors programmed the finite state machine, with the “tape” concept represented by a strip of eight servo-controlled flip cards. While TMD-1 worked fine, it had some limitations, which [Mike] quickly remedied with TMD-2, a decidedly more complicated affair that used a Raspberry Pi, a camera, and OpenCV to read an expanded state machine with six symbols and six states, without breaking the budget on all the Hall sensors required.

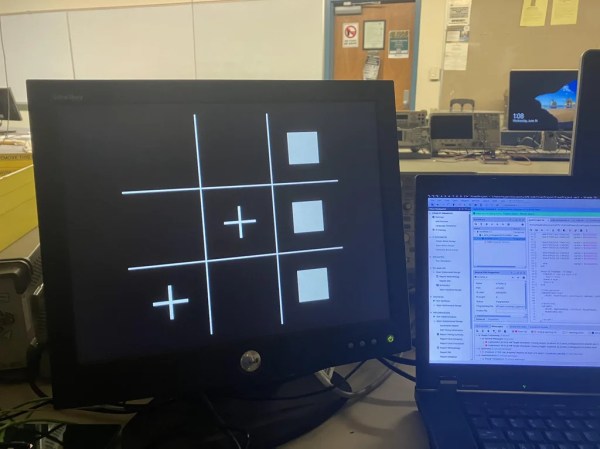
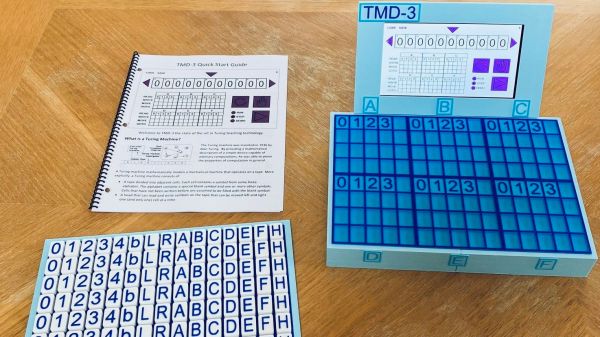
TMD-3 refines the previous design, eschewing the machine vision approach and returning to the Hall effect roots of the original. But instead of using three sensors per tile, [Mike] determined that one sensor would suffice as long as he could mount the magnet at different depths within each tile. That way, the magnetic field for each symbol could be discerned by a single Hall sensor, greatly reducing complexity and expense. An LCD screen and a Raspberry Pi run a console app that shows the tape status, the state machine, and the state transitions.

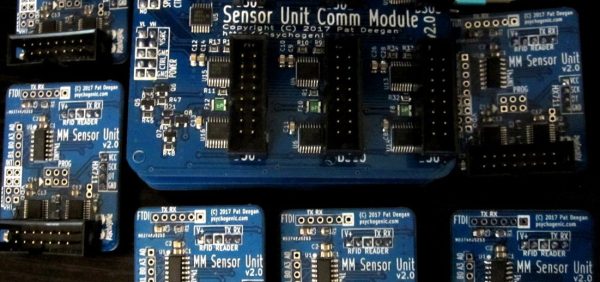
[Mike] put a ton of work into this one — there are nineteen project logs — and he includes a lot of useful tips and tricks, like designing PCBs directly in KiCAD before even having a schematic. Of course, with a track record like his, we’d expect nothing less.

Continue reading “TMD-3: Clever Hall Sensor Hack Leads To Better Turing Demo”

FPGA Plays Tic-Tac-Toe

As computers get more and more powerful and artificial intelligence algorithms improve, few games remain where the best humans can reliably beat their electronic counterparts. In chess this barrier was passed in 2005 with the last human win against a computer, and recently humans lost to computers at go. Simpler games like tic-tac-toe have been solved for all possible positions for a while now, so even a simple computer will always win or tie the game. But that doesn’t mean that there’s nothing left to learn about these games as [Hayden] demonstrates with this tic-tac-toe game built entirely on an FPGA.

[Hayden] is making this as part of a college course on digital design, so it really starts at first principles for working with FPGAs. It’s programmed in Verilog on a Basys 3 board, which also hosts the switches used as the game’s input and handles the VGA video output as well. The build uses state machines to keep track of the moves played on each of the squares, and another state machine to keep track of whether or not the current game has been won. If so, it highlights the winning moves in red, and stops taking further inputs until it is reset. Some more logic ties everything together along with a customized VGA driver to produce the entire gaming experience.

A game like tic-tac-toe is a great way to master the fundamentals of a system like this before moving on to more complex programs, especially on an FPGA platform that might handle a lot of the things we take for granted on more traditional computing systems, such as the video output. If you’re interested in taking more of a deep dive into the world of FPGAs, we published a primer about them a few years ago that will get you started.

Continue reading “FPGA Plays Tic-Tac-Toe”

One Bit CPU Runs At A Blistering 60Hz

If you really think hard about it, a CPU is just a very general-purpose state machine. Well, most CPUs are, anyway. The MC14500 is a one-bit computer that has only 16 instructions and was meant to serve in simple tasks where a big CPU wouldn’t work for space, power, or budget reasons. However, [Laughton] took the idea one step further and created a single-bit computer with no real instructions to control a printing press. The finished machine uses a clever format in an EEPROM to drive an endless program.

Honestly, we’d say this is more of a state machine, but we like the idea of it being a minimal CPU which is also true. The design uses the EEPROM in an odd way. Each CPU address really addresses a block of four bytes. The byte that gets processed depends on the current phase and the status of the one-bit flag register.

Continue reading “One Bit CPU Runs At A Blistering 60Hz”

Laser Galvos And An ESP32 Recreate Old-School Asteroids

Playing Asteroids now isn’t quite what it used to be when it came out 40 years ago. At the time, the vector-scan display was part of the charm; making do with an emulator running on a traditional raster display just doesn’t quite do it for purists. But if you manage to build your own laser-projector version of the game like [Chris G] did, you’re getting close to capturing some of the original magic of the game.

There’s a lot to unpack about this project, and the video below does a good job explaining it. Where the original game used a beam of electrons flashing inside a CRT to trace out each object in the game, [Chris] substituted an off-the-shelf two-axis galvanometer from eBay and a 5-mW laser LED. This can project a gamefield on a wall up to two meters on a side, far bigger than any version of the machine ever built. The galvos are driven by op-amp drivers and an SPI DAC on a custom PCB. And in comparison to the discrete logic chips and 6502 running the original game, [Chris] opted for an ESP32.

As interesting as the hardware for this is, the real story is in the software. [Chris] does an excellent job running through his design, making the bulk of the video feel like a master class in game programming. His software is from scratch — no emulations here. As such it doesn’t perfectly reproduce the original games — no flying saucers and no spaceship explosion animations (yet) — but when coupled with the laser vector display, it certainly captures the feel of the original.

Being devoted Asteroids fans from back in the day, this one really pushes our buttons. We’ve seen laser-based recreations of the game before, but this one makes us think we can finally afford to recapture the glory of our misspent youth.

Continue reading “Laser Galvos And An ESP32 Recreate Old-School Asteroids”

TMD-1 Makes Turing Machine Concepts Easy To Understand

For something that has been around since the 1930s and is so foundational to computer science, you’d think that the Turing machine, an abstraction for mechanical computation, would be easily understood. Making the abstract concepts easy to understand is what this Turing machine demonstrator aims to do.

The TMD-1 is a project that’s something of a departure from [Michael Gardi]’s usual fare, which has mostly been carefully crafted recreations of artifacts from the early days of computer history, like the Minivac 601  trainer and the DEC H-500 computer lab. The TMD-1 is, rather, a device that makes the principles of a Turing machine more concrete. To represent the concept of the “tape”, [Mike] used eight servo-controlled flip tiles. The “head” of the machine conceptually moves along the tape, its current position indicated by a lighted arrow while reading the status of the cell above it by polling the position of the servo.

Below the tape and head panel is the finite state machine through which the TMD-1 is programmed. [Mike] limited the machine to three states and four transitions three symbols, each of which is programmed by placing 3D-printed tiles on a matrix. Magnets were inserted into cavities during printing; Hall Effect sensors in the PCB below the matrix read the pattern of magnets to determine which tiles are where. The video below shows the TMD-1 counting from 0 to 10, which is enough to demonstrate the basics of Turing machines.

It’s hard not to comment on the irony of a Turing machine being run by an Arduino, but given that [Mike]’s goal was to make abstract concepts easy to understand, it makes perfect sense to leverage the platform rather than try to do this with discrete logic. And you can’t argue with results — TMD-1 made Turing machines clear to us for the first time.

Continue reading “TMD-1 Makes Turing Machine Concepts Easy To Understand”

Three-Dollar Router Rebooter Has One Job

Sometimes connectivity problems go away by power cycling a router. It’s a simple but inconvenient solution to a problem that shouldn’t exist, but that didn’t stop [Mike Diamond] from automating it for a few bucks in parts. The three-dollar router rebooter may be a simple device with only one job, but it’s well documented and worth a look.

The device is an ESP8266 board configured to try to reach Google periodically via the local wireless network. If Google cannot be reached, the board assumes a reboot is needed and disconnects the 12 V power supply from the router by using a relay. Then, after a delay, power is re-connected and all of one’s problems are over until the next time it happens. [Mike] used a relay module that has built-in screw terminals and a socket for the ESP8266-01, so it looks like the whole device can be put together without soldering a thing.

While the code for making this happen may sound trivial, [Mike] nevertheless delves into documenting it. It makes a great example of how to implement a simple event-driven finite state machine in a way that’s clear and concise. By structuring the code so that there is a finite number of specific states the device can be in (router power on, router power off, and testing connection) and by defining exactly how and when the device switches between those states, operation and troubleshooting becomes a much more manageable job. Another great example is this IoT Garage Door Opener project. If you’re programming devices that interface to physical things, these techniques are definitely good practice.

Trials And Tribulations In Sending Data With Wires

When working on a project that needs to send data from place to place the distances involved often dictate the method of sending. Are the two chunks of the system on one PCB? A “vanilla” communication protocol like i2c or SPI is probably fine unless there are more exotic requirements. Are the two components mechanically separated? Do they move around? Do they need to be far apart? Reconfigurable? A trendy answer might be to add Bluetooth Low Energy or WiFi to everything but that obviously comes with a set of costs and drawbacks. What about just using really long wires? [Pat] needed to connect six boards to a central node over distances of several feet and learned a few tricks in the process.

When connecting two nodes together via wires it seems like choosing a protocol and plugging everything in is all that’s required, right? [Pat]’s first set of learnings is about the problems that happen when you try that. It turns out that “long wire” is another way to spell “antenna”, and if you happen to be unlucky enough to catch a passing wave that particular property can fry pins on your micro.

Plus it turns out wires have resistance proportional to their length (who would have though!) so those sharp square clock signals turn into gently rolling hills. Even getting to the point where those rolling hills travel between the two devices requires driving drive the lines harder than the average micro can manage. The solution? A differential pair. Check out the post to learn about one way to do that.

It looks like [Pat] needed to add USB to this witches brew and ended up choosing a pretty strange part from FTDI, the Vinculum II. The VNC2 seemed like a great choice with a rich set of peripherals and two configurable USB Host/Peripheral controllers but it turned out to be a nightmare for development. [Pat]’s writeup of the related troubles is a fun and familiar read. The workaround for an incredible set of undocumented bad behaviors in the SPI peripheral was to add a thick layer of reliability related messaging on top of the physical communication layer. Check out the state machine for a taste, and the original post for a detailed description.