Dummy The Robot Arm Is Not So Dumb

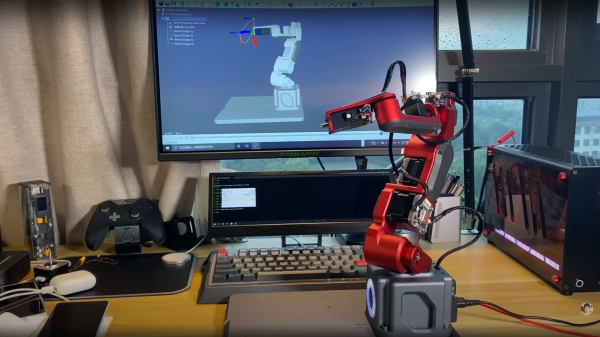
[Zhihui Jun] is a name you’re going to want to remember because this Chinese maker has created quite probably one of the most complete open-source robot arms (video in Chinese with subtitles, embedded below) we’ve ever seen. This project has to be seen to be believed. Every aspect of the design from concept, mechanical CAD, electronics design and software covering embedded, 3D GUI, and so on, is the work of one maker, in just their spare time! Sound like we’re talking it up too much? Just watch the video and try to keep up!

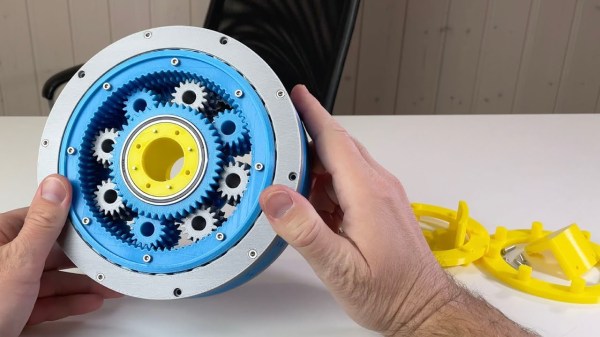
After an initial review of toy robots versus more industrial units, it was quickly decided that servos weren’t going to cut it – too little torque and lacking in precision. BLDC motors offer great precision and torque when paired with a good controller, but they are tricky to make small enough, so an off-the-shelf compact harmonic drive was selected and paired with a stepper motor to get the required performance. This was multiplied by six and dropped into some slick CNC machined aluminum parts to complete the mechanics. A custom closed-loop stepper controller mounts directly to the rear of each motor. That’s really nice too.

Stepper controller mounts on the motor rear – smart!

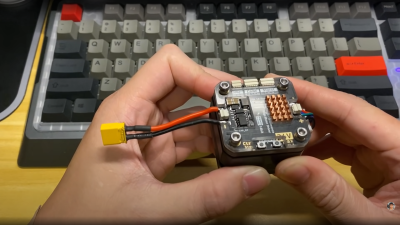
Control electronics are based around the STM32 using an ESP32 for Wi-Fi connectivity, but the pace of the video is so fast it’s hard to keep up with how much of the design operates. There is a brief mention that the controller runs the LiteOS kernel for Harmony OS, but no details we can find. The project GitHub has many of the gory details to pore over perhaps a bit light in places but the promise is made to expand that. For remote control, there’s a BLE-connected teaching device (called ‘Peak’) with a touch screen, again details pending. Oh, did we mention there’s a force-feedback (a PS5 Adaptive Trigger had to die for the cause) remote control unit that uses binocular cameras to track motion, with an AHRS setup giving orientation and that all this is powered by a Huawei Atlas edge AI processing system? This was greatly glossed over in the video like it was just some side-note not worth talking about. We hope details of that get made public soon!

Threading a needle through a grape by remote control

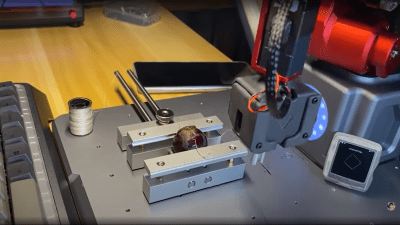
The dedicated GUI, written in what looks like Unity, allows robot programming and motion planning, but since those harmonic drives are back-drivable, the robot can be moved by hand and record movements for replaying later. Some work with AR has been started, but that looks like early in the process, the features just keep on coming!

Quite frankly there is so much happening that it’s hard to summarise here and do the project any sort of justice, so to that end we suggest popping over to YT and taking a look for yourselves.

We love robots ’round these parts, especially robot arms, here’s a big one by [Jeremy Fielding],  and if you think stepper motors aren’t necessary, because servo motors can be made to work just fine, you may be right.

Continue reading “Dummy The Robot Arm Is Not So Dumb”

1960s Stereo Console Gets An Upgrade

Faced with an old console stereo from the 1960s that was barely functional, [Sherman Banks] aka W4ATL decided to upgrade its guts while keeping its appearance as close to the original as possible. This stereo set is a piece of mahogany furniture containing an AM/FM stereo receiver and an automatic turntable from JCPenny’s Penncrest line. As best [Sherman] can determine, it is most likely a 1965 model. The old electronics were getting more and more difficult to repair and the tuner was drifting off-station every 15 minutes. He didn’t want to throw it away, so he decided to replace all the innards.

The first thing was to tear out the old electronics while retaining the chassis proper. The new heart of the entertainment center is a modern Denon AV stereo receiver. This unit can be controlled over Ethernet, has a radio tuner, inputs for SiriusXM and a turntable, and supports Bluetooth streaming. [Sherman] next replaced the 1965 turntable, and then turned his attention to connecting up the controls and indicators.

The potentiometers were replaced with equivalent ones of lower resistance, the neon stereo indicator was replaced with an LED, but the linear tuning dial proved to be a nearly two month challenge and resulted in a cool hack. In brief, he connected an optical rotary encoder to the tuning knob and used a stepper motor with a linear actuator to control the dial indicator. All this is controlled from an Arduino Mega 2560 with three shields for I/O and LAN. But there was still one remaining issue — without vacuum tubes to warm up, the radio would play immediately after power-on. [Sherman] fixed that by programming the Arduino to slowly ramp up the volume at the same rate as the original tube receiver. And finally, he installs a small HDMI monitor in the corner to display auxiliary information and metadata from the Denon receiver.

Check out the videos below the break. We wrote about a couple of similar conversions in the past: this one from 2018 was also a Penncrest, and from last year this COVID isolation project that emphasized the addition of a new liquor cabinet.

Continue reading “1960s Stereo Console Gets An Upgrade”

PCB Stepper Motor Micro Robots

[Kevin Lynagh] is interested in tiny PCB stepper motors, and after reviewing the various projects and patents to-date, decided to give it a try himself. These are basically a stepper motor that’s been unrolled and made flat — traces on the PCB act as the coils and tiny magnetic “robots” act as the rotor.

If you want to try this concept yourself, [Kevin]’s post contains an excellent survey of prior art and projects, as well as exploring the theory behind how these things work. He has taken a deep dive in to the theory, deep enough to grasp what’s going on and to build some preliminary prototypes with a bit of confidence. First off was just a hand-wound flat coil as a proof-of-concept. Next was a PCB version that worked almost exactly as planned, although he confesses to burning out a motor driver circuit before stepping back and making some calculations.

We covered one such project back in 2014 and wrote about a Hackaday.io magnetic robot project from reader [bobricius] in 2018. Have you ever used this technology for anything besides a demonstration? Let us know in the comments below.

Thanks to [Adrian] for sending us the tip.

Teaching A DC Servo Motor To Act Like A Stepper

[Frank Herrmann] had an interesting idea to turn a geared DC motor into a servo motor assembly, but with a stepper motor-like interface. By stacking some small PCBs behind the motor body, it was possible to squeeze a DRV8837 DC motor driver and a pair of hall effect sensors on the first PCB layer, with the magnetic encoder nestled tightly behind it. Pin headers at the edge of the PCB connect to a second PCB bearing the microcontroller, which is based on the cheap STM32L432. The second PCB also holds an associated LDO and debug LED. Together, this handful of parts provide all that is needed to read the encoder, control the motor rotation and listen on the ‘stepper motor driver’ interface pins hooked up to the motion controller upstream. The Arduino source for this can be found on the project GitHub.

Whilst [Frank] mentions that this assembly has a weight and torque advantage over a NEMA 17 sized stepper motor, but we see no hard data on accuracy and repeatability which would be important for precise operations like 3D printing.

This project is part of a larger goal to make a complete 3D printer based around these ‘DC motor stepper motors’ which we will watch with interest.

While we’re on the subject of closed-loop control of DC motors, here’s another attempt to do the same, without the integration. If these are too small for you, then you always repurpose some windscreen washer motors.

Continue reading “Teaching A DC Servo Motor To Act Like A Stepper”

Arduino Drives Faux Spirograph

The holidays always remind us of our favorite toys from when we were kids. Johnny Astro, an Erector set, and — of course — a Spirograph. [CraftDiaries] has an Arduino machine that isn’t quite a Spirograph, but it sure reminds us of one. The Arduino drives two stepper motors that connect to a pen that can create some interesting patterns.

The build uses a few parts that were laser cut, but they don’t look like they’d be hard to fabricate using conventional means or even 3D printing. The author even mentions you could make them out of cardboard or foamboard if you wanted to.

Continue reading “Arduino Drives Faux Spirograph”

Cheap Big Servo For Robot Arm

[Skyentific] is looking to push the hobbyist robotics state of the art. Motors and their gears, the actuators, are typically the most expensive part. For his build, he realised he needed big servos capable of delivering plenty of torque. Thus, he set about creating a 3D-printed design to get the job done on a budget. (Video, embedded below.)

Stepper motors are the order of the day here, chosen for their low cost compared to brushless solutions, particularly when taking control hardware into account. In this design, the stepper motor drives a sun gear as part of a bigger planetary gearbox with a high gear ratio. Cross-roller bearings are used to allow the servo to effectively handle both radial and axial loads. The servo as a whole is designed to fit neatly into the joints of the robot arm itself, and has external mounting points provisioned as such.

It’s a neat servo that somewhat apes those used on full-sized industrial designs, at least in the sense of being an integrated part of the joints of a robot arm. It also comes in at a relatively-cheap $32 based on the materials used by [Skyentific].

We’ve seen some related work from [Skyentific] before, too – like this interesting cable-driven joint. Video after the break.

Continue reading “Cheap Big Servo For Robot Arm”

Light Painting With An 19th Century Inspired Plotter

The geometric chuck was a device that stacked up multiple rotating wheels that could vary their speed and their offset to a central shaft, in order to machine ornate designs using a lathe. It’s this piece of machining obscura from the 19th century that inspired this light painting build from [Ted Kinsman].

Rather than the complicated gears and wheels used in the distant past, [Ted] instead elected to use stepper motors. Three stepper motors are stacked on top of each other, each one able to rotate at an independent rate. The design only implements three steppers as the slip rings needed to send power and control signals to each stepper are prohibitively expensive.

An Arduino is programmed to run the show, changing the speed of each motor and thus the patterns the system generates. Put LEDs on the spinning plates, or install a pen to mark a piece of paper, and it’s possible to generate all manner of beautiful spirograph-like patterns. Vary the motor speeds or the positioning of the lights, and the patterns vary in turn.

It’s a fun build for light painting, with some great visuals produced. We also appreciate the use of the Arduino which makes varying the parameters far easier than having to change out gearsets in classical designs.

If you miss the old school spirograph, you can always build one out of Lego. Else, consider experimenting with other light painting techniques. If you’ve built a fancy rig of your own, be sure to let us know!

[Thanks to zit for the tip!]