Texture Trick For 3D Prints From The Stone Age

Arguably one of the most difficult aspects of 3D printing is trying to make the finished product look like it wasn’t 3D printed. It can take a lot of time and work to cover up the telltale layer lines (or striations, if you want to get fancy), especially if your 3D printer isn’t perfectly calibrated. While there aren’t many shortcuts to achieve a glass-like finish on 3D printed parts, if your end goal is to make something that looks like stone, [Wekster] has a tip for you.

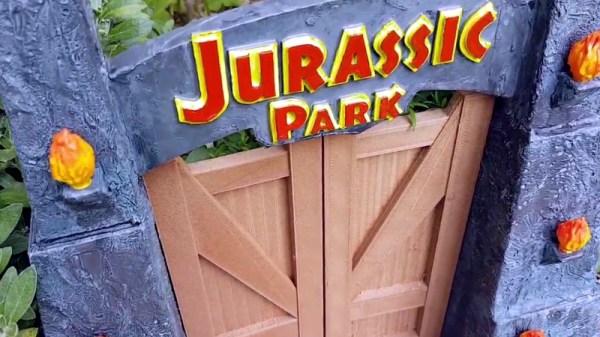
He demonstrates the technique by building a gorgeous recreation of the main gate from Jurassic Park. The process gives the relatively smooth plastic the gnarled look of rough-hewn stone with very little in the way of manual work. While it’s true there’s no overabundance of projects this stone-look finish will work for, it’s definitely something we’ll be filing away mentally.

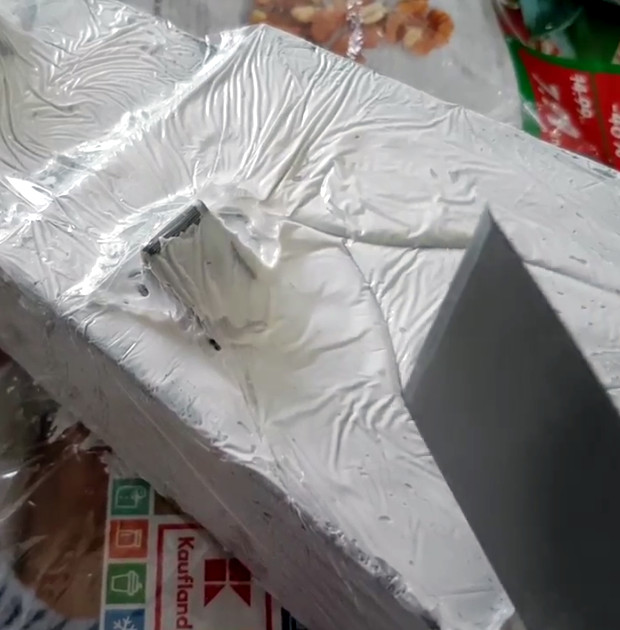
So what’s the secret? [Wekster] first coats the 3D printed parts with common wood filler, the sort of stuff available at any hardware store. He then wraps them in clear plastic wrap, allowing the wrap to bunch up rather than trying to pull it taught. For extra detail, he digs into the plastic wrap here and there to create what will appear to be gaps and cracks on the finished piece. The wood filler is then left to dry; a process which normally only takes a few minutes, but now will take considerably longer as the plastic wrap will be keeping the air from it.

Once its hardened and unwrapped, [Wekster] sprays it with a base coat of color, and follows up with a few washings with watered down black and gray paints. This technique is well known to anyone who’s done miniature or model painting; serving to highlight the surface texture and give the finish more depth. With this method, anything that resembles a layer line in the print is long gone, and the surface looks so complex and detailed that at first glance few would believe it’s plastic.

[Wekster] also used wood filler during the finishing process for his Fallout 4 “Thirst Zapper” replica. In the past we’ve shown how you can smooth out 3D printed parts with epoxy and taken a very scientific look at using UV resin as a conformal coating, but maybe it’s time we give wood filler a shot.

Continue reading “Texture Trick For 3D Prints From The Stone Age”

Cutting Stone With A Diamond Bit Built From Plumbing Parts

Everyone’s favorite Canadian is at it again. This time, [AVE] needed to cut a large hole in a stone countertop. They making coring bits for this, but a bit this size would cost upwards of $400. Not a problem. [AvE] broke out the tools and built his own stone cutting bit.

Everything starts with a 6″ plastic pipe cap. [AvE] center drilled the cap, then threaded it. A turned down bolt makes a great arbor for this new tool. The edge of the cap was then slotted. [AvE] used a clapped out Bridgeport milling machine, but you could do the same job with a hacksaw or a Dremel tool.

The secret sauce is industrial diamonds. That’s right, this is a diamond cutting bit. [AvE] ordered 20 grams of 20-25 mesh industrial diamonds. “Mesh” defines the size of the individual diamonds — in this case around 50 microns and up.  Now, how to bind diamond and plastic? Plumber’s transition cement didn’t work – the diamonds and coating just peeled off like a sunburn. The solution turned out to be JB-Weld. A liberal coating of JB-Weld on the face of the tool, a sprinkling of industrial diamonds, and the pipe cap was ready to cut.

The cutting operation was slow, steady, and lots of cooling water. [AvE] made it most of the way through his countertop before having to refurbish his bit.

[AvE] usually is a man of many words, as can be seen in this post about his EDM machine. This time though, he gave us the silent treatment — an entire video with no words, set to classical music. It’s great seeing YouTubers step outside their comfort zone and trying something new.

Continue reading “Cutting Stone With A Diamond Bit Built From Plumbing Parts”

Need For New Hobby Leads To Stone Marbles

[Tom Lange] said he was looking for a new hobby when he saw a marble made out of stone and wondered what goes into making one for himself. Fast forward three years and he set up shop at the Madison Mini Maker Faire to show off the tools he built and the fascinating glossy orbs he’s produced. Read on to see the awesome process he uses to turn a hunk of stone into a perfect marble.

Continue reading “Need For New Hobby Leads To Stone Marbles”

Natural Materials For Nature’s Call

When it comes to picking out high-end fixtures and appointments for your bathroom remodel, there are tons of choices out there these days. Sure, that double-slipper tub or  $2500 stainless steel toilet can make a statement, and even the local Big Box Home Store has some pretty unique stuff. But for a one of a kind sink, follow [The Samurai Carpenter]’s lead and carve a sink out of a boulder.

Capture2Starting with a stone he found off the porch of his house, [Samurai Carpenter] was able to rough out the shape of the basin with a diamond-bladed cutoff saw. A few plunge cuts within a hand-sketched outline gave him the room needed to hog out most of the material with a cold chisel and hammer. A diamond wheel on an angle grinder, along with a chisel bit on an impact drill, got him down to the final smooth finish. After the break there’s a video showing the final installation, including drilling out the drain hole and mounting the sink to the vanity, which is a beautiful rough-cut slab of what appears to be locally sourced wood. The whole installation looks fantastic and appears to function well; our only quibble is there’s no overflow in the basin, but it’s hard to see how he could have provided one without significantly complicating the project and potentially ruining the aesthetic.

Although they may not fit in with the natural vibe of his remodel, either this or this tricked out mirror could complete a high-end  bathroom remodel.

Continue reading “Natural Materials For Nature’s Call”

3D Printing On A Much Larger Scale

The end goal of this giant rapid prototyping machine is to print buildings. We’re not holding our breath for a brand new Flintstones-esque abode, but their whimsical suggesting of printed buildings on the moon seems like science fiction with potential. The machine operates similar to a RepRap but instead of plastic parts, it prints stone by binding sand with epoxy. This method is not revolutionary, but hasn’t really been seen in applications larger than a square meter or so. It’s fun to see the things we dabble in heading for industrial production applications.

[Thanks Juan]