Streaming Deck Removes Need For Dedicated Hardware

Streaming content online has never been more popular than it is now, from YouTube to Twitch there are all kinds of creators around with interesting streams across a wide spectrum of interests. With that gold rush comes plenty of people selling figurative shovels as well, with audio mixing gear, high-quality web cams, and dedicated devices for controlling all of this technology. Often these devices take the form of a tablet-like device, but [Lenochxd] thinks that any tablet ought to be able to perform this task without needing dedicated, often proprietary, hardware.

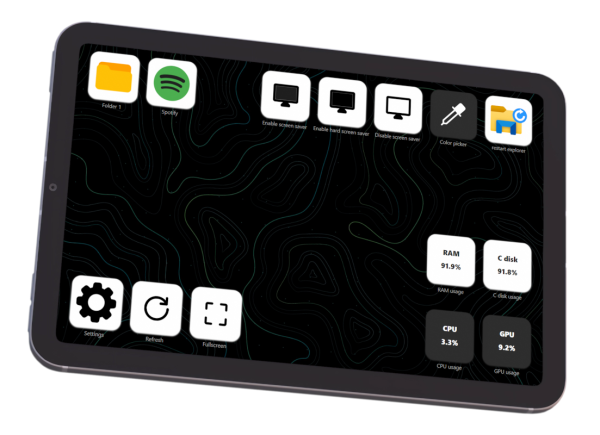
The solution offered here is called WebDeck, an application written in Flask that turns essentially any device with a broswer into a stream control device. Of course it helps to have a touch screen as well, but an abundance of tablets and smartphones in the world makes this a non-issue. With the software running on the host computer, the streamer can control various aspects of that computer remotely by scanning a QR code which opens a browser window with all of the controls accessible from within. It has support for VLC, OBS Studio, and Spotify as well which covers the bases for plenty of streaming needs.

Currently the host software only runs on Windows, but [Lenochxd] hopes to have MacOS and Linux versions available soon. We’re always in favor of any device that uses existing technology and also avoids proprietary hardware and software. Hopefully that’s a recipe to avoid planned obsolescence and unnecessary production. If you prefer a version with a little bit of tactile feedback, though, we’ve seen other decks which add physical buttons for quick control of the stream.

Super 8 Camera Brought Back To Life

The Super 8 camera, while a groundbreaking video recorder in its time, is borderline unusable now. Even if you can get film for it (and afford its often enormous price), it still only records on 8mm film which isn’t exactly the best quality of film around, not to mention that a good percentage of these cameras couldn’t even record audio. They were largely made obsolete by camcorders in the late ’80s and early ’90s, although some are still used for niche artistic purposes. If you’d rather not foot the bill for the film, though, you can still put one of these to work with the help of a Raspberry Pi.

[befinitiv] has a knack for repurposing antique analog equipment like this while preserving its aesthetic. While the bulk of the space inside of this camera would normally be used for housing film, this makes a perfect spot to place a Raspberry Pi Zero, a rechargeable battery, and a power converter circuit all in a 3D printed enclosure that snaps into the camera just as a film roll would have. It uses the Pi camera module but still makes use of the camera’s built in optics which include a zoom function. [befinitiv] also incorporated the original record button so that from the outside this looks like a completely unmodified Super 8 camera.

The camera can connect to a WiFi network and can stream live video to a computer, or it can record video files to an internal SD card. As a bonus, thanks to the power converter circuit, it is also capable of charging a cell phone. [befinitiv] notes that many of the aesthetic properties of 8 mm film seem to be preserved when using this method, and he has several theories as to why but no definitive answer. If you’d like to take a look at some of his other projects like this, check out this analog camera that is now able to take digital pictures. Continue reading “Super 8 Camera Brought Back To Life”

Tucoplexing: A New Charliplex For Buttons And Switches

Figuring out the maximum number of peripherals which can be sensed or controlled with a minimum number of IOs is a classic optimization trap with a lot of viable solutions. The easiest might be something like an i2c IO expander, which would give you N outputs for 4 wires (SDA, SCL, Power, Ground). IO expanders are easy to interface with and not too expensive, but that ruins the fun. This is Hackaday, not optimal-cost-saving-engineer-aday! Accordingly there are myriad schemes for using high impedance modes, the directionality of diodes, analog RCs, and more to accomplish the same thing with maximum cleverness and minimum part cost. Tucoplexing is the newest variant we’ve seen, proven out by the the prolific [Micah Elizabeth Scott] (AKA [scanlime]) and not the first thing to be named after her cat Tuco.

[Micah’s] original problem was that she had a great 4 port USB switch with a crummy one button interface. Forget replacement; the hacker’s solution was to reverse and reprogram the micro to build a new interface that was easier to relocate on the workbench. Given limited IO the Tucoplex delivers 4 individually controllable LEDs and 4 buttons by mixing together a couple different concepts in a new way.

Up top we have 4 LEDs from a standard 3 wire Charlieplex setup. Instead of the remaining 2 LEDs from the 3 wire ‘plex at the bottom we have a two button Charlieplex pair plus two bonus buttons on an RC circuit. Given the scary analog circuit the scan method is pleasingly simple. By driving the R and T lines quickly the micro can check if there is a short, indicating a pressed switch. Once that’s established it can run the same scan again, this time pausing to let the cap charge before sensing. After releasing the line if there is no charge then the cap must have been shorted, meaning that switch was pressed. Else it must be the other non-cap switch. Check out the repo for hardware and firmware sources.

Last time we talked about a similar topic a bunch of readers jumped in to tell us about their favorite ways to add more devices to limited IOs. If you have more clever solutions to this problem, leave them below! If you want to see the Twitter thread with older schematics and naming of Tucoplexing look after the break.

Continue reading “Tucoplexing: A New Charliplex For Buttons And Switches”

Twitch Plays Battling Robots?

Audience interaction reached an all-time high in 2014 with Twitch Plays Pokemon, an online gaming stream where viewers were able to collaboratively command an emulated Game Boy playing Pokemon Red. Since then, the concept has taken off. Today, we see this extended to robots in the real world, with [theotherlonestar]’s Twitch Chat Controlled Robots.

The build is one that takes advantage of modern off-the-shelf components – an ESP8266 provides the brains, while a Pololu Zumo provides a ready to go robot chassis to save time on the mechanical aspects of the build. An L298N dual motor controller then handles motive power.

The real ingenuity though, is teaching the robots to respond to commands from Twitch chat. The chat is available in a readily parsable IRC format, which makes programming around it easy. [theotherlonestar] created a command set that enables the robots to be driven remotely by stream viewers, and then outfitted the ‘bots with hammers with which to fight, as well as a fedora to tip, if one is so inclined.

It’s a cool build, and one which shows further promise as Twitch continues to reduce stream & chat latency. We look forward to seeing future battles, but the first one already excites.

Interested in where it all began? Check out our Twitch Plays Pokemon coverage from way back when. Video after the break.

Continue reading “Twitch Plays Battling Robots?”

Twitch Stream Turned Infinity Mirror

Most Hackaday readers are likely to be familiar with the infinity mirror, a piece of home decor so awesome that Spock still has one up on the wall in 2285. The idea is simple: two parallel mirrors bounce and image back and forth, which creates a duplicate reflection that seems to recede away into infinity. A digital version of this effect can be observed if you point a webcam at the screen that’s displaying the camera’s output. The image will appear to go on forever, and the trick provided untold minutes of fun during that period in the late 1990’s where it seemed everyone had a softball-shaped camera perched on their CRT monitors.

Making use of that webcam in 2018.

While you might think you’ve already seen every possible variation of this classic visual trick, [Matt Nishi-Broach] recently wrote in to tell us about an infinity mirror effect he’s created using the popular streaming platform Twitch. The public is even invited to fiddle with the visuals through a set of commands that can be used in the chat window.

It works about how you’d expect: the stream is captured, manipulated through various filters, and then rebroadcast through Twitch. This leads to all sorts of weird visual effects, but in general gives the impression that everything is radiating from a central point in the distance.

While [Matt] acknowledges that there are probably not a lot of other people looking to setup their own Twitch feedback loops, he’s still made his Python code available for anyone who might be interested. There’s a special place in Hacker Valhalla for those who release niche software like this as open source. They’re the real MVPs.

If you’d like to get started on your infinite journey with something a bit more physical, we’ve covered traditional infinity mirror builds ranging from the simplistic to the gloriously over-engineered.

A Wireless Webcam Without A Cumbersome Cloud Service

After a friend bought a nannycam that required the use of a cloud service to make the device useful,  [Martin Caarels] thought to himself — as he puts it — ”I can probably do this with a Raspberry Pi!

Altogether, [Caarels] gathered together a 4000mAh battery, a Raspberry Pi 3 with a micro SD card for storage, a Logitech c270 webcam, and the critical component to bind this project together: an elastic band. Once he had downloaded and set up Raspbian Stretch Lite on the SD card, he popped it into the Pi and connected it to the network via a cable. From there, he had to ssh into the Pi to get its IP so he could have it hop onto the WiFi.

Now that he effectively had a wireless webcam, it was time to turn it into a proper security camera.

Continue reading “A Wireless Webcam Without A Cumbersome Cloud Service”

Playing DVDs On An IPad

[Harrison Jackson] figured out how to add DVD playback to an iPad. It doesn’t require a jailbreak, or any hardware modifications to your prized tablet. The work is done with some server-side processing and played back through the browser.

The popular open-source multimedia player VLC has the ability to encode from the command line during playback. [Harry’s] option flag mastery of the program allows him to convert a DVD to a 320×240 format that is iPad friendly. But this alone doesn’t get the video any closer to being on the iDevice. You’ll need to be running a webserver that can stream video. This example is on OSX, but since he’s using an Apache server it should be simple to reproduce on any Unix variant. Once you’ve enabled m3u8 files in the Apache mime-types, the iPad browser can be pointed to the file address VLC is kicking out and you’ll be watching a movie in no time.

We’ve wondered about replacing our home theater front-end with an ATV 2 running XBMC but the thought of having no optical drive in the living room requires some contemplation. If this becomes a feasible option (that isn’t downscaled from DVD quality) it will be a no-brainer to make that jump.

Don’t miss the demo video after the break. Full instruction are in the comment section of that clip.

Continue reading “Playing DVDs On An IPad”