3D printed test jig to determine the yield point of a centrally loaded 3D printed beam.

One Object To Print, But So Many Settings!

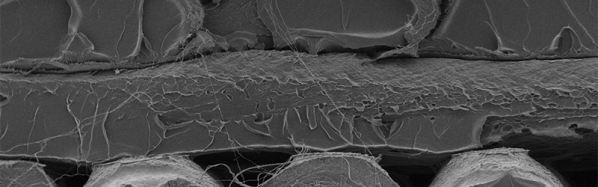
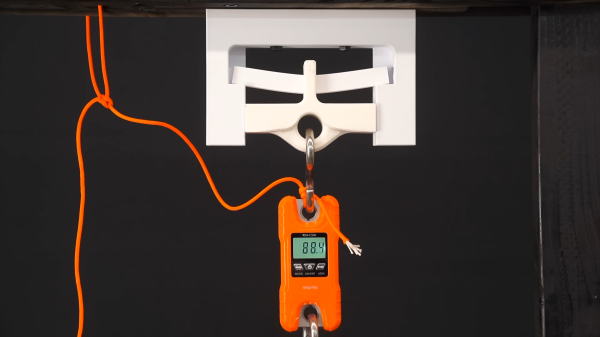
When working with an FDM 3D printer your first prints are likely trinkets where strength is less relevant than surface quality. Later on when attempting more structural prints, the settings become very important, and quite frankly rather bewildering. A few attempts have been made over the years to determine in quantifiable terms, how these settings affect results and here is another such experiment, this time from Youtuber 3DPrinterAcademy looking specifically at the effect of wall count, infill density and the infill pattern upon the strength of a simple beam when subjected to a midpoint load.

A tray of 3D printing infill patterns available in mainstream slicers
Modern slicers can produce many infill patterns, but the effect on real world results are not obvious

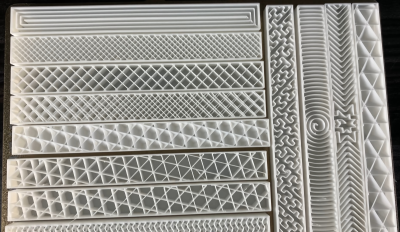
When setting up a print, many people will stick to the same few profiles, with a little variety in wall count and infill density, but generally keep things consistent. This works well, up to a point, and that point is when you want to print something significantly different in size, structure or function. The slicer software is usually very helpful in explaining the effect of tweaking the numbers upon how the print is formed, but not too great at explaining the result of this in real life, since it can’t know your application. As far as the slicer is concerned your object is a shape that will be turned into slices, internal spaces, outlines and support structures. It doesn’t know whether you’re making a keyfob or a bearing holder, and cannot help you get the settings right for each application. Perhaps upcoming AI applications will be trained upon all these experimental results and be fed back into the slicing software, but for now, we’ll just have to go with experience and experiment. Continue reading “One Object To Print, But So Many Settings!”

Splitting 3D Prints Into Parts Can Add Strength

One of the great things about 3D printers is their ability to make a single part all at once. Separating a part into multiple pieces is usually done to split up objects that are too big to fit on the 3D printer’s print bed. But [Peter] at Markforged (manufacturers of high-end 3D printers) has a video explaining another reason: multi-part prints can benefit from improved strength.

This part can be easily printed as a single piece, but it can be made nearly twice as strong when printed as two, and combined.

The idea is this: filament-based 3D printers generally create parts that are strongest along their X-Y axis (relative to their manufacture) and weakest in the Z direction. [Peter] proposes splitting a part into pieces with this in mind. Not because the part is inconveniently large or has tricky geometry, but so the individual pieces can be printed in orientations that provide the best mechanical strength.

This is demonstrated with the simple part shown here. The usual way to print this part would be flat on a print bed, but by splitting the parts into two and printing each in their optimal orientation, the combined part withstands nearly twice as much force before failing.

[Peter]’s examples use Markforged’s own filaments, but gives advice on more common polymers as well and the same principles apply. This idea is one worth keeping in mind the next time one is seeking to optimize strength. because of how simple it is.

We’ve seen a variety of methods to toughen up or ruggedize prints in the past, but they’re usually more complex (or at least messier.) Examples include embedding braided steel cable, embedding fiberglass mesh, applying electroplating to a printed structure, and plain old embedding some bolts and washers to buffer load-bearing areas.

Continue reading “Splitting 3D Prints Into Parts Can Add Strength”

The Effect Of Filament Color On Print Strength And More

What is an FDM filament coloring’s purpose but to be an aesthetic choice? As it turns out, the additives that create these changes in coloring and transparency also affect the base properties of the polymer, whether it’s PLA, PETG, or another material. This is where a recent video by [CNC Kitchen] is rather illustrative, using a collection of colored PLA filaments from a single filament manufacturer.

[CNC Kitchen] ran a range of tests including tensile strength, ductility, layer adhesion, impact resistance, and annealing performance. The results showed no clear overall winner between plain PLA polymer and any specific color. Perhaps most fascinating was just how much these color additives change the material’s response to annealing. Baking the PLA at 100°C for 30 minutes generally improves material properties, but also can cause warping and shrinking. The effective warping and shrinking differed wildly between the filament.

The general conclusion would seem to be that the natural polymer isn’t necessarily the optimal choice, but that you should test and pick the filament from a specific manufacturer to fit your project’s needs.

Continue reading “The Effect Of Filament Color On Print Strength And More”

Raspberry Pi Test Stand Tells You Which Glues To Use

Not all glues are created equal; or rather, not every glue is good for every application. But how is one to know which glue to use in which kinds of joints? The answer to that is not always clear, but solid numbers on the comparative strength of different glues are a great place to start.

To quantify what can ordinarily be a somewhat subjective process, there’s probably no one better than woodworker and hacker [Matthias Wandel], equipped as he is with his DIY strength-tester. Using its stepper-driven power to blast apart glued lap joints, [Matthias] measured the yield point of the various adhesives using a strain gauge connected to a Raspberry Pi.

His first round of tests had some interesting results, including the usually vaunted construction adhesive ending up in a distant last place. Also performing poorly, at least relative to its reputation and the mess it can cause, was the polyurethane-based Gorilla Glue. A surprise standout in overall strength was hot glue, although that seemed to have a sort of plastic yield mode. Ever the careful empiricist, [Matthias] repeated his tests using hardwoods, with remarkably different results; it seems that glues really perform better with denser wood. He also repeated a few tests to make sure every adhesive got a fair shake. Check out the video below for the final results.

It’s always good to see experiments like this that put what we often take for granted to the test. [John] over at the Project Farm channel on YouTube does this kind of stuff too, and even did a head-to-head test of epoxy adhesives.

Continue reading “Raspberry Pi Test Stand Tells You Which Glues To Use”

Robot Arm Adds Freedom To 3D Printer

3D printers are an excellent tool to have on hand, largely because they can print other tools and parts rapidly without needing to have them machined or custom-ordered. 3D printers have dropped in price as well, so it’s possible to have a fairly capable machine in your own home for only a few hundred dollars. With that being said, there are some limitations to their function but some of them can be mitigated by placing the printer head on a robot arm rather than on a traditional fixed frame.

The experimental 3D printer at the University of Nottingham adds a six-axis robotic arm to their printer head, which allows for a few interesting enhancements. Since the printer head can print in any direction, it allows material to be laid down in ways which enhance the strength of the material by ensuring the printed surface is always correctly positioned with respect to new material from the printer head. Compared to traditional 3D printers which can only print on a single plane, this method also allows for carbon fiber-reinforced prints since the printer head can follow non-planar paths.

Of course, the control of this printer is much more complicated than a traditional three-axis printer, but it is still within the realm of possibility with readily-available robotics and microcontrollers. And this is a hot topic right now: we’ve seen five-axis 3D printers, four-axis 3D printers, and even some clever slicer hacks that do much the same thing. Things are finally heating up in non-planar 3D printing!

Thanks to [Feinfinger] for the tip!

Continue reading “Robot Arm Adds Freedom To 3D Printer”

Electroplating 3D Printed Parts For Great Strength

Resin 3D printers have a significant advantage over filament printers in that they are able to print smaller parts with more fine detail. The main downside is that the resin parts aren’t typically as strong or durable as their filament counterparts. For this reason they’re often used more for small models than for working parts, but [Breaking Taps] wanted to try and improve on the strength of these builds buy adding metal to them through electroplating.

Both copper and nickel coatings are used for these test setups, each with different effects to the resin prints. The nickel adds a dramatic amount of stiffness and the copper seems to increase the amount of strain that the resin part can tolerate — although [Breaking Taps] discusses some issues with this result.

While the results of electroplating resin are encouraging, he notes that it is a cumbersome process. It’s a multi-step ordeal to paint the resin with a special paint which helps the metal to adhere, and then electroplate it. It’s also difficult to ensure an even coating of metal on more complex prints than on the simpler samples he uses in this video.

After everything is said and done, however, if a working part needs to be smaller than a filament printer can produce or needs finer detail, this is a pretty handy way of adding more strength or stiffness to these parts. There’s still some investigating to be done, though, as electroplated filament prints are difficult to test with his setup, but it does show promise. Perhaps one day we’ll be able to print with this amount of precision using metal directly rather than coating plastic with it.

Thanks to [smellsofbikes] for the tip!

Continue reading “Electroplating 3D Printed Parts For Great Strength”

The Effects Of Color On Material Properties Of 3D Printed Components

The strength of object printed on filament-based 3D printers varies by the plastic used, the G-code used by the printer, the percent infill, and even the temperature the plastic was extruded at. Everything, it seems, has an effect on the strength of 3D printed parts, but does the color of filament have an effect on the stress and strain a plastic part it can withstand? [Joshua M. Pearce] set out to answer that question in one of his most recent papers.

The methods section of the paper is about what you would expect for someone investigating the strength of parts printed on a RepRap. A Lulzbot TAZ 4 was used, along with natural, white, black, silver, and blue 3mm PLA filament. All parts were printed at 190°C with a 60°C heated bed.

The printed parts demonstrated yet again that a RepRap can produce parts that are at least equal in material strength to those produced by a proprietary 3D printer. But what about a difference in the strength among different colors? While there wasn’t a significant variation in the Young’s modulus of parts printed in different colors, there was a significant variation of the crystallization of differently colored printed parts, with white PLA producing the largest percent crystallinity, followed by blue, grey, black, and finally natural PLA. This crystallinity of a printed part can affect the tensile properties of a printed part, but [Pearce] found the extrusion temperature also has a large effect on the percentage of crystallinity.