Retrotechtacular: Studio Camera Operation, The BBC Way

If you ever thought that being a television camera operator was a simple job, this BBC training film on studio camera operations will quickly disabuse you of that notion.

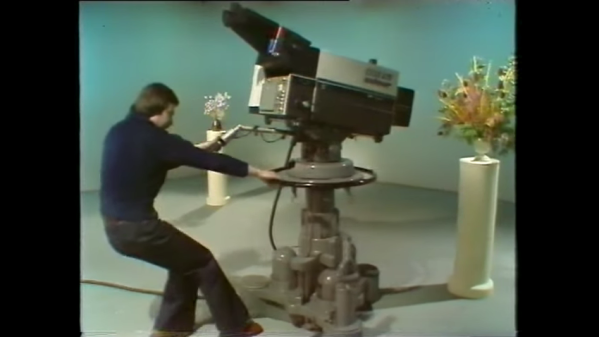
The first thing that strikes you upon watching this 1982 gem is just how physical a job it is to stand behind a studio camera. Part of the physicality came from the sheer size of the gear being used. Not only were cameras of that vintage still largely tube-based and therefore huge — the EMI-2001 shown has four plumbicon image tubes along with tube amplifiers and weighed in at over 100 kg — but the pedestal upon which it sat was a beast as well. All told, a camera rig like that could come in at over 300 kg, and dragging something like that around a studio floor all day under hot lights had to be hard. It was a full-body workout, too; one needed a lot of upper-body strength to move the camera up and down against the hydropneumatic pedestal cylinder, and every day was leg day when you had to overcome all that inertia and get the camera moving to your next mark.

Operating a beast like this was not just about the bull work, though. There was a lot of fine motor control needed too, especially with focus pulling. The video goes into a lot of detail on maintaining a smooth focus while zooming or dollying, and shows just how bad it can look when the operator is inexperienced or not paying attention. Luckily, our hero Allan is killing it, and the results will look familiar to anyone who’s ever seen any BBC from the era, from Dr. Who to I, Claudius. Shows like these all had a distinctive “Beeb-ish” look to them, due in large part to the training their camera operators received with productions like this.

There’s a lot on offer here aside from the mechanical skills of camera operation, of course. Framing and composing shots are emphasized, as are the tricks to making it all look smooth and professional. There are a lot of technical details buried in the video too, particularly about the pedestal and how it works. There are also two follow-up training videos, one that focuses on the camera skills needed to shoot an interview program, and one that adds in the complications that arise when the on-air talent is actually moving. Watch all three and you’ll be well on your way to running a camera for the BBC — at least in 1982.

Continue reading “Retrotechtacular: Studio Camera Operation, The BBC Way”

Ray's panels on the wall - circles of different sizes (from 60 to 15cm in diameter) covered by fabric of different shades, their arrangement vaguely resembling a cloud.

DIY Acoustic Panels Or Modern Artwork? Can’t Tell

The acoustic properties of a room have a surprising impact when you want to use a microphone. [RayP24]’s son was trying to make his bedroom into a better recording studio, and for [Ray], that turned into an artfully-executed wall panel project. Fortunately, the process is documented so we all can learn from it. When it comes to acoustics, you can often get a whole lot of improvement from surprisingly few changes. And, as this project demonstrates, you can make it look like a decorative piece to boot.

When arranged and placed on the wall, these panels look like an art piece, a decoration you could get from a somewhat fancy store. If you show them to someone, they might not believe that they also serve as a functioning home acoustics improvement, dampening the sound quite well for audio recording needs. The panels are built out of individual circles, cut out in a way that uses as much of a 3/16″ (5mm) plywood sheet as possible, with hollow circles serving as frames to attach foam-backed fabric. In the Instructables post, [Ray] talks quite a bit about how you can assemble your own and what liberties you can take. There’s also a short video accompanying this project, which you can see after the break. This project is begging to be recreated.

There’s a sizeable amount of hacking-meets-home improvement-meets-home acoustics projects out there, especially lately, when so many people are stuck at home for one reason or another. Just a few months ago, we covered another marvelous “art piece turned reverb killer” project operating by a slightly different principle, and also going a bit more into the theory. Perhaps in a few years, we will no longer have to build panels or structures for our soundproofing needs, as purpose-grown mycelium shapes will do that for us. And once it becomes a question of where to hang your newly-built acoustic panels, this simple guide is a good place to start.

Continue reading “DIY Acoustic Panels Or Modern Artwork? Can’t Tell”

Zac shows off his sound diffusion panels

Taking The Bark Out Of Reverb With Wood Scraps

For the past few years, many have become used to having virtual meetings in their homes. Spaces like kitchen tables, couches, spare bedrooms, and hammocks in the yard have all become “offices”. As you can imagine, many of these spaces aren’t well known for their acoustic qualities. [Zac] built a sound diffusion art piece out of scrap pieces of wood to help his office sound better when recording.

Reverb is caused by sound bouncing off hard, flat surfaces like drywall. These reflections are picked up by the microphone and lead to a noticeable drop in perceived sound quality. There are generally two ways to kill reverb in a space: diffusion and absorption. Diffusion is the technique that [Zac] is going for, with thousands of faces at different angles and locations, it breaks up the harsh reflections into millions of tiny reflections. Absorption is usually accomplished with foam and other typically soft substances.

[Zac] happened to have a large pile of offcuts and extra material from past projects of various wood species, making it easy to make a visually interesting piece. He used a table saw to rip them to a consistent width and a drum sander reduced them all to the same depth. Next, the long sticks were cut with a miter saw into 5 different lengths, leaving him with thousands of little pieces of wood. The hard part began when he had to glue several thousand pieces to a plywood backer board with CA glue. Sanding, finishing with poly, and a french cleat made the three pieces ready to hang on the wall.

Overall, the effect is stunning. While we’d love more hard data on the improvement, it certainly does sound better anecdotally. If you’re interested in more woodworking, take a look into making an inlay without a CNC. Video after the break.

Continue reading “Taking The Bark Out Of Reverb With Wood Scraps”

Raspberry Pi Tally Lights

Running a camera studio is a complicated affair from pretty much every angle. Not only is the camera gear expensive but the rest of the studio setup takes care and attention down to the lighting as well. When adding multiple cameras to the mix, like for a television studio, the level of complexity increases exponentially. It’s great to have a few things that simplify the experience of running all of this equipment too, without the solution itself causing more problems than it solves, like these network-operated Raspberry Pi-powered tally lights.

A tally light is the light on a camera that lets the person being recorded know which camera is currently in use. Networking them all together often requires complex wiring or at least some sort of networking solution, which is what this particular build uses. However, the lights are controlled directly over HTTP rather than using a separate application which might need a port open on a firewall or router, which not only simplifies their use but doesn’t decrease network security.

The HTTP interface, plus all of the software and schematics for this build, are available on the project’s GitHub page. We imagine the number of people operating a studio and who are in need of a tally light system to be fairly low, but the project is interesting from a networking point-of-view regardless of application. If you do have a studio like this and are looking for other ways to improve it, we do have a simple teleprompter hack that might be right up your alley.

A Walk-In Broadcast Transmitter

[Mr. Carlson] likes electronics gear. Mostly old gear. The grayer the case, the greener the phosphors, and the more hammertone, the better. That’s why we’re not surprised to see him with a mammoth AM radio station transmitter in his shop. That it’s a transmitter that you can walk into while it’s energized was a bit of a surprise, though.

As radio station transmitters go, [Mr. Carlson]’s Gates BC-250-GY broadcast transmitter is actually pretty small, especially for 1940s-vintage gear. It has a 250 watt output and was used as a nighttime transmitter; AM stations are typically required to operate at reduced power when the ionosphere is favorable for skip on the medium frequency bands. Stations often use separate day and night transmitters rather than just dialing back the daytime flamethrower; this allows plenty of time for maintenance with no interruptions to programming.

If you enjoy old broadcast gear, the tour of this transmitter, which has been rebuilt for use in the ham bands, will be a real treat. Feast your eyes on those lovely old bakelite knobs and the Simpson and Westinghouse meters, and picture a broadcast engineer in white short sleeves and skinny tie making notations on a clipboard. The transmitter is just as lovely on the inside — once the plate power supply is shut down, of course, lest [Mr. Carlson] quickly become [the former late Mr. Carlson] upon stepping inside. Honestly, there aren’t that many components inside, but what’s there is big – huge transformer, giant potato slicer variable caps, wirewound resistors the size of paper towel tubes, and five enormous, glowing vacuum tubes.

It’s a pretty neat bit of broadcasting history, and it’s a treat to see it so lovingly restored. [Mr. Carlson] teases us with other, yet larger daytime transmitters he has yet to restore, and we can’t wait for that tour. Until then, perhaps we can just review [Mr. Crosley]’s giant Cincinnati transmitter from the 1920s and wait patiently.

Continue reading “A Walk-In Broadcast Transmitter”

One Hacker’s Small Tabletop Photo Studio

We love good pictures. You know, being worth a thousand words and all. So, after our article on taking good reference photos, we were pleased to see a reader, [Steve], sharing his photography set-up.

Taking good technical photos is a whole separate art from other fields of photography like portraiture.  For example, [Steve] mentions that he uses “bullseye” composition, or, putting the thing right in the middle. The standard philosophy on this method is that it’s bad and you are bad. For technical photos, it’s perfect.

[Steve] also has some unique toys in his arsenal. Like a toy macro lens from a subscription chemistry kit. He also showed off his foldscope. Sadly, they appear to no longer be for sale, but we sometimes get by with a loupe held in front of the lens. He also uses things standard in our shop. Such as a gridded cutting mat as a backdrop and a cheap three dollar tripod with spring actuated jaws to hold his phone steady.

In the end, [Steve] mostly shows that a little thought goes a long way to producing a photo that doesn’t just show, but communicates an idea in a better way than just words can manage.


A Pi Powered Recording Studio

In the mid-90s, you recorded your band’s demo on a Tascam cassette tape deck. These surprisingly cheap four-track portable studios were just low tech enough to lend an air of authenticity to a band that calls itself, ‘something like Pearl Jam, but with a piano’. These tape decks disappeared a decade later, just like your dreams of being a rock star, replaced with portable digital recording studios.

The Raspberry Pi exists, the Linux audio stack is in much better shape than it was ten years ago, and now it’s possible to build your own standalone recording studio. That’s exactly what [Daniel] is doing for our Raspberry Pi Zero contest, and somewhat predictably he’s calling it the piStudio.

Although the technology has moved from cassette tapes to CompactFlash cards to hard drives, the design of these four-track mini recording studios hasn’t really changed since their introduction in the 1980s. There are four channels, each with a fader, balance, EQ, and a line in and XLR jack. There are master controls, a few VU meters, and if the technology is digital, a pair of MIDI jacks. Since [Daniel] is using a Raspberry Pi for this project, he threw in an LCD for a great user interface.

As with all digital recorders, the money is in the analog to digital converters. [Daniel] is using a 24-bit, 216kHz, four-channel chip, Texas Instruments’ PCM4204. That’s more than enough to confuse the ears of an audiophile, although that much data will require a hard drive. Good thing there will be SATA.

Although you can buy an eight-channel solid state recorder for a few hundred dollars – and [Daniel] will assuredly put more than that into this project, it’s a great application of a ubiquitous Linux computer for a device that’s very, very useful.


Raspberry_Pi_LogoSmall

The Raspberry Pi Zero contest is presented by Hackaday and Adafruit. Prizes include Raspberry Pi Zeros from Adafruit and gift cards to The Hackaday Store!
See All the Entries || Enter Your Project Now!