Electroluminescent Surfboard Looks Sharp For Night Surfing

If you’ve watched Point Break lately, you probably considered the thrill and elation involved in night surfing. If you’ve hung out with a lifeguard, though, you might instead have fretted over the dangers. In any case, it remains a popular pastime, and it’s all the more fun with a light-up surfboard like this one from [Moritz Sivers].

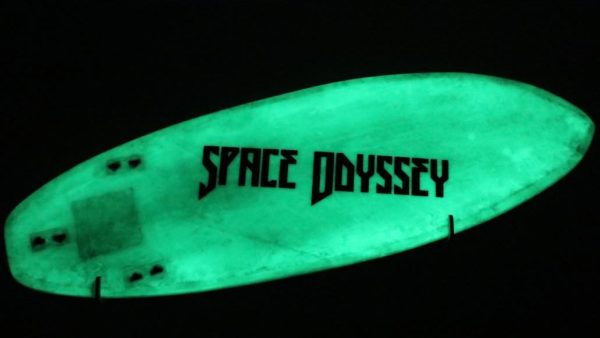
This project came about due to a local tradition for [Moritz], where people often surf at night to avoid the crowded breaks during the day. The build started from scratch, with a foam blank shaped into a compact  design optimized for riversurfing, with three fins set up in a thruster configuration. The back side of the board was given a coat of resin impregnated with glow-in-the-dark pigment such that the entire thing would emit an nice green glow, making it more visible at night. On the top surface, a pocket was cut in the board to host electronics for running an electroluminescent panel, complete with artwork inspired by 2001 – A Space Odyssey. The board was also outlined with EL wire to further improve the look.

[Moritz] has experimented with some neat LED surfboard designs before, too. Video after the break.

Continue reading “Electroluminescent Surfboard Looks Sharp For Night Surfing”

Electric Surfboard Gets An Overhaul

One of the realities of building your own hardware is that it will more often than not lead to constant tinkering and revisions. [Simon]’s 3D printed electric surfboard is no exception as it recently got an overhaul. The motors were upgraded from 5000 W to 7500 W, most parts were redesigned to use bearings, and the impellers were swapped out. Luckily, almost all the electronics inside were suitable for reuse.

We previously covered the surfboard in question, and we’re always excited to see an old project revisited. The bearing reduces vibrations and allows the system to last longer. Despite the water cooling on the motors, the temperatures were still getting relatively high when running full tilt. So rather than buying more efficient (and more expensive) motors, he opted to reduce the load on the motors by changing out the impeller from a double to a single. But this meant cutting and grinding a new shaft as now needed to be one impeller shorter.

Continue reading “Electric Surfboard Gets An Overhaul”

a home depot surfboard

Foam Surfboard From Scratch

Have you ever wanted to make your own surfboard, but felt held back by a lack of tools, materials, or the cost of it? Drawing almost entirely from what can be found at a well-known home improvement retailer, [AndrewW1997] details the steps needed to craft your board.

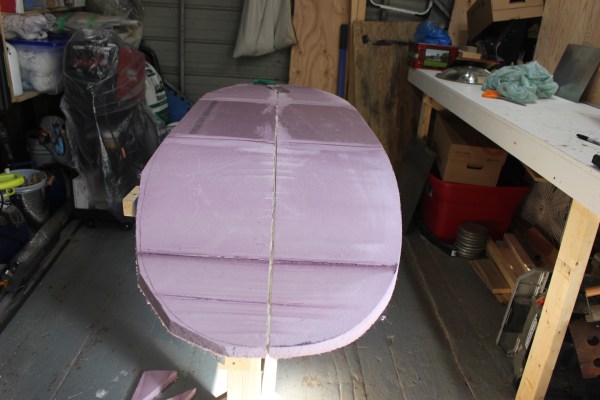
In his guide, he details the difference between XPS (expanded polystyrene) and EPS (extruded polystyrene) and how each product’s closed cell and open cell nature affects the final board. Starting with two pink sheets of XPS, he laminated them together with glue to form his blank. A stringer is a long piece of wood in the middle of the surfboard that provides additional flex and strength. Some flooring plywood curved with a jigsaw provides the shape needed. Unfortunately, the blank needs to be split in half to install the stringer. However, he has a trick for gluing the blank back together without it buckling, and that trick is ratchet straps.

He cuts the foam into roughly the right shape with a hot wire. Clean up is done with sanding blocks, a plane, and a level. The next step is laminating the board with epoxy and fiberglass. Next, [Andrew] details a few considerations around the process and gets to glassing. Sanding up to 2000 grit and some polishing compound make the board gorgeous. After a bit of final curing time, you’re ready to ride some waves.

There’s a handy playlist on YouTube detailing the process so you can follow along. Once you’ve finished your surfboard, perhaps your next project will be to power it up with a jet drive. Video after the break.

Continue reading “Foam Surfboard From Scratch”

Surfboard Gets Jet Upgrades

Surfing is a fun and exciting sport but a lot of beginners can get discouraged with how little time is spent actually riding waves while learning. Not only are balance and wave selection critical skills that take time to learn, but a majority of time in the water is spent battling crashing waves to get out past the breakers. Many people have attempted to solve this problem through other means than willpower alone, and one of the latest attempts is [Andrew W] with a completely DIY surfboard with custom impeller jet drives.

The surfboard is hand-made by [Andrew W] himself using a few blocks of styrofoam glued together and then cut into a generic surfboard shape. After the rough shaping is done, he cuts out a huge hole in the back of the board for the jet drive. This drive is almost completely built by [Andrew] as well including the impeller pumps themselves which he designed and 3D printed. The pair of impellers are driven by some beefy motors and a robust speed controller that connects wirelessly to a handheld waterproof throttle to hold while surfing. Once everything was secured in the motor box the surfboard was given a final shaping and then glassed. The final touch was an emergency disconnect attached to a leash so that if he falls off the board it doesn’t speed away without him.

The build is impressive not only for [Andrew]’s shaping skills but for his dedication to a custom jet drive for the surfboard. He spent over a year refining the build and actually encourages people not to do this as he thinks it took too much time and effort, but we’re going to have to disagree with him there. Even if you want to try to build something a lot simpler, builds like these look like a lot of fun once they’re finished. The build seems flawless and while he only tested it in a lake we’re excited to see if it holds up surfing real waves in an ocean.

Continue reading “Surfboard Gets Jet Upgrades”

The Egg-laying Wool-Milk Pig

Last week, I wrote about two recent projects of mine that serve as cautionary tales in keeping projects simple — you probably can’t simplify everything, so it’s worth the time to find out which simplifications have the most bang for the buck. This week, I’d like to share a tale of lack of design focus.

German has the eierlegende Wollmilchsau: a mystical animal that lays eggs, while producing wool, milk, and meat to boot. It’s a little bit like the English “jack of all trades, master of none” except that the eierlegende Wollmilchsau doesn’t do each job badly, it plainly can’t exist. This is obviously a bad way to start a design.

The first surfboard that I made by myself was supposed to be an eierlegende Wollmilchsau. It was going to be a longboard, because we had months with smaller waves that just weren’t all that suitable for shortboarding, but it was also going to turn sharply off the rails like a shortboard. To help it turn, it was going to have tons of camber (bend like a banana), and small fins. And along the way, I thought I’d make it thin to cut through the water.

Of course what I ended up with, not helped by my heavy fiberglassing hand, was a plow that dug into the water, would turn unexpectedly when you managed to get it onto the rails, and couldn’t pick up a small wave to save its life due to the camber and aforementioned plowing. I surfed it anyway, as a matter of pride, but I had no illusions of it being anything but the the worst board I owned. And that’s comparing it to the $30 used rasta-graphic plank that had been taking on water for at least five years, unrepaired, and was rotting out from the inside. At least it had design focus.

My surfboard didn’t suffer from feature creep, where you start piling on features until the project crumbles from overload, but rather from wanting to have my cake and eat it too. Or from failing to realize that certain design goals were necessarily tradeoffs. The “raily” behavior that I wanted when it was in bigger waves was necessarily “diggy” in small waves. Good boards trade off these features, and getting the balance between them is the art of shaping a board.

So when you start up a new project, think about which facets of your design are jointly achievable, and which are necessarily tradeoffs. Ignoring tradeoffs is a recipe for disaster, designing an eierlegende Wollmilchsau. But viewed constructively, it’s exactly these nuanced decisions that separates the simply possible from the truly marvelous. May you identify your trades, and make them well!

Don’t Let Your PLA Filament Hang Loose With This 3D-Printed Surfboard

People always tend to push the boundaries of what is doable with a 3D printer.  This is also true for [AndrewW1977] when he decided to 3D print a full-sized functional surfboard.

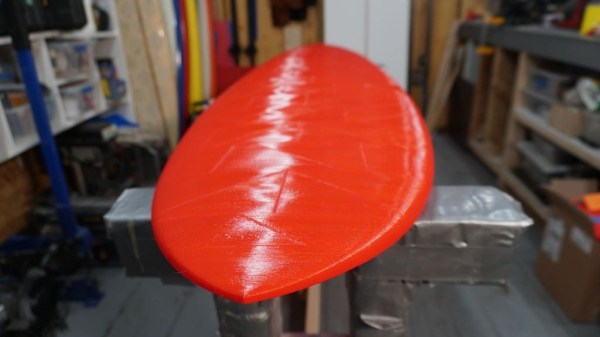
With just over nine full days of printing time, 95 individual pieces, and using 3.1 kg of PLA (not counting all the test prints), this is certainly a monumental project. One of the bigger issues [AndrewW1977] had to solve was avoiding air pockets inside the board. Ideally, you would want to end up with only one continuous hollow chamber in order to easily vent all the air inside the board when it heats up. [AndrewW1977] chose to overcome this problem by using zero infill for each individual piece. The pieces were then connected with the help of alignment pins that have a central hole thereby connecting all hollow chambers.

By using a triangular shape, he managed to print all pieces without using supports. After gluing them together the whole board was covered with fiberglass and epoxy resin similar to traditional surfboard building. Unfortunately, due to the current situation with Covid19 [AndrewW1977] remains short of showing us the board in action. In case you have a 3D printer at home and lots of spare time during lockdown, [AndrewW1977] has published all files for his surfboard on Thingiverse.

As [AndrewW1977] points out in the video embedded below other people have already done similar projects. From jet boats to electric hydrofoils it seems that water sports and 3D printing are a perfect match.

Continue reading “Don’t Let Your PLA Filament Hang Loose With This 3D-Printed Surfboard”

2D-Scanner Records Surfboard Profiles For Posterity

[Ryan Schenk] had a problem: he built the perfect surfboard. Normally that wouldn’t present a problem, but in this case, it did because [Ryan] had no idea how he carved the gentle curves on the bottom of the board. So he built this homebrew 2D-scanner to make the job of replicating his hand-carved board a bit easier.

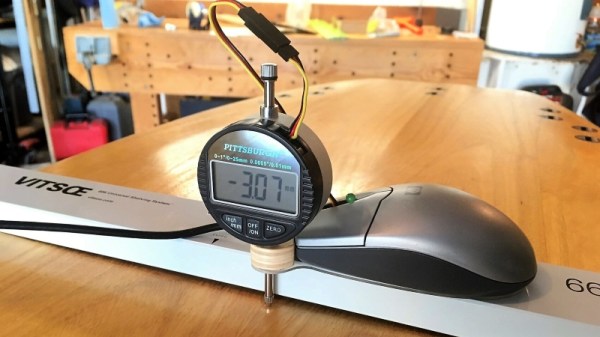
Dubbed the Scanbot 69420 – interpretation of the number is left as an exercise for the reader, my dude – the scanner is pretty simple. It’s just an old mouse carrying a digital dial indicator from Harbor Freight. The mouse was gutted, with even the original ball replaced by an RC plane wheel. The optical encoder and buttons were hooked to an Arduino, as was the serial output of the dial indicator. The Arduino consolidates the data from both sensors and sends a stream of X- and Z-axis coordinates up the USB cable as the rig slides across the board on a straightedge. On the PC side, a Node.js program turns the raw data into a vector drawing that represents the profile of the board at that point. Curves are captured at various points along the length of the board, resulting in a series of curves that can be used to replicate the board.

Yes, this could have been done with a straightedge, a ruler, and a pencil and paper – or perhaps with a hacked set of calipers – but that wouldn’t be nearly as much fun. And we can certainly see applications for this far beyond the surfboard shop.