Desktop Soundbar Is Ideal For PC Use

Soundbars are a rather strange category of speaker, most typically used with televisions to add some punch that the drivers crammed into a flatscreen TV simply can’t match. [Matt] of DIY Perks wanted a soundbar that was better suited to use on a computer desk rather than in a loungeroom, and set about creating one.

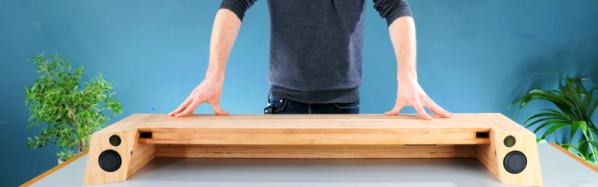
Regular soundbars aren’t great for a computer desk as they tend to deliver sound directed at one’s chest rather than one’s ears. [Matt]’s design instead angles its speakers slightly upwards, aimed at the user’s head as it should be. The build uses reclaimed wooden flooring for a cheap source of pretty wood that isn’t as ugly or flaky as MDF.

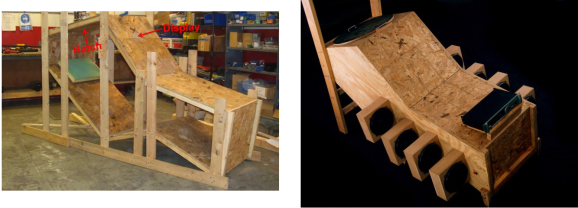
The design acts as a monitor stand and keyboard hutch, raising the screen to a comfortable height for viewing. The speakers themselves are in acoustic enclosures mounted on either side, also helping to provide good stereo separation. A subwoofer is also built into the shelf to add some bass response, with an impressively-neat bass chamber design. Finished off with some LED lights and a USB hub, the design delivers great sound along with a lovely desk environment for getting work done.

[Matt] does love a nice DIY build; his water-cooled outdoor TV is a particular delight. Video after the break.

Continue reading “Desktop Soundbar Is Ideal For PC Use”

Lamps Double As Secret Surround Sound Speakers

Combined with today’s massive flat panel displays, a nice surround sound system can provide an extremely immersive environment for watching movies or gaming. But a stumbling block many run into is speaker placement. The front speakers generally just go on either side of the TV, but finding a spot for the rear speakers that’s both visually and acoustically pleasing can be tricky.

Which is why [Peter Waldraff] decided to take a rather unconventional approach and hide his rear surround sound speakers in a pair of functioning table lamps. This not only looks better than leaving the speakers out, but raises them up off the floor and into a better listening position. The whole thing looks very sleek thanks to some clever wiring, to the point that you’d never suspect they were anything other than ordinary lamps.

The trick here is the wooden box located at the apex of the three copper pipes that make up the body of the lamp. [Peter] mounted rows of LEDs to the sides of the box that can be controlled with a switch on the bottom, which provides light in the absence of a traditional light bulb. The unmodified speaker goes inside the box, and connects to the audio wires that were run up one of the pipes.

In the base, the speaker and power wires are bundled together so it appears to be one cable. Since running the power and audio wires together like this could potentially have resulted in an audible hum, [Peter] only ran 12 VDC up through the lamp to the LEDs and used an external “wall wart” transformer. For convenience, he also put a USB charging port in the center of the base.

When speakers or surround sound systems pass our way, it’s usually because some hacker has either made  a set from scratch, or has added some new and improved capabilities to their existing gear. This project may be a bit low-tech compared to some that have graced these pages, but it’s undoubtedly a clever and unexpected solution to the problem, and that’s a hack in our book.

Continue reading “Lamps Double As Secret Surround Sound Speakers”

Subwoofer Gets Arduino Brain Transplant

The Samsung PS-WTX500 subwoofer is designed to be used as part of a 5.1 channel home theater system, but not just any system. It contains the amplifiers for all the channels, but they’ll only function when the subwoofer is connected to the matching receiver. [Alejandro Zarate] figured there must be some way to unlock the system’s full functionality without being limited to the original receiver, he just needed to reverse engineer how the subwoofer worked.

All the wires tuck underneath the Arduino

The result is a fantastically well documented write-up that covers the whole process, starting with how [Alejandro] identified and researched the Pulsus PS9829B Digital Audio Processor (DAP). Documentation for this particular chip seems hard to come by, but he was able to find a similar chip from the same manufacturer that was close enough to put him on the right track. From there, he started studying the SPI communications between the DAP and the subwoofer’s S3P70F4 microcontroller.

After analyzing the communication between the two chips, [Alejandro] pulled the S3P70F4 off the board and wired an Arduino Pro Mini 328 in its place. The Arduino was quite a bit larger than the original microcontroller, but with some careful wiring, he manged a very professional looking installation. Short of coming up with a custom PCB adapter, we don’t think it could look much better.

With some relatively straightforward code and a listing of the captured byte sequences, the Arduino was able to power up the PS-WTX500’s amplifiers and handle the incoming audio signal as a stand-alone device.

In the past we’ve seen a similar trick done with the ESP8266, which had the added benefit of enabling WiFi control of the speakers. We’re all for adding modern functionality to older hardware, even if you’ve got to hang it off the back as an external module.

Continue reading “Subwoofer Gets Arduino Brain Transplant”

Sniffing Signals To Teach Old Speakers New Tricks

Like many of the stories you’ll find on these pages, this one starts with a user being annoyed about their device’s inability to perform a simple task. All [Jay Tavares] wanted was for his Bose Cinemate speakers to turn themselves on and off as needed. It seems like a reasonable enough request, and indeed, is exactly the point of HDMI’s Consumer Electronic Control (CEC) feature. But in this case, it would take a bit of custom hardware to get similar functionality.

Unfortunately, the speakers [Jay] has only support optical audio; so any interoperability with HDMI-CEC (hacked or otherwise) was immediately out the window. Still, he reasoned that he should be able to detect when the TOSLINK audio source is actually active or not, and give the speaker system the appropriate signal to either power on or shut down. You might think this would require some kind of separate stand-alone device, but as it turns out, all the necessary information was available by reverse engineering the connection between the receiver and the subwoofer.

After some investigation, [Jay] found that not only was the content of the TOSLINK audio source being sent over this DB9 cable, but so were the control signals required to turn the system on and off. So he designed a simple pass-through device with an ATtiny85 and a couple passives that latches onto the relevant lines in the cable.

When audio is detected over the optical connection, the MCU will inject the appropriate signals on the control line to simulate the user pressing the “Power” button the remote. When the chip hasn’t detected audio after 10 seconds, it sends the signal to shut the speakers off.

While [Jay] notes he can’t guarantee this works on anything other than the particular Bose Cinemate GS Series II system he has, we’d be willing to bet the concept could be adapted to other models or even brands that use a similar cable to link their principle components. If all else fails, you could always add an ESP8266 to your sound system and control it over WiFi.

Home Theater For One Shakes Souls, Removes Fillings

hmmmm

Sometimes an earth-shaking home theater setup just won’t do. A speaker enclosure can only fill the average sized room with so much sound. [Kevin Bastyr] has figured out a way around this. Do away with the room, and build the home theater INSIDE the speaker enclosure! [Kevin’s] creation is called Humorously Maniacal Milwaukee Makerspace Multimedia Machine, (or HMMMMMM for short). As the name implies, HMMMMMM was created at the Milwaukee Makerspace. The HMMMMMM reminds us a bit of the sensory deprivation chambers which were so popular in the 70’s. HMMMMMM’s purpose in life however, is anything but deprivation. The user (victim?) climbs through a 27” hatch and settles into a reclining position. An LCD display is mounted a comfortable distance away from the users eyes. Then movie (or brainwashing program) begins.

The sound system is what sets the HMMMMMM apart. The HMMMMMM utilises a 5.16 surround sound system. That’s 5 speakers and 16 10″ high efficiency subwoofers. We’re not sure if it would be better to call it a sound system, or a full-out frontal assault on the senses. We’re not kidding when we say senses as well. Bass this loud can be felt as much as it is heard. The HMMMMMM is has been measured at 148.6dB at 40Hz. That’s well into the hearing damage range. To be safe, HMMMMMM users must wear double hearing protection: foam earplugs and earmuffs.

[Kevin’s] graphs aren’t all smoke and mirrors either – he’s an audio engineer by trade, and made his measurements with a laboratory grade 1/2″ Bruel and Kjaer microphone. Sound pressure level testing isn’t without its dangers. During testing the 2050 watt amplifier powering HMMMMMM encountered a fan failure. The amp’s circuit board ended up scorched black with delaminated traces. The HMMMMMM however was none the worse for wear. Future plans for the HMMMMMM include RGB LEDs that flash to the beat, and a smoke machine to create that extra atmosphere when the escape hatch is opened.

Adding Remote Control To Klipsch Surround System

The speaker system [Zurcher] bought was made by Klipsch. It is a surround sound unit but it’s intended to be used with a computer so there’s no wireless remote for it. Instead, a wired unit sits on the desk and lets you select between the speakers or headphones, and has a volume adjustment knob. The thing is he uses them for his home theater system and had to add his own remote control hardware to adjust them from across the room.

He started with some web searches that helped a lot. It seems others have mapped out the hardware in the past and he was able to use that information to find the volume chip inside the controller. A bit of signal sniffing let him work out the control commands coming in over the i2c bus. This was the information he needed to build his own controller. He grabbed his Arduino board, and IR receiver to take commands from just about any remote, and a four-digit 7-segment display to provide settings feedback. You can seen him showing off the final build in the clip after the break.

Continue reading “Adding Remote Control To Klipsch Surround System”

Surround Sound System Controller Replacement Includes Home Automation

[Neoxy] always wanted surround sound for his computer, and one day he managed to get a hold of a dead 5.1 system. Why buy one when you can repair someone’s rubbish, right? That turned out to be easier said than done, but after several false-starts he managed to resurrect the audio system by replacing the microcontroller.

We find his trouble-shooting technique interesting. The amp would power up without a hitch but no sound would come out of it. So he took a headphone cable and used the L and R conductors as probes. That cable was fed from an MP3 player, and by touching the probes to the audio inputs for the pre-amp and amplifier circuits he could get great sound out of the speakers. Reasonably certain that those boards were working fine he narrowed down the troubles to three chips that mix, select inputs, and control the system.

A lot of prototyping with an ATmega328 and an Arduino led him to the functionality you see in the video after the break. Not only did he get the system working, but he’s using the Arduino to add Internet control for the device.

Continue reading “Surround Sound System Controller Replacement Includes Home Automation”