Artist operating artistic visualizer with MIDI keyboard

Synth And Visualizer Combo Has Retrocomputing Vibe

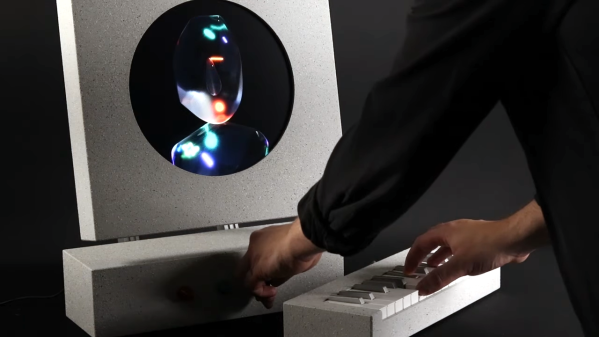
[Love Hultén]’s latest piece of interactive art is the SYNTH#BOI, a super-clean build with something of the semi-cyberdeck, semi-vintage computing vibe to it. The device is a combination synthesizer and visualizer, with a 15-inch display, MIDI keyboard, and based on an Intel NUC i5 small form factor PC.

There are not many details about the internal workings of the device, but the high quality of the build is very evident. Photos show a fantastic-looking enclosure with clean lines and sharp finish; it’s a reminder that careful measuring and attention to detail can be the difference between something that looks like a hack job, and something that looks like a finished product.

Watch the SYNTH#BOI in action in the video, embedded below. And if the name [Love Hultén] seems familiar, it’s probably because we featured his VOC-25 “Pink Denture Synth”, a concept instrument with a decidedly memorable design of its own.

Continue reading “Synth And Visualizer Combo Has Retrocomputing Vibe”

Vacuum tube Atari Punk Console

The Atari Punk Console, Now With More Vacuum Tubes

Most of us have beheld the sonic glory of an Atari Punk Console, that lo-fi synth whose classic incarnation is a pair of 555 timers set up to warble and bleep in interesting ways. Very few of us, however, have likely seen an APC built from 555s that are made from vacuum tubes.

It’s little surprise to regular readers that this one comes to us by way of [David] at Usagi Electric, who hasn’t met a circuit that couldn’t be improved by realizing it in vacuum tubes. His “hollow-state” Atari Punk Console began with the 18-tube version of the 555 that he built just for fun a while back, which proved popular enough that he’s working on a kit version, the prototype of which served as the second timer for the synth. With 32 tubes aglow amid a rats-nest of jumpers, the console managed to make the requisites sounds, but lacked a certain elegance. [David] then vastly simplified the design, reducing the BOM to just four dual-triode tubes. Housed on a CNC milled PCB in a custom wood box, the synth does a respectable job and looks good doing it. The video below shows both versions in action, as well as detailing their construction.

As cool as a vacuum tube synth may be, we realize that not everyone goes for the hot glass approach. No worries — plenty of silicon Atari Punk Consoles to choose from here. There’s one built into a joystick, a circuit sculpture version complete with mini-CRT, or even eight APCs teamed up with MIDI control.

Continue reading “The Atari Punk Console, Now With More Vacuum Tubes”

Ken Shirriff Breaks Open The Yamaha DX7

For better or worse, this synthesizer was king in the 1980s music scene. Sure, there had been synthesizers before, but none acheived the sudden popularity of Yamaha’s DX7. “Take on Me?” “Highway to the Dangerzone”?  That harmonica solo in “What’s Love Got to Do With It?”  All DX7. This synth was everywhere in pop music at the time, and now we can all get some insight from taking a look at this de-capped chip from [Ken Shirriff].

To be clear, by “look” that’s exactly what we mean in this case, as [Ken] is reverse-engineering the YM21280 — the waveform generator of the DX7 — from photos. He took around 100 photos of the de-capped chip with a microscope, composited them, and then analyzed them painstakingly. The detail in his report is remarkable as he is able to show individual logic gates thanks to his powerful microscope. From there he can show exactly how the chip works down to each individual adder and array of memory.

[Ken]’s hope is that this work improves the understanding of the Yamaha DX7 chips enough to build more accurate emulators. Yamaha stopped producing the synthesizer in 1989 but its ubiquity makes it a popular, if niche, platform for music even today. Of course you don’t need a synthesizer to make excellent music. The next pop culture trend, grunge, essentially was a rebellion to the 80s explosion of synths and neon colors and we’ve seen some unique ways of exploring this era of music as well.

Thanks to [Folkert] for the tip!

Close up shot of a mechanical sequencer for 555 based synthesizers

Kinetic Synth-Kebab Sculpture Plays Punk Sequentially

What’s better than an Atari Punk Console synthesizer? How about four Atari Punk Console synthesizers. And what better way to present them but as brass wire art sculptures. We’d have forgiven [iSax] if he’d stopped at four brass wire synths, but he took things to another level with his kinetic sculpture that does double duty as a mechanical sequencer. Called the Cyclotone – The Mechanical Punk Console Sequencer, it features wood, brass, brushes, and 555 timers. You can see the demonstration in the video below the break.

If you’re not familiar with the Atari Punk Console, it’s a circuit first described as a “Sound Synthesizer” in Forest Mims’ “Engineer’s Notebook: Integrated Circuit Applications” first published in 1980. It utilized two 555 timers in a single chip, the 556. Later dubbed the “Atari Punk Console”, the circuit has stood the test of time and is still quite popular among hackers of all sorts.

[iSax]’s build adds a sequencing element that allows the synths to be played automatically. The synthesizers are skewered 90 degrees from each other on a square dowel, which is turned at a variable RPM by a stepper motor controlled by a knob at the base of the sculpture.

On either side of each synth is a commutator that contacts salvaged rotary tool brushes which provide power through the hexagonal brass supports. Each synth retains its own speaker and controls and has its own segmented numeral displayed with discrete LED’s that light up when each synth is played.

We applaud [iSax] for a well executed and imaginative build that successfully meshes circuit scultpure, kinetic sculpture, classic electronics and even blinkenlights. If you enjoyed this build, you should also go have a look at a free form Atari Punk Console build and another one built into a joystick. If you come across a project of any kind that catches your fancy, be sure you let us know about it via the Tip Line!

Continue reading “Kinetic Synth-Kebab Sculpture Plays Punk Sequentially”

Dub Siren, a 555-powered synthesizer

Classic Chip Line-Up Powers This Fun Dub Siren Synth

There’s a certain elite set of chips that fall into the “cold, dead hands” category, and they tend to be parts that have proven their worth over decades, not years. Chief among these is the ubiquitous 555 timer chip, which nearly 50 years after its release still finds its way into the strangest places. Add in other silicon stalwarts like the 741 op-amp and the LM386 audio amp, and you’ve got a Hall of Fame lineup for almost any project.

That’s exactly the complement of chips that powers this fun little dub siren. As [lonesoulsurfer] explains, dub sirens started out as actual sirens from police cars and the like that were used as part of musical performances. The ear-splitting versions were eventually replaced with sampled or synthesized siren effects for recording studio and DJ use, which leads us to the current project. The video below starts with a demo, and it’s hard to believe that the diversity of sounds this box produces comes from just a pair of 555s coupled by a 741 buffer. Five pots on the main PCB control the effects, while a second commercial reverb module — modified to support echo effects too — adds depth and presence. I built-in speaker and a nice-looking wood enclosure complete the build, which honestly sounds better than any 555-based synth has a right to.

Interested in more about the chips behind this build? We’ve talked about the 555 and how it came to be, taken a look inside the 741, and gotten a lesson in LM386 loyalty.

Continue reading “Classic Chip Line-Up Powers This Fun Dub Siren Synth”

Small synth held in two hands

3D Printed Synth Kit Shares Product Design Insights

We’ve always been delighted with the thoughtful and detailed write-ups that accompany each of [Tommy]’s synth products, and the background of his newest instrument, the Scout, is no exception. The Scout is specifically designed to be beginner-friendly, hackable, and uses 3D printed parts and components as much as possible. But there is much more to effectively using 3D printing as a production method than simply churning out parts. Everything needed to be carefully designed and tested, including the 3D printed battery holder, which we happen to think is a great idea.

3d printed battery holder, showing inserted spring contacts
3D printed battery holder, with spring contacts inserted by hand.

[Tommy] also spends some time explaining how he decided which features and design elements to include and which to leave out, contrasting the Scout with his POLY555 synth. Since the Scout is designed to be affordable and beginner-friendly, too many features can in fact be a drawback. Component costs go up, assembly becomes less straightforward, and more complex parts means additional failure points when 3D printing.

[Tommy] opted to keep the Scout tightly focused, but since it’s entirely open-sourced with a hackable design, adding features is made as easy as can be. [Tommy] designed the PCB in KiCad and used OpenSCAD for everything else. The Scout uses the ATmega328, and can be easily modified using the Arduino IDE.

STL files can be downloaded here and all source files are on the project’s GitHub repository, which also contains detailed assembly and modification guides. Watch it in action in the video, embedded below.

Continue reading “3D Printed Synth Kit Shares Product Design Insights”

Touchscreen Makes For A Neat Wavetable Synth

A popular tool in chiptune software like LSDJ allows the user to draw a waveform and use it as the basis for a wavetable synth. It’s fun and it can produce some great bleeps and bloops. [Kevin] has created a similar tool using an Arduino and a touchscreen.

You can draw the waveform! That’s neat.

The build is based on the Arduino Uno, the humble mainstay of the Arduino line. It’s hooked up to an ILI9488 color touchscreen display, which acts as the primary user interface. Using a stylus, or presumably a finger, the user can draw directly on the screen to specify the desired waveform for the synth to produce. The Arduino reads the step-by-step amplitude values of the drawn waveform and uses them to synthesize audio according to MIDI messages received over its serial port. Audio output is via PWM, as is common in low-cost microcontroller projects.

It’s a fun build and we’re sure [Kevin] learned plenty about wavetable synthesis along the way. We’ve seen his work on other Arduino synthesis projects before, too! Video after the break.

Continue reading “Touchscreen Makes For A Neat Wavetable Synth”