Laser Tachometer Knows How Fast You Were Spinning Back There

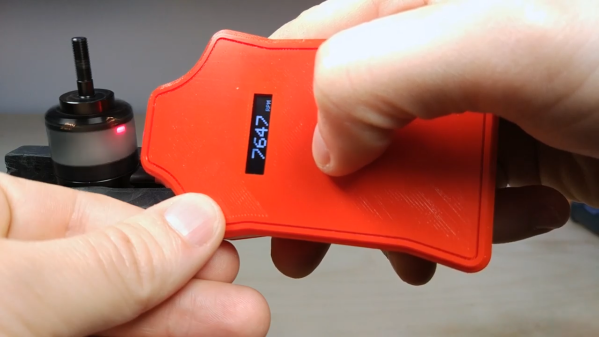
Does your drill go as fast as the manufacturer says it will? Well, you’d need a tachometer to figure that out. They’re not that expensive to buy, but as [Elite Worm] shows, they’re not that expensive to make, either — about $10 total if you get your parts from the right places. Lucky for you, he has links to everything.

Really, the links are just the tip of the iceberg here as far as the gifts that [Elite Worm] bestows upon those who choose to undertake this project. The build video (after the break, as usual; our favor to you) is fantastic, and would be perfect for a beginner because of the entrancing speed at which he builds it. The video is straight up relaxing to watch, whether you want to build one or not.

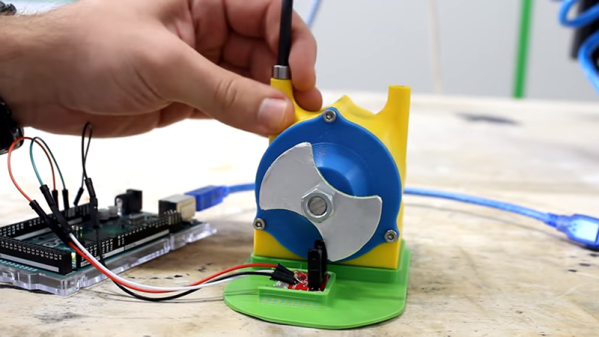
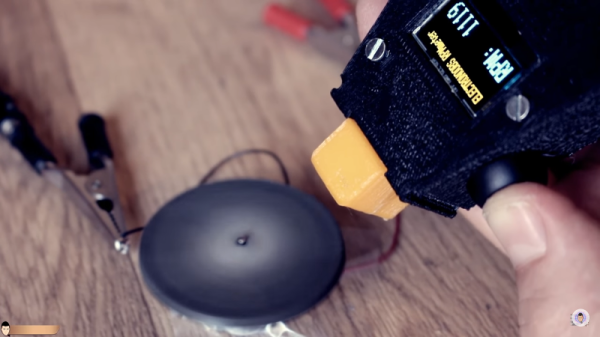
It’s a fairly simple circuit — just push the momentary switch, and the laser diode and sensor pair count the revolutions over one second. The Arduino Nano multiplies this number by 60 and displays the RPM on the OLED screen. What we absolutely love about this build is the care that taken in designing the case. There’s a designated spot for each component, and the ones without their own special holder are kept in place with printed crossbar pieces. [Elite Worm] says this has a higher refresh rate than his store-bought tacho, and we say it looks way cooler, too.

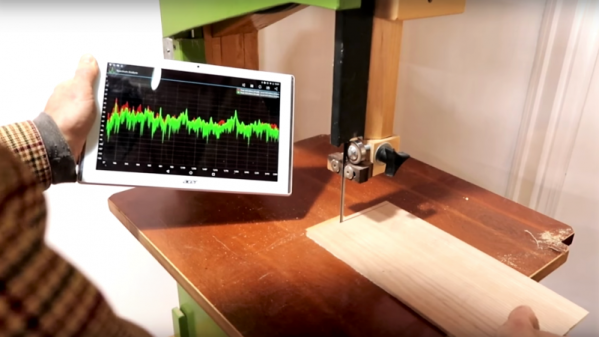
Still don’t want to make one yourself? Well, okay. Before you buy one, try using your phone to calculate RPM.

Continue reading “Laser Tachometer Knows How Fast You Were Spinning Back There”

Hacking A Cheap EBay Frequency Counter

eBay is a wondrous land, full of Star Wars memorabilia in poor condition, old game consoles at insane markups, and a surprising amount of DIY electronics. [TheHWCave] found himself tinkering with a common frequency counter kit, and decided to make a few choice improvements along the way (Youtube link, embedded below).

The frequency counter in question is a common clone version of [Wolfgang “Wolf” Büscher]’s minimalist PIC design. Using little more than a PIC16F628 and some seven-segment displays, it’s a competent frequency counter for general use. Clone versions often add a crystal oscillator tester and are available on eBay for a fairly low price.

[TheHWCave] found that the modifications were less than useful, and developed a way to turn the tester components into a more useful signal preamp instead. Not content to stop there, custom firmware was developed to both improve the resolution and also add a tachometer feature. This allows the device to display its output in revolutions per minute as opposed to simply displaying in hertz. By combining this with an optical pickup or other RPM signal, it makes a handy display for rotational speed. If you’re unfamiliar with the theory, read up on our phototachometer primer. If you’re looking to modify your own kit, modified firmware is available on Github.

We’ve seen other eBay kit specials modified before. Being cheap and using commodity microcontrollers makes them a ripe platform for hacking, whether you just want to make a few tweaks or completely repurpose the device.

[Thanks to Acesoft for the tip!]

Continue reading “Hacking A Cheap EBay Frequency Counter”

Arduino Tachometer Clock Fires On All Cylinders

We’re certainly no strangers to unique timepieces around these parts. For whatever reason, hackers are obsessed with finding new and interesting ways of displaying the time. Not that we’re complaining, of course. We’re just as excited to see the things as they are to build them. With the assumption that you’re just as enamored with these oddball chronometers as we are, we present to you this fantastic digital tachometer clock created by [mrbigbusiness].

The multi-function digital gauge itself is an aftermarket unit which [mrbigbusiness] says you can get online for as little as $20 from some sites. All he needed to do was figure out how to get his Arduino to talk to it, and come up with some interesting way to hold it at an appropriate viewing angle. The mass of wires coming out of the back of the gauge might look intimidating, but thanks to his well documented code it shouldn’t be too hard to follow in his footsteps if you were so inclined.

Hours are represented by the analog portion of the gauge, and the minutes shown digitally were the speed would normally be displayed. This allows for a very cool blending of the classic look of an analog clock with the accuracy of digital. He’s even got it set up so the fuel indicator will fill up as the current minute progresses. The code also explains how to use things like the gear and high beam indicators, so there’s a lot of room for customization and interesting data visualizations. For instance, it would be easy to scrap the whole clock idea and use this gauge as a system monitor with some modifications to the code [mrbigbusiness] has provided.

The gauge is mounted to a small project box with some 3D printed brackets and bits of metal rod, complete with a small section of flexible loom to cover up all the wires. Overall it looks very slick and futuristic without abandoning its obvious automotive roots. Inside the base [mrbigbusiness] has an Arduino Nano, a DS1307 RTC connected via I2C, a voltage regulator, and a push button to set the time. It’s a perfectly reasonable layout, though we wonder if it couldn’t be simplified by using an ESP8266 and pulling the time down with NTP.

We’ve seen gauges turned into a timepiece before, but we have to admit that this is probably the most practical realization we’ve seen of the idea yet. Of course if you want to outfit the garage with something a bit more authentic, you can always repurpose a Porsche brake rotor.

PLA Foils Homemade Tachometer

[Integza] built a Tesla turbine and wanted to know how fast it was spinning. However, he didn’t have a tachometer, and didn’t want to buy one. After a false start of trying to analyze the audio to measure the speed, he decided to use a tried-and-true method. Let the wheel break an infrared (IR) optointerruptor and count the spokes of the wheel as they go by. If you know the spacing between the spokes, you can compute the speed. There was only one problem: it didn’t work.

Turns out, PLA is at least somewhat transparent to IR. Knowing that it was a simple matter to fix some tape to the wheel that would block IR and that made things work much better. If you missed the video where he built the turbine, you might want to watch it first.

Continue reading “PLA Foils Homemade Tachometer”

Tachometer Uses Light, Arduinos

To measure how fast something spins, most of us will reach for a tachometer without thinking much about how it works. Tachometers are often found in cars to measure engine RPM, but handheld units can be used for measuring the speed of rotation for other things as well. While some have mechanical shafts that must make physical contact with whatever you’re trying to measure, [electronoobs] has created a contactless tachometer that uses infrared light to take RPM measurements instead.

The tool uses an infrared emitter/detector pair along with an op amp to sense revolution speed. The signal from the IR detector is passed through an op amp in order to improve the quality of the signal and then that is fed into an Arduino. The device also features an OLED screen and a fine-tuning potentiometer all within its own self-contained, 3D-printed case and is powered by a 9 V battery, and can measure up to 10,000 RPM.

The only downside to this design is that a piece of white tape needs to be applied to the subject in order to get the IR detector to work properly, but this is an acceptable tradeoff for not having to make physical contact with a high-speed rotating shaft. All of the schematics and G code are available on the project site too if you want to build your own, and if you’re curious as to what other tools Arduinos have been used in be sure to check out the Arduino-based precision jig.

Continue reading “Tachometer Uses Light, Arduinos”

The Tachometer Inside Your Smartphone

It’s the latest in instrumentation for the well-appointed shop — an acoustically coupled fast Fourier transform tachometer. Sounds expensive, but it’s really just using a smartphone spectrum analyzer app to indirectly measure tool speeds. And it looks like it could be incredibly handy.

Normally, non-contact tachometers are optically coupled, using photoreceptors to measure light flashing off of a shaft or a tool. But that requires a clear view of the machine, often putting hands far too close to the danger zone. [Matthias Wandel]’s method doesn’t require line of sight because it relies on a cheap spectrum analyzer app to listen to a machine’s sound. The software displays peaks at various frequencies, and with a little analysis and some simple math, the shaft speed of the machine can be determined. [Matthias] explains how to exclude harmonics, where to find power line hum, isolating commutator artifacts, and how to do all the calculations. You’ll need to know a little about your tooling to get the right RPM, and obviously you’ll be limited by the audio frequency response of your phone or tablet. But we think this is a great tip.

[Matthias] is no stranger to shop innovations and putting technology to work in simple but elegant ways. We wonder if spectrum analysis could be used to find harmonics and help with his vibration damping solution for a contractor table saw.

Continue reading “The Tachometer Inside Your Smartphone”

Nixie Tachometer Displays In Style

Nixietach II is a feature-rich tachomoter [Jeff LaBundy] built for his 1971 Ford LTD. It displays RPM with an error rate of only 0.03 RPM at 1,000 RPM

The latest iteration of a long-running project, [Jeff] approached it with three goals: the tachometer had to be self-contained and easy to install, the enclosure had to be of reasonable size, and it had to include new and exciting features over the first two versions.

The finished project consists of an enclosure mounted under the dash with a sensor box in the engine bay connected to the ignition coil. He can also flip a switch and the Nixietach serves as a dwell sensor able to measure the cam’s angle of rotation during which the ignition system’s contact points are closed.  The dash-mounted display consists of those awesome Soviet nixie tubes with a lovely screen-printed case. Its reverse has a USB plug for datalogging and a programming interface.

Hackaday has published some great car projects recently, like this chess set built from car parts and a 90-degree gearbox harvested from a wrecked car.