ESP32 Drives Tiny FM Radio

Even as music streaming services and podcast apps dominate most of our listening time, it’s still a great idea to keep a radio on hand, if for nothing else than in emergency situations. After all, blizzards, hurricanes, and other natural disasters can quickly take out both home and mobile Internet access. If you’d like to have an FM radio with the absolute smallest footprint, take a look at this one built around an ESP32.

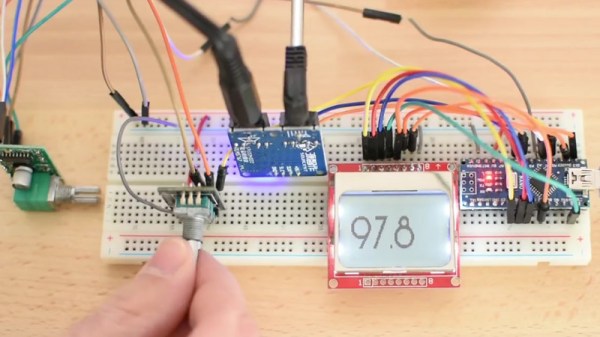
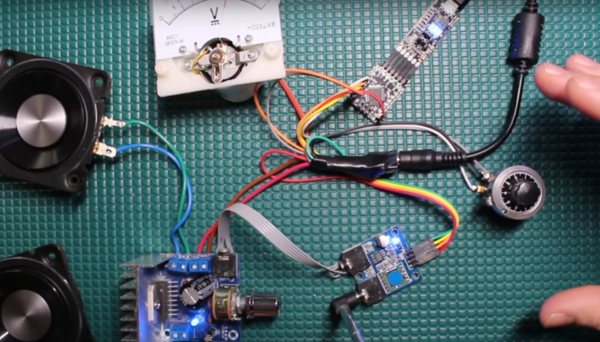
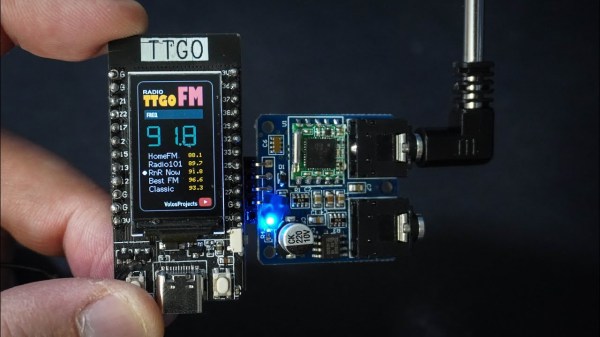
While the radio uses the ESP32 as the main control board hosted by a TTGO T-Display board which adds a 1.14 inch ST7789V IPS panel, it also makes use of the TEA5767 chip for handling the FM radio signals. As [Volos Projects] has it programmed, the ESP32 stores five preset channels which can be toggled using two buttons at the bottom of the device. There’s also some circuitry to handle output to headphones or a stereo.

For making the radio even smaller, some of the audio processing could be done on the ESP32 instead, although its much simpler to take a slightly larger footprint and offload this to an audio processing chip. Since the source code for this project is open, modifications could be done including adding seek/tune functionality instead of relying only on presets. If you’re not building this for emergencies, though, and your entire area is dominated by cookie cutter corporate-owned radio stations, an ESP32 with an internet connection is great for accessing better radio stations around the world.

Continue reading “ESP32 Drives Tiny FM Radio”

Two hands holding a 3d printed alarm clock with an LCD display, snooze button and knob on top

IO Connected Radio Alarm Clock

[CoreWeaver] creates an alarm clock that includes features one might expect in such a project, including an FM radio, snooze button inputs and a display, but goes beyond the basic functionality to include temperature sensing and a PC connection, opening the way for customizable functionality.

Block diagram for the IO connected Alarm Clock

An Atmega328 is used for the main microcontroller which communicates via I2C both to a DS1307 real time clock (RTC) and a TEA5767 FM module. The main power comes from a 9V power source with an LM317 and LM7805 linear regulators providing a 3.3V and 5V power rail, respectively. Most of the electronics are powered using 5V except for the TEA5767, which is powered from the 3.3V rail and has its I2C communication levels shifted from 5V to 3.3V. The audio output of the TEA5767 feeds directly into the TDA7052 audio amplifier to drive the speakers. Since the RTC has an auxiliary coin cell battery for power, the alarm clock can keep accurate time even when not plugged in. Continue reading “IO Connected Radio Alarm Clock”

DIy Arduino FM radio enclosure with the lid off, showing the electronics inside

DIY Arduino Due TEA5767 FM Radio

Older hackers will remember that a crystal set radio receiver was often one of the first projects attempted.  Times have changed, but there’s still something magical about gathering invisible signals from the air and listening to the radio on a homemade receiver. [mircemk] has brought the idea right up to date by building an FM radio with an OLED display, controlled with a rotary encoder.

The design is fairly straightforward, based as it is on another project that [mircemk] found on another site, but the build looks very slick and would take pride of place on any hacker’s workbench. An Arduino Due forms the heart of the project, controlling a TEA5767 module, an SH1106 128×64 pixel OLED display and a rotary encoder. The sound signal is passed through an LM4811 headphone amplifier for private listening, and a PAM8403 Class D audio amplifier for the built-in loudspeaker. The enclosure is made from PVC panels, and accented with colored adhesive tape for style.

It’s easier than ever before to quickly put together projects like this by connecting pre-built modules and downloading code from the Internet, but that doesn’t mean it’s not a worthwhile way to improve your skills and make some useful devices like this one. There are so many resources available to us these days and standing on the shoulders of giants has always been a great way to see farther.

We’ve shown some other radio projects using Arduinos and the TEA5767 IC in the past, such as this one on a tidy custom PCB, and this one built into an old radio case.

Continue reading “DIY Arduino Due TEA5767 FM Radio”

Art Deco Radio Gets FM Reception

Taking a vintage radio and cramming it full of modern, Internet-connected, guts has long been a staple of the hacking and making scene. While some might see it as a crime to take what’s arguably a legitimate piece of history and turn it into nothing more than a slipshod case for the Raspberry Pi, we have to admit there’s a certain appeal to the idea. Taking the beauty of classic design and pairing it with more modern capabilities is getting the best of both worlds.

But this project by [Nick Koumaris] is a somewhat unique take on the concept. Rather than sacrificing a real vintage piece of hardware to house the electronics, he’s designed a 3D printable case that looks like a classic 1936 AWA Radiolette. But what’s really interesting to us is that he then puts a basic FM radio inside of it.

That’s right, no Internet radio streaming or smartphone Bluetooth compatibility here. It’s just a regular FM radio, not entirely unlike the kind of hardware you’d expect to be inside of a classic radio. Of course, it’s much more modern, and [Nick] actually built it himself from a TEA5767 FM radio module and an Arduino Pro Mini.

While functionally it might not be terribly exciting, we do appreciate that he went through the trouble to make a vintage-looking user interface for the radio. While physical buttons would arguably have been more appropriate given the era, the art deco inspired font and graphics that show on the device’s Nokia 5110 LCD do look really slick.

Purists will surely be happy to see another project where a piece of vintage piece of audio equipment wasn’t sacrificed at the Altar of Hack, but we’ve also played host to many projects which weren’t nearly as concerned with historical preservation.

Continue reading “Art Deco Radio Gets FM Reception”

Parts Bin Bonanza Leads To Arduino FM Radio

Trolling eBay for parts can be bad for your wallet and your parts bin. Yes, it’s nice to be well stocked, but eventually you get to critical mass and things start to take on a life of their own.

This unconventional Arduino-based FM receiver is the result of one such inventory overflow, and even though it may take the long way around to listening to NPR, [Kevin Darrah]’s build has some great tips in it for other projects. Still in the mess-o-wires phase, the radio is centered around an ATmega328 talking to a TEA5767 FM radio module over I²C. Tuning is accomplished by a 10-turn vernier pot with an analog meter for frequency display. A 15-Watt amp drives a pair of speakers, but [Kevin] ran into some quality control issues with the amp and tuner modules that required a little extra soldering as a workaround. The longish video below offers a complete tutorial on the hardware and software and shows the radio in action.

We like the unconventional UI for this one, but a more traditional tuning method using the same guts is also possible, as this retro-radio refit shows.

Continue reading “Parts Bin Bonanza Leads To Arduino FM Radio”

Retro-fit Old Radio With Arduino And FM Module

“You can’t put new wine in old bottles” – so the saying goes. But you would if you’re a hacker stuck with a radio built in 2005, which looked like it was put together using technology from 1975. [Marcus Jenkins] did just that, pulling out the innards from his old radio and converting it to an Arduino FM radio.

His cheap, mains powered radio was pretty bad at tuning. It had trouble locating stations, and tended to drift. One look at the insides, and it was obvious that it was not well engineered at all, so any attempts at fixing it would be pointless. Instead, he drew up a simple schematic that used an Arduino Nano, an FM radio module based on the TEA5767, and an audio amplifier based on the LM386.

A single button on the Arduino helps cycle through a range of preset frequencies stored in memory. The Arduino connects to the FM radio module over I2C. The existing antenna was connected to the TEA5767 module. The radio module outputs stereo audio, but [Marcus] was content with using just a mono channel, as it would be used in his workshop. The audio amplifier is pretty straightforward, based on a typical application found in the data sheet. He put it all together on proto-board, although soldering the FM radio module was a bit tricky. The Arduino code is quite simple, and available for download (zip file).

He retained the original tuning knob, which is no longer functional. The AM-FM selector knob was fitted with a micro-switch connected to the Arduino for selecting the preset stations. Almost everything inside was held together with what [Marcus] calls “hot-snot” glue. The whole exercise cost him a few Euros, and parts scavenged from his parts bin. A good radio could probably be had for a few Euros from a yard sale and much less effort, but that wouldn’t be as cool as this.

Go deeper and explore how FM signals are modulated and demodulated for playback.