Machine Learning Makes Sure Your LOLs Are Genuine

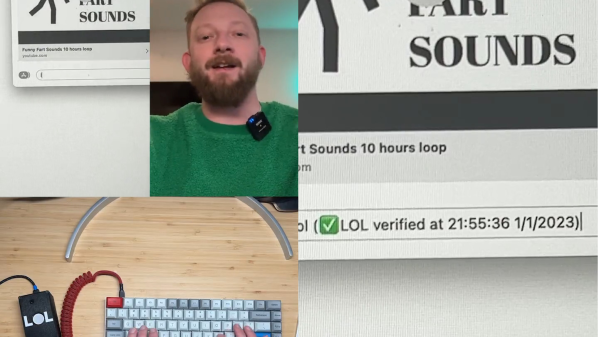
There was a time not too long ago when “LOL” actually meant something online. If someone went through the trouble of putting LOL into an email or text, you could be sure they were actually LOL-ing while they were typing — it was part of the social compact that made the Internet such a wholesome and inviting place. But no more — LOL has been reduced to a mere punctuation mark, with no guarantee that the sender was actually laughing, chuckling, chortling, or even snickering. What have we become?

To put an end to this madness, [Brian Moore] has come up with the LOL verifier. Like darn near every project we see these days, it uses a machine learning algorithm — EdgeImpulse in this case. It detects a laugh by comparing audio input against an exhaustive model of [Brian]’s jocular outbursts — he says it took nearly three full minutes to collect the training set. A Teensy 4.1 takes care of HID duties; if a typed “LOL” correlates to some variety of laugh, the initialism is verified with a time and date stamp. If your LOL was judged insincere – well, that’s on you. See what you think of the short video below — we genuinely LOL’d. And while we’re looking forward to a ROTFL verifier, we’re not sure we want to see his take on LMAO.

Hats off to [Brian] for his attempt to enforce some kind of standards online. You may recall his earlier attempt to make leaving Zoom calls a little less awkward, which we also appreciate.

Continue reading “Machine Learning Makes Sure Your LOLs Are Genuine”

A NABU PC opened up and powered on

NABU PC Gets CPU Upgrade, Emulates A TRS-80

The NABU PC caused a bit of a buzz in the retrocomputing community a couple weeks back. After all, it doesn’t happen often that a huge batch of brand-new computers from the 1980s suddenly becomes available on eBay. Out of the box, the computer itself isn’t that useful: with no internal storage, or any application software whatsoever, it can really only serve as a bare-bones development platform. But since its hardware is quite similar to that of other contemporary home computers, emulating one of those shouldn’t be too difficult, which is exactly what [Ted Fried] did: he managed to turn his NABU into a TRS-80 clone by using his MCLZ8 CPU emulator.

The MCLZ8 is basically an 800 MHz Teensy CPU with an adapter board that allows it to be plugged into a Z80 socket. It emulates the Z80 CPU in real-time, but it also holds the TRS-80 ROM and performs real-time translation between peripherals. On the input side, it reads out the ASCII characters coming in from the NABU’s 8251A UART and stores them in the virtual TRS-80’s keyboard buffer. On the output side, it transfers the TRS-80’s video data to the NABU’s TMS9918 video chip.

The motherboard of a NABU PC with a Teensy-based CPU upgradeOne problem [Ted] ran into was a difference in screen resolution: the NABU has a 40×24 character display, while the TRS-80 generates a 64×16 character image. [Ted] solved the vertical difference by simply keeping the NABU logo on the screen at all times, and decided to just ignore the 24 characters that drop off the right side – it’s not a big issue for a typical BASIC program anyway.

The repurposed NABU might not be a perfect TRS-80 clone, but that’s not the point: it shows how easily the NABU’s hardware can be reprogrammed to do other things. For example, [Ted] has already started work on a new project that doesn’t emulate the Z80, but instead runs code directly on the Teensy’s ARM A9 processor. As you might imagine, this gives the NABU several orders of magnitude more processing power, although the practical use of this is limited because the CPU still has to wait for the NABU’s slow data bus and display chip. [Ted] explains the setup and runs a few impressive demos in the video embedded below.

[Ted]’s NABU experiments are a great example of the Teensy board’s flexibility: we’ve already seen how it can emulate a Z80 as well as an 8088. We’re also curious to see what others will develop with the NABU’s hardwareif they can still buy it, of course.

Continue reading “NABU PC Gets CPU Upgrade, Emulates A TRS-80”

Teensy Becomes Tiny Handheld Computer, Plays Emulators

Science fiction predicted that we would one day all carry around tiny computers of great power. While smartphones are great, those predictions were more based on cuter systems that more closely approximated existing computers, with keyboards and screens. [Jean-Marc Harvengt] has built something along those very lines, and it’s called the T-COMPUTER.

This build centers around the mighty Teensy 4.1. That means it’s got an 800 MHz Cortex-M7 processor, 1 MB of RAM, and 8 MB of flash – eclipsing the specs of many retrocomputers of yesteryear. [Jean-MarcHarvengt] has paired the Teensy with a 42-key keyboard and a TFT screen, making a compact handheld computer platform. It’s also got VGA out for display on a bigger screen, along with USB and an old-school Atari joystick port! Power is via a small rechargeable lithium cell on the back, and 16-bit stereo audio is available via a standard 3.5mm jack. There’s also a little GPIO available if you need to interface with something.

It’s capable of emulating the Commodore 64 and Super Nintendo, as well as more obscure systems like the Atari Lynx. And before you ask – yes, it can run DOOM. It’s a fun little platform that would be enjoyable for retrogaming and hacking on the go. If you want to build your own, files are readily available on Github to recreate the system.

Handheld computer builds are always growing in popularity now that so much computing power can be had in a tiny devboard formats. If you’ve built your own neat little rig, be sure to let us know! Video after the break.

Continue reading “Teensy Becomes Tiny Handheld Computer, Plays Emulators”

Getting To The TrackPoint Quicker

Love it or hate it, TrackPoint can be a powerful tool. Love it or hate it, the idea of moving the mouse without removing your hands from the keys has an appeal. [Alon Swartz] incorporated one into his custom wired split mechanical keyboard and wrote a helpful guide on how to do it yourself.

The first step was to determine the pinout of the Trackpoint, which he provides a handy repository of various devices with annotations and pictures. The next step is swapping the little rubber nub at the top for something a bit longer. As the PCB sits below the keys, a labret cheek piercing happens to be a perfect candidate. Strong, thin, easily obtainable in different lengths, and threaded on one end. With jewelry in hand, [Alon] created a reset circuit with just a few resistors and a capacitor so the teensy can trigger a reset of the Trackpoint. The keyboard’s TMK firmware also needed a few tweaks to support reading the Trackpoint.

It’s a great guide, and we love the use of the jewelry as a piece of the keyboard. A knitting needle was used in a previous attempt to add a Trackpoint to a mechanical keyboard, and we’re excited to see what other household items end up in keyboards.

Collaborative Effort Gets Laser Galvos Talking G-Code

Everyone should know by now that we love to follow up on projects when they make progress. It’s great to be able to celebrate accomplishments and see how a project has changed over time. But it’s especially great to highlight a project that not only progresses, but also gives back a little to the community.

That’s what we’re seeing with [Les Wright]’s continuing work with a second-hand laser engraver. It was only a few weeks ago that we featured his initial experiments with the eBay find, a powerful CO2 laser originally used for industrial marking applications. It originally looked like [Les] was going to have to settle for a nice teardown and harvesting a few parts, but the eleven-year-old tube and the marking head’s galvanometers actually turned out to be working just fine.

The current work, which is also featured in the video below, mainly concerns those galvos, specifically getting them working with G-code to turn the unit into a bit of an ad hoc laser engraver. Luckily, he stumbled upon the OPAL Open Galvo project on GitHub, which can turn G-code into the XY2-100 protocol used by his laser. While [Les] has nothing but praise for the software side of OPAL, he saw a hardware hole he could fill, and contributed his design for a PCB that hosts the Teensy the code runs on as well as the buffer and line driver needed to run the galvos and laser. The video shows the whole thing in use with simple designs on wood and acrylic, as well as interesting results on glass.

Of course, these were only tests — we’re sure [Les] would address the obvious safety concerns in a more complete engraver. But for now, we’ll just applaud the collaboration shown here and wait for more updates.

Continue reading “Collaborative Effort Gets Laser Galvos Talking G-Code”

Teensy Spectrum Analyzer Has 170 Channels

While high-fidelity audio has come a long way in the past several decades, a lot of modern stereo equipment is still missing out on some of the old analog meters that were common on amplifiers and receivers of the 60s through the 80s. Things like VU meters don’t tend to be common anymore, but it is possible to build them back in to your sound system with the help of some microcontrollers. [Mark] shows us exactly how to reclaim some of the old-school functionality with this twin audio visualizer display.

Not only does this build include two displays, but the microcontroller is keeping up with 170 channels in real-time in order to drive the display. What’s more impressive is that it’s being done all on a Teensy 4.1. To help manage all of the data and keep the speed as fast as possible it uses external RAM soldered to the board, and a second Teensy audio board is used to do the real time FFT analysis. Most of the channels are sent to the display hosting the spectrum analyzer but two are reserved for left and right stereo VU meters on the second display.

The project from [Mark] is originally based on this software from [DIYLAB] so everything is open-source. While it was originally built for a specific piece of hardware, [Mark] has it set up with a line in and line out plus a microphone input so it can be used for virtually any audio hardware now. For another take on the classic VU meter, take a look at this design based on an Arudino instead.

Continue reading “Teensy Spectrum Analyzer Has 170 Channels”

A Gameport Joystick To USB-MIDI Converter

These days, live music performance often involves electronic synthesizers and computers rather than traditional instruments played by hand. To aid in his own performances, [alekappa] built a special interface to take signals from a joystick and convert them to MIDI messages carried over USB.

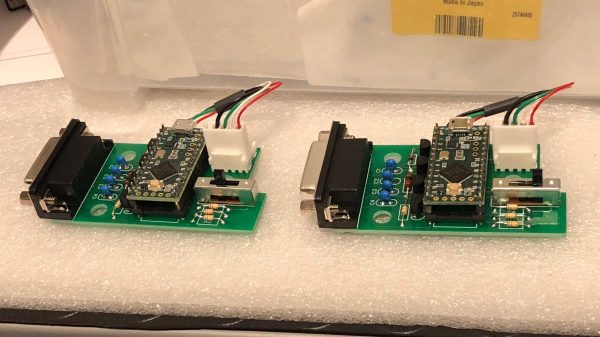
The build is simple and straightforward, using a Teensy LC to interface with a simple gameport joystick. With a smattering of simple components, it’s easy to read the outputs of the joystick with only a little debounce code needed to ensure the joystick’s buttons are read accurately. Similarly, analog axes are read using the analog-to-digital converters onboard the microcontroller.

This data is then converted into control changes, note triggers and velocity levels and sent out over the Teensy LC’s USB interface. A mode switch enables changes to the system’s behaviour to be quickly made. The device is wrapped up in a convenient housing nabbed from an old Gameport-to-USB converter from many years ago.

It’s a neat project and we’re sure the joystick allows [alekappa] to add a new dimension to his performances on stage. We’ve seen other great MIDI controllers, too, from the knitted keyboard to the impressive Harmonicade. If you’ve got your own mad musical build under construction, don’t hesitate to drop us a line!