Calibrating Thermal Cameras With Hot Patterned Objects

Thermal cameras are great if you want to get an idea of what’s hot and what’s not. If you want to use a thermal camera for certain machine vision tasks, though, you generally need to do a geometric calibration to understand what the camera is seeing and correct for lens distortion. [Henry Zhang] has shared various methods of doing just that.

It’s all about generating a geometrically-regular thermal pattern.

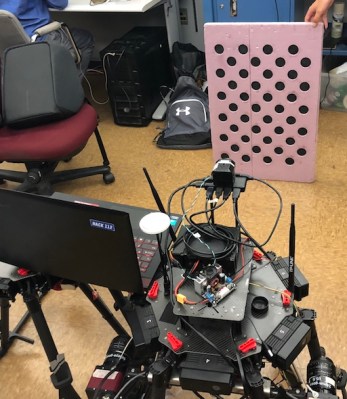
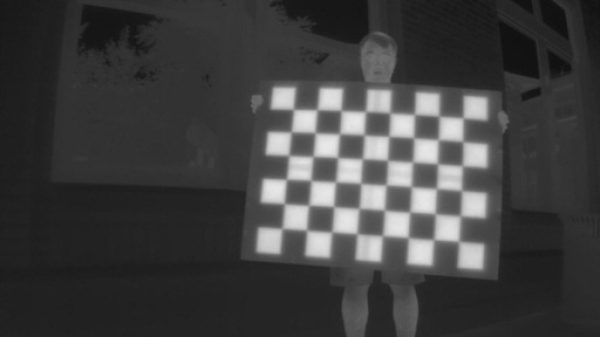
To calibrate a thermal camera, first you need a thermal pattern. This is like typical test image for a camera or screen, but with temperatures instead of colors. [Henry] explains several methods for doing this. One involves using a grid of nichrome wires to create a thermal pattern for calibration purposes. Another uses discs of cold aluminium inserted into a foam board. Even a simple checkerboard can work, with the black spaces heating up more from ambient sunlight than their neighbouring white spots. [Henry] then explains the mathematical techniques used for calibrating based on these patterns.

It’s a useful primer on the topic if you’re working with thermal camera systems. We’ve looked at some other interesting machine vision topics before, too. If you’ve got any great thermal imaging tips of your own, don’t hesitate to drop us a line!


Not Just A Floor Wax But An Embossing Powder!

The embossing process used in the creation of some of your fancier wedding invitations and business cards is an interesting one. It’s often called thermography or thermographic printing. Slow-drying, wet ink is applied to a substrate. The ink is dusted with a thermoplastic polymer called embossing powder, and a heat source raises the ink while drying it.

Commercial embossing powder costs about $10 an ounce. As [Ken] discovered, its manufacture is quite closed-source to boot. He set about creating his own embossing powder, and succeeded with a combination of commonly available floor finish and distilled white vinegar. A standard-sized bottle of floor finish yielded about four ounces of homemade embossing powder.

How does this work? The floor finish is an acrylic-based stable emulsion. Adding vinegar destabilizes the emulsion, decreasing its pH and setting the polymer free.  It’s a fairly fast process, which you can see in the second video that accompanies [Ken]’s write up. From there, it’s mostly a matter of straining the material, letting it dry, and pulverizing the coarse matter into powder. In the first video, [Ken] performs a comparison test of Ranger, a commercial powder, and his own concoction.

For a completely different take on home embossing, check out this soda-can-turned-keepsake-box.