DIY Rotary Tool

DIY Rotary Tool

[Shashank] has a modest tool collection but is missing a rotary tool. He needed one for a project he was working on but didn’t think that it would get much use after the current project was completed. So instead of buying a rotary tool, he decided to make one to get the job done.

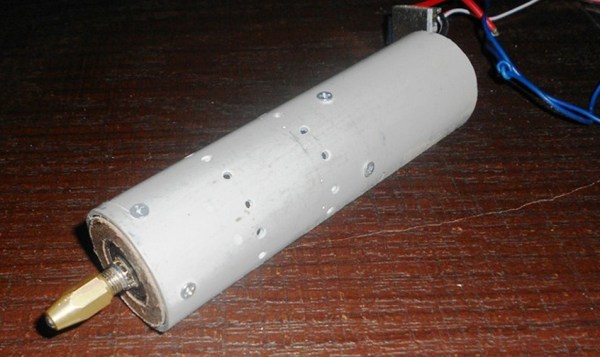
The project started out with a 40mm PVC pipe that would serve a the main body of the tool. Two MDF disks were cut to fit inside the pipe. One was used for mounting an RC vehicle brushless motor and the other was bored out to accept a pair of bearings. The bearings supported a modified pin vise that acts as the chuck for securing rotary tool bits. A 20-amp ESC and a servo tester control the motor’s speed and can get the motor up to 18,000 rpm.

Although this worked for a while, [Shashank] admits it did fall apart after about 20 hours of use. The MDF bearing mounts crumbled, thought to be a result of vibration due to mis-assignment between the motor and pin vise. He suggests using aluminum for the bearing mounts and a flexible coupling to connect the motor to the pin vise. If you’re interested in making your own rotary tool but don’t have any spare motors kicking around,  this 3D printed vacuum-powered rotary tool may be for you.

Massive Wood Joints With Chainsaw Mortiser

mortise-tenon
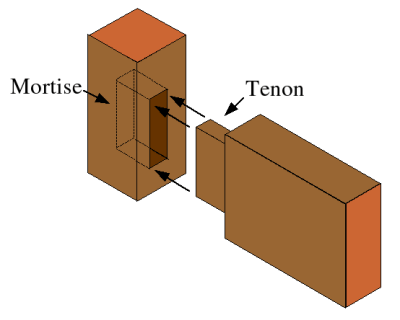
One common joinery method used in wood working is the mortise and tenon. A mortise is basically a hole in a piece of wood and the tenon is another piece of wood cut to tightly fit in that hole. The tenon is usually secured in place with either glue or a wooden pin or wedge.

The folks over at [WayOutWest] were building a fence and needed a way to cut a bunch of mortises in 4×4 inch posts to accept 2×6 inch rails. Although they had a chainsaw, trying to cut a mortise with it by hand turned out to be super dangerous because the chainsaw would kick up every time the tip of the blade touched the wood. The team had some parts kicking around so they made a fixture to hold the chainsaw as it is plunged into the 4×4’s.

The contraption’s frame is made from an old scaffolding stand and the slides are just pipes inside of pipes. The chainsaw is bolted to the slide and a lever moves it forward and back. A second lever moves the piece of wood getting mortised up and down so that the mortise can be cut to any width. This is a pretty ingenious build that only cost a little effort and will end up saving a bunch of time mortising countless fence posts.

Continue reading “Massive Wood Joints With Chainsaw Mortiser”

How To Zip, Stick, And Screw Stuff Together

One of the first problems every new hacker/maker must solve is this: What’s the best way to attach part “A” to part “B”. We all have our go-to solutions. Hot glue, duck tape ( “duct tape” if you prefer) or maybe even zip ties. Super glue, epoxy, and if we’re feeling extra MacGyver-ish then it’s time for some bubble gum. For some Hackaday readers, this stuff will seem like old hat, but for a beginner it can be a source of much frustration. Even well versed hackers might pick up a few handy tips and tricks presented in this video after the break.

In part one of this series, [Ben Krasnow] shows us the proper use of just a few of the tools and techniques he uses in his shop. [Ben] starts out with a zip-tie tool which he loves in part because of a tension setting that ensures it’s tight but not overly. He moves on to advice for adhesive-vs-material and some tips on using threaded fasteners in several different circumstances. He also included a list of the parts and tools he uses so you don’t have to go hunting them down.

[Ben] is no stranger to us here at Hackaday. He does some epic science video. You can subscribe to his channel or follow his blog if you enjoy what you see.

Continue reading “How To Zip, Stick, And Screw Stuff Together”

The Four Thousand Dollar MP3 Player

[Pat]’s friend got a Pono for Christmas, a digital audio player that prides itself on having the highest fidelity of any music player. It’s a digital audio device designed in hand with [Neil Young], a device that had a six million dollar Kickstarter, and is probably the highest-spec audio device that will be released for the foreseeable future.

The Pono is an interesting device. Where CDs have 16-bit, 44.1 kHz audio, the Pono can play modern lossless formats – up to 24-bit, 192 kHz audio. There will undoubtedly be audiophiles arguing over the merits of higher sampling rates and more bits, but there is one way to make all those arguments moot: building an MP3 player out of an oscilloscope.

Digital audio players are limited by the consumer market; there’s no economical way to put gigasamples per second into a device that will ultimately sell for a few thousand dollars. Oscilloscopes are not built for the consumer market, though, and the ADCs and DACs in a medium-range scope will always be above what a simple audio player can manage.

[Pat] figured the Tektronicx MDO3000 series scope sitting on his bench would be a great way to capture and play music and extremely high bit rates. He recorded a song to memory at a ‘lazy’ 1 Megasample per second through analog channel one. From there, a press of the button made this sample ready for playback (into a cheap, battery-powered speaker, of course).

Of course this entire experiment means nothing. the FLAC format can only handle a sampling rate of up to 655 kilosamples per second. While digital audio formats could theoretically record up to 2.5 Gigasamples per second, the question of ‘why’ would inevitably enter into the minds of audio engineers and anyone with an ounce of sense. Short of recording music from the master tapes or another analog source directly into an oscilloscope, there’s no way to obtain music at this high of a bit rate. It’s just a dumb demonstration, but it is the most expensive MP3 player you can buy.

Wooden Band Saw Fears Its Wood-Cutting Brethren

DIY Wooden Bandsaw

What is cooler than building a band saw out of wood? Building two, of course! And that is exactly what [Pekka] did. The first was a small bench top model while the second was a much larger version with the saw blade strung between big 13-3/4 inch wheels. For those who are unfamiliar with band saws, they are tools that have a long thin blade that is routed around rotating wheels. The wheels are spread apart to make the blade taut. Unlike the reciprocating action of a jigsaw, saws-all or scroll saw, the band saw blade continually rotates in one direction. These blades are typically thin making it easy to cut irregular and curved shapes.

The frame of [Pekka’s] larger machine is made from 35mm (~1-3/8″) plywood. This proved to be a sturdy frame material. The previously mentioned wheels were made by gluing pieces of oak together, mounting the assembly on a wood lathe and turning the outer diameter down to size. By using multiple piece of wood to construct the wheels allows the grain direction of each portion to be parallel with the blade. This method of construction ensures any expansion/contraction of the wood is uniform around the wheel. A strip of rubber around the blade’s outer diameter provides the friction required to prevent the blade from slipping.

[Pekka’s] friend was nice enough to turn the flanged axle shafts on his metal lathe. These shafts support the wooded wheels and are mounted in pillow block bearings. The upper pillow blocks are mounted to a sliding support that allows adjusting the tension of the saw blade. [Pekka] was not going to be satisfied with a one-speed band saw so he grabbed a motor he had kicking around that originally came from a wood lathe and already had 4 different sized pulleys mounted on the shaft.

This is a great project that shows what can be done with a little desire and ingenuity.

Home Made Miter Saw Is Not Completely Dangerous

Home Made Miter Saw

If the term ‘home made miter saw’ instantly instills frightening images of severed limbs into your head, you’re not alone. A quick internet search will yield some pretty hokey tool builds, we’ve even featured a few here on hackaday. This saw is different. [Pekka] made a pretty cool saw for cutting very accurate angles in wood.

This saw was purpose built with one goal in mind: cutting wood that will be glued together for use in segmented turning. Segmented turning is shaping a piece of wood stock that is composed of many different types of wood. This results in a very visually interesting product.

Home Made Miter Saw
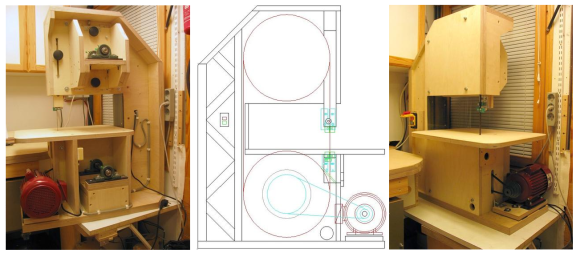
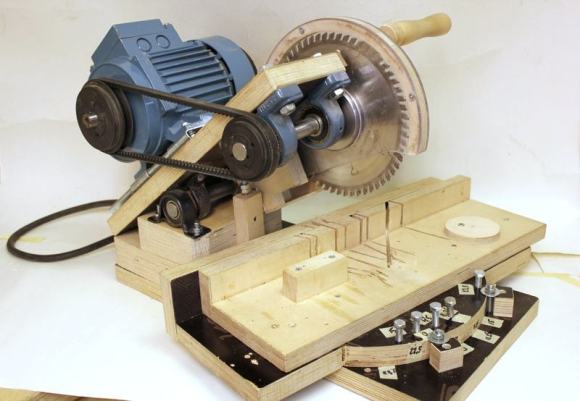
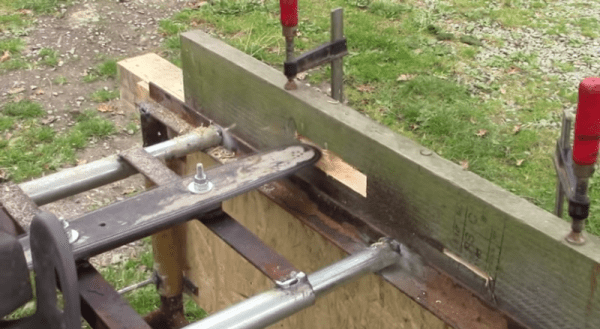
Most of the saw is made from plywood. The hinge and supports for the arbor are beefy off-the-shelf pillow blocks. A 3-phase motor with speed control transmits power to the arbor via a belt. Belt tension is adjusted by sliding the motor further back along the motor mount base. [Pekka] took care so that the entire pivoting assembly was nearly balanced adding to the ease of use.Typical miter saws rotate the blade to achieve different angles of cuts. This design rotates the saw fence.

For safety there are a pair of polycarbonate blade guards and a micro switch on the handle that won’t let the saw start unless it is depressed. The micro switch has a secondary function also, when let go it applies an electronic brake to the motor so that the spinning blade does not touch the work piece when lifting the blade back up.

Rebuilding A Bridgeport Mill

It looks like the Internet’s resident steampunker is moving up a century or two. [Jake Von Slatt] rebuilt the CNC portion of a Bridgeport Series II mill so it can interface with a computer. It’s a feat even more impressive than moving the mill into [Jake]’s garage.

The first step of the build was tearing out the BOSS 5 industrial microcomputer and replacing it with a Win XP laptop running ArtSoft’s Mach 3. This allows G-code to be displayed directly on the screen. The old power supply for the mill did give [Jake] a few problems. The Gecko stepper drivers that replace the old electronics couldn’t handle the voltage of the old power supply. That can be dealt with by opening the transformer and removing a few turns of wire.

[Jake] has been sending in a few of his hacks as of late, so it’s good to see Hack a Day has another fan, especially one of [Mr. Von Slatt]’s caliber. There is a problem with the mill modifications though – [Jake] hasn’t figured out how to program it. If any HaD readers would like to chime in on the best way to program G-code for the mill, feel free to leave a message in the comments.