Soundwave Tunes Up Your Portable Workbench

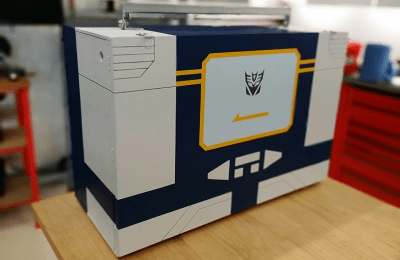
[Tez_Gelmir] built an awesome portable workbench. Not satisfied with just mundane designs, he patterned his box after Soundwave from the classic Transformers: Generation 1 series. This portable bench keeps his tools organized and ready to roll out.

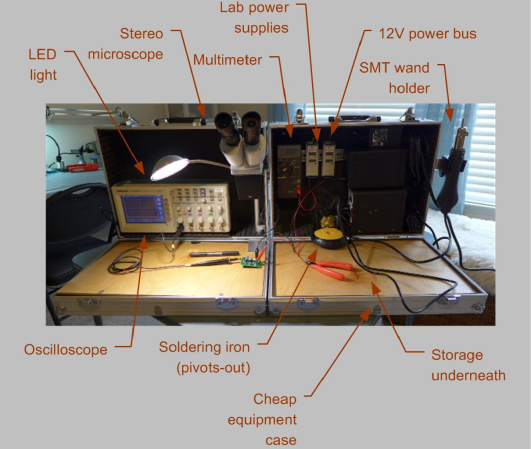
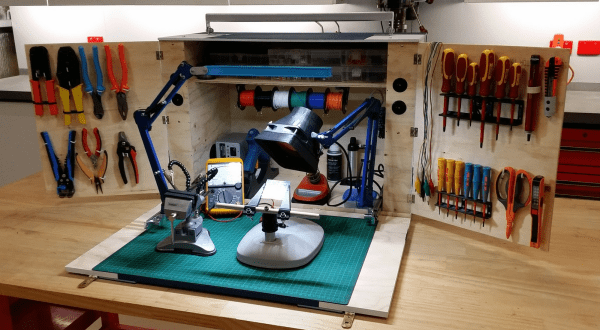
[Tez] has all the basic tool groups covered – screwdrivers small and large, pliers, crimpers, soldering iron, fume extractor, vice, and wire spool. He’s also got room for parts boxes to hold his components.

soundwaveThe basic box is built from a single sheet of 7mm plywood. The front work area is a smaller piece of 12mm plywood. Working with 7mm plywood did prove to be a challenge – [Tez] had to use some very small screws for his hinges.  The basic box construction was easy though – [Tez] used a pneumatic nailer and PVA (wood) glue.

[Tez] used a number of 3D printed parts in his design. He kept the Transformer theme going with a Decepticon logo built into his screwdriver holder. The fume extractor and lamp were also especially clever – [Tez] mounted them to drawer sliders, so they are there when he needs them, and out of the way when he doesn’t.

[Tez] spent quite a bit of time setting up his power system, and it shows. The inside of the box is framed with four power points. The main cord has its own “mouse door”, and everything tucks neatly away when not in use.

The Soundwave paint job is what sets this box apart – [Tez] spent quite a bit of time getting everything just right. It looks like Ravage is ready to spring out at any moment.

We really love this setup – Our only suggestion would be to add some sheet metal to protect the corners of the box while in transit.

Continue reading “Soundwave Tunes Up Your Portable Workbench”

Auto Roll-up Tool Storage

Auto Roll-up Tool Storage

[Anred’s] got the right idea. Everybody and their mother has a toolbox: rectangular, wooden, crowded. You’re not impressing anyone with that old thing. Instead, why not spice it up by rolling it up, with a tool case that spins to store in style?

This storage hack seems to draw its inspiration from field medic roll-up bags, where everything’s laid out for easy access with a quick toss. [Anred] started by taking inventory of all the items he wanted to use on a regular basis, organizing them across a sturdy fabric. Next, he marked all the mounting spots and affixed some elastic material with needle and thread to hold each tool in place. The tools then roll up around a center rod, like an upside-down pull curtain.

Continue reading “Auto Roll-up Tool Storage”

Portable SMT Lab For Hacker On The Go

smt-lab2

We admit it, we’re suckers for workbenches and toolboxes. [Jon] must feel the same way, because he built this portable surface mount electronics lab. It’s a beast of a project, which might be why it’s project #666 on Hackaday.io. [Jon] spends a lot of time working off site, and keeps finding himself without proper surface mount soldering tools. Ever tried to stack an 0603 resistor with a 40 watt pistol grip iron? Take our word for it, the results are not pretty.

[Jon] started with two cheap aluminum cases from Harbor Freight. He loaded them up with the typical lab supplies: soldering iron, oscilloscope, multimeter, dual lab supplies, and a good assortment of hand tools. He then added a few choice SMT tools: A hot air tool, a good LED light, and a stereo magnifier. Many of the tools are mounted on DIN rail along the rear of the cases.  All the low voltage equipment runs on  a common 12V bus.

We really like what [Jon] did with the tops of the cases. Each lid contains a plywood sheet. When the cases are opened, the plywood becomes a work surface. As an added bonus, the wood really strengthens the originally flimsy tool cases. The only thing we would add is a good portable anti-static mat.

The final build is really slick. Once the cases are open, four bolts act as feet. The microscope swings out, and the hot air gun hangs on the right side. Plug in power and you’ve gone from zero to SMT hero in under 1 minute.

Guitar Amp Turned Tool Cabinet

amp cabinet

While HANDMADE.hackaday was a rather ephemeral experiment, we still come across some mighty fine examples of handmade projects that we think deserve to grace the pages of Hack a Day. As is the case with this beautifully repurposed guitar amp turned tool cabinet.

After gutting the original amp, [Max] set to bending some 22ga steel plate into drawers. He enjoys using that particular gauge because its fairly easy to cut and bend, while still being rigid enough for most applications. Once content with the bending jobs, he attached ball bearing roller slides to the sides and installed the drawers. Making use of the original amp face for the top drawer he cleaned up all the edges and gave it some new paint — it’s a beautifully crafted example of what you can do with a bit of sweat and elbow grease!

And for the audiophiles, don’t worry — the amp wasn’t functional before it was cannibalized for its casing.

[Via Reddit]

Building A Boombox Where Tools Are Meant To Go

[Danman1453] is ready to face the rest of his summer thanks to this toolbox boombox he built for outside use. It’s always nice to have some tunes when laboring at those not-so-fun jobs (we’ve got some windows that need re-glazing and you can bet we’re not doing that in silence). But if you can’t really hear it what’s the point? The highest volume [Danman1453] could get out of the consumer options he tried just wasn’t cutting it, and that led him to this project.

The only thing he bought to complete the boombox was some black spray paint. He already had an old toolbox for the enclosure, a head unit and the larger speakers from an old car, and the small speakers came from a set of computer speakers. Those are cleverly mounted in the compartments on the lid of the toolbox, pointed down so that they’re oriented correctly when the lid is propped open. The faceplate was even recycled by using wood an old shipping pallet.

He would like a little bit of advice though. When he’s playing a CD and the bass really gets bumping the head unit tends to skip. Does anyone have an easy method of isolating it from the speakers while still keeping it safe and sound in the portable enclosure?

On-the-go Desktop

Here’s a desktop you can take with you. [Rbean] built it at a hackerspace in Milwaukee, Wisconsin (go Badgers!) using very basic materials and techniques. The utilitarian construction of the wooden body reminds us of Cub Scout tool box projects. It features an open space in the top which house the keyboard and mouse during travel. The blue strap lets you sling all forty pounds over one shoulder, but we’d also love to see a thick dowel to go along with the toolbox concept we’ve got stuck in our mind.

The lower half of the case is removable, serving as the mounting area for what looks like a mini ITX motherboard, hard drive, and full-sized power supply. As you can see the LCD screen mounts to the side of the box which allows you to rest the unit on its side and protects the display if the whole thing were to be knocked over. [Rbean] mentions that he’d like to try another revision using aluminum instead of wood, but we like this version. The only thing we’d want to see added is a set of speakers mounted inside the case on either side of the monitor.

C Sharp Development 101 – Part 2: Toolbox Controls

In this tutorial we are going to start finding out more about the toolbox we utilized in the previous tutorial.  The Controls available in the toolbox are quite extensive and allow users to simplify a variety of everyday tasks such as manually creating and instantiating a textbox on a windows form.  At the end of this tutorial you should be comfortable finding Controls in the Visual Studio Toolbox, alter or produce code to link tools together using event handlers and ultimately get a better sense of Visual Studio, it’s layout and how to easily navigate it.