Wooden You Love To Build A Ribbon Microphone?

Carbohydrate foams derived from dead trees are not the first material that springs to mind when considering building audio equipment. But really, there’s no reason not to explore new materials for jobs normally reserved for metal or plastic, and when pulled off right, as with this wooden ribbon microphone, the results can both look and sound great.

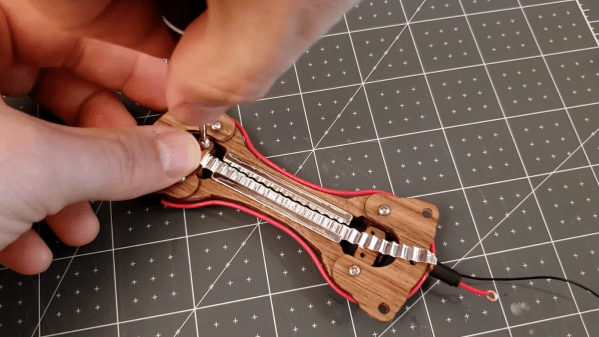
To be fair, there are plenty of non-wood components in [Frank Olson]’s replica of a classic RCA model 44 microphone. After all, it’s hard to get wood to exhibit the electromagnetic properties needed to turn acoustic energy into electric currents. But that doesn’t mean that wood, specifically walnut veneer, isn’t front and center in this design. [Frank] worked with thin sheets of veneer; cut into shape with a commercial vinyl cutter and stacked up with alternating grains, the wood was glued up with copious cyanoacrylate adhesive to form a plywood of sorts. The dogbone-shaped body was fitted with two neodymium magnets, leaving a gap just wide enough for the microphone’s ribbon diaphragm. That was made from a thin piece of aluminum foil that was corrugated using a DIY crimp roller. Suspended between the magnets and connected to leads, the mic element was adorned with a wood and fabric windscreen and suspended from elastic bands in a temporary frame for testing. The narration on the video below was recorded with the mic, which sounds quite nice to our ears.

We’ve seen ribbon microphones before, as well as wooden microphones, but this is the first time we’ve seen a wooden ribbon microphone. It looks as though [Frank] has more work he wants to do to finish it off properly, and we eagerly await the finished product.

Continue reading “Wooden You Love To Build A Ribbon Microphone?”

Cool Off With A Piezo And A Glass Of Water

Some cool-mist humidifiers work by flinging water at a vaporizer, but our favorite kind uses a piezoelectric transducer. These work by using high-frequency sound waves to pound the surface of the water with mechanical energy. That energy introduces standing waves that force the water to break apart into a fine mist on the surface of the piezo disk.

The driving circuit for this DIY mist maker uses a 555 to generate 113 KHz, a trimmer potentiometer to fine-tune it, and a MOSFET to amplify the signal. You don’t need much more than that and a handful of passives to recreate this cool junk box experiment, but the spec of the piezo disk is quite important. The circuit is designed for atomizing transducers, which have a resonant frequency of 113 KHz — much higher than your average junk box piezo. Check out the demo and build video after the break.

Atomizing transducers can do way more than than moisten the air for our comfort. They’re not picky about where the water comes from, so if you have enough of them, you can dry a load of laundry in a few minutes.

Continue reading “Cool Off With A Piezo And A Glass Of Water”

Brass And Nickel Work Together In This Magnetostrictive Earphone

When you go by a handle like [Simplifier], you’ve made a mission statement about your projects: that you’ll take complex processes and boil them down to their essence. So tackling the rebuilding of the humble speaker, a device he himself admits is “both simplified and optimized already,” would seem a bit off-topic. But as it turns out, the principle of magnetostriction can make the lowly speaker even simpler.

Most of us are familiar with the operation of a speaker. A powerful magnet sits at the center of a coil of wire, which is attached to a thin diaphragm. Current passing through the coil builds a magnetic field that moves the diaphragm, creating sound waves. Magnetostriction, on the other hand, is the phenomenon whereby ferromagnetic materials change shape in a magnetic field. To take advantage of this, [Simplifier] wound a coil of fine copper wire around a paper form, through which a nickel TIG electrode welding filler rod is passed. The nickel rod is anchored on one end and fixed to a thin brass disc on the other. Passing a current through the coil causes the rod to change length, vibrating the disc to make sound. Give it a listen in the video below; it sounds pretty good, and we love the old-time look of the turned oak handpiece and brass accouterments.

You may recall [Simplifier]’s recent attempt at a carbon rod microphone; while that worked well enough, it was unable to drive this earphone directly. If you need to understand a little more about magnetostriction, [Ben Krasnow] explained its use in anti-theft tags a couple of years back.

Continue reading “Brass And Nickel Work Together In This Magnetostrictive Earphone”

Wood And Carbon Rods Used For This Handsome And Effective Microphone

Anyone who was active in the phreaking scene or was even the least bit curious about the phone system back in the Ma Bell days no doubt remembers the carbon capsule microphone in the mouthpiece of many telephone handsets. With carbon granules sandwiched between a diaphragm and a metal plate, they were essentially sound-driven variable resistors, and they worked well enough to be the standard microphone for telephony for decades.

In an attempt to reduce complicated practices to their fundamentals, [Simplifier] has undertaken this surprisingly high-fidelity carbon microphone build that hearkens back to the early days of the telephone. It builds on previous work that was more proof of concept but still impressive. In both builds, the diaphragm of the microphone is a thin piece of wood, at first carved from a single block of softwood, then later improved by attaching a thin piece of pine to a red oak frame. The electrical side of the mic has four carbon rods running from the frame to the center of the diaphragm, where they articulate in a carbon block with small divots dug into it. As the diaphragm vibrates, the block exerts more or less pressure on the rods, varying the current across the mic and reproducing the sound. It works quite well, judging by the video after the break.

Congratulations to [Simplifier] for another great build and top-notch craftsmanship. We’ve seen homebrew vacuum tubes, conductive glass, and solar cells from him before, which sort of makes him the high-tech version of Primitive Technology. We’re looking forward to whatever comes next. Continue reading “Wood And Carbon Rods Used For This Handsome And Effective Microphone”

Capture A Star In A Jar With Sonoluminescence

If nothing else, [Justin Atkin] is persistent. How else do you explain a five-year quest to create sonoluminescence with simple tools?

So what exactly is sonoluminescence? The short answer is as the name suggests: a release of light caused by sound. In [Justin]’s case, he used an ultrasonic transducer to set up a standing wave at the resonant frequency of a flask of water. A drop of water is used to entrain a small air bubble, which is held in a stable position in the flask in much the same way as styrofoam beads are in an acoustic levitator. Turn off the lights and you’ll see that the bubble glows with a ghostly blue light.

What causes the glow? Good question. According to [Justin], we just don’t know for sure what causes it, although the leading theory is that cavitation of the bubble causes the trapped gas to compress and heat violently, turning into a brief bit of plasma. But there are problems with that theory, which is one of the reasons he wanted to show just how easy the process can be – now that he’s shaken out the bugs with five years of effort. It wasn’t easy getting the transducers attached and the driver circuit properly tuned, but with little more than a signal generator, an audio amp, and a spool of magnet wire, you too can make your own “star in a jar.”

We applaud [Justin]’s determination to bring this project to a successful conclusion. It’s not unlike his dogged effort to make a cold plasma torch, or even his desktop radio telescope.

Continue reading “Capture A Star In A Jar With Sonoluminescence”

Simple Ultrasound Machine Shows The Skeleton Lurking Inside Us All

That first glimpse of a child in the womb as a black and white image on a screen is a thrilling moment for any parent-to-be, made possible by several hundred thousand dollars worth of precision medical instrumentation. This ultrasound machine cobbled together from eBay parts and modules is not that machine by a long shot, but it’s still a very cool project that actually gives a peek inside the skin.

The ultrasound transducer used by [stoppi71] in this build has an unusual source: a commercial paint-thickness meter. Cue the jokes about watching paint dry, but coatings measurement is serious stuff. Even so, the meter in question only ran about $40 on eBay, and provided the perfect transducer for the build. The sender needs a 100V pulse at about 5 MHz, so [stoppi71] had some fun with a boost converter and a 74121 Schmitt-trigger one-shot driving a MOSFET to switch the high voltage. On the receive side, the faint echo is sent through a three-stage amp using AD811 op amps before going through an LM7171 op amp acting as a rectifier and peak detector. Echos are sent to an Arduino Due for display on a 320×480 LCD. The resolution isn’t great, but the video below shows that it’s enough to see reflections from the skin of [stoppi71]’s forearm and from the bones within.

[stoppi71] says that he was inspired to tackle this build by Murgen, an open-source ultrasound project. That project got further refined and entered into the “Best Product” category in the 2018 Hackaday Prize. We like that because focusing on turning projects into products is what this year’s Hackaday Prize is all about.

Continue reading “Simple Ultrasound Machine Shows The Skeleton Lurking Inside Us All”