A 1960s Copal flip clock

Classic 1960s Flip Clock Gets NTP Makeover

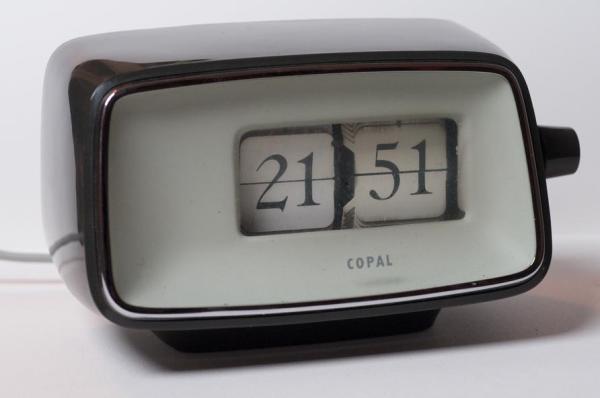
Many of the clocks we feature here on Hackaday are entirely built from scratch, or perhaps reuse an unusual display type. But sometimes, an old clock is just perfect as it is, and only needs a bit of an upgrade to help it fit into the modern world. One such example is the lovely 1960s Copal flip clock (in German, Google Translate link) that [Wolfgang Jung] has been working with — he managed to bring it squarely into the 21st century without changing its appearance one bit.

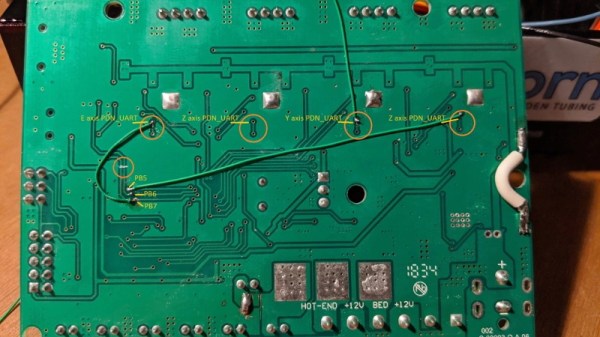
Like most flip clocks from the 60s and 70s, the Copal clock uses a small synchronous AC motor to advance the digits. Because this motor runs in step with the mains frequency, it also acts as the clock’s timing reference. However the original motor had died, and a direct replacement was impossible to find. So [Wolfgang] decided to replace it with a modern stepper motor. He designed a small PCB that fit the original housing, on which he placed a Trinamic TMC2225 stepper motor driver, a Wemos D1 Mini and a small 5 V power supply.

A flip clock mechanism with a PCB attached to it
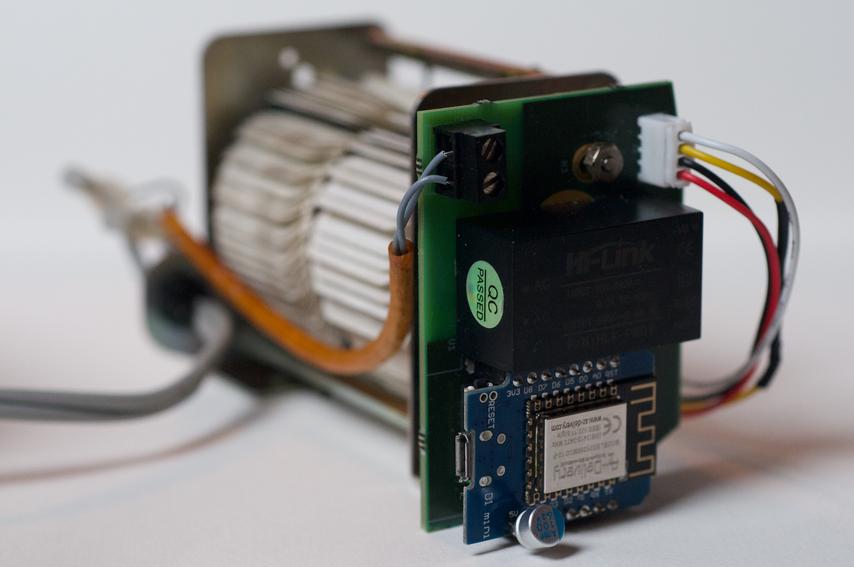
Thanks to its WiFi connection, the D1 can find out the correct time by contacting a Network Time Protocol (NTP) server. Displaying that time would be tricky with the original hardware though, because there is no indication of which numbers are displayed at any time. [Wolfgang] cleverly solved this problem by placing an IR proximity sensor near the lowest digit, allowing the D1 to count the number of digits that have flipped over and thereby deduce the current state of the display.

There’s plenty of fun to be had with classic flip clocks like this, and with a bit of hacking any old split-flap display should be usable for your own clock project. If none are available at your local thrift store or yard sales, you can always roll your own.

Pen Plotter Draws Maps Directly On The Wall

For map-lovers like [Christopher Getschmann], poring over a quality map can be as satisfying as reading a good book. Good maps can be hard to come by, though, especially at a scale worth looking at, or worth using as adornment on a dull, lifeless wall. The solution is obvious: build a wall-mount CNC plotter to draw maps directly on the wall.

[Christopher] began his map quest by scraping world map data from a number of sources, including OpenStreetMap, Natural Earth, and GEBCO. This gave him data for coastlines, terrain, and bathymetry — enough for a map of the world large enough to fill a wall. Since the scale of the map would preclude the use of even a large-format inkjet printer, [Christopher] set about building a wall-covering pen-plotter to render the map. The CoreXY-style plotter is large, but still light enough to hang on the wall while it works, and to be repositioned to cover a larger area.

The plotter runs on steppers driven by ultra-quiet Trinamic TMC5160 drivers, so the plotter wouldn’t be a nuisance while it worked. The map was plotted on eight pieces of cardboard mounted directly to the wall, filling the 2- x 3-meter space almost entirely. Landmasses and elevation contours were plotted as continuous lines in black ink, while bathymetric data was rendered in blue ink as cross-hatching with variable spacing, to make deeper oceans darker blue.

We find [Christopher]’s map breathtaking, all the more so considering the work that went into making it. It would be interesting to find alternate uses for the plotter, which reminds us a little of a cross between a draw-bot and a Maslow vertical CNC router, now that it’s done with its cartographic duties.

A Little Rewiring Teaches A Creality Ender 3 New Tricks

The Creality Ender 3 is part of the new wave of budget 3D printers, available for less than $250 from many online retailers. For the money, it’s hard to complain about the machine, and it’s more than suitable for anyone looking to get make their first steps into the world of FDM printing. But there’s certainly room for improvement, and as [Simon] shows in a recent blog post, a little effort can go a long way towards pushing this entry-level printer to the next level.

The first step was to replace the printer’s stepper drivers with something a bit more modern. Normally the Ender 3 uses common A4988 drivers, but [Simon] wanted to replace them with newer Trinamic drivers that offer quieter operation. Luckily, Trinamic makes a drop-in replacement for the A4988 that makes installation relatively easy. You’ll need to change out a few caps and remove some resistors from the board to make everyone play nice, but that shouldn’t pose a challenge to anyone who knows their way around a soldering iron.

Beyond quieter running steppers, the Trinamic TMC2208 drivers also offer direct UART control mode. Of course the Ender’s board was never designed for this, so the MCU doesn’t have enough free pins to establish serial communications with the three drivers (for the X, Y, and Z axes). But [Simon] realized if he sacrificed the SD card slot on the board, the six pins that would free on the controller could be cut and rewired to the driver’s UART pins.

Combined with the Klipper firmware, these relatively minor modifications allows him to experiment with printing at speeds far greater than what was possible before. Considering the kind of headaches that a ~$200 printer would have given you only a few years ago, it’s impressive what these new machines are capable of; even if it takes a few tweaks.

Prusa Unveils New Mini 3D Printer, Shakes Up The Competition

For the last couple of years, consumer desktop 3D printer choices in the under $1,000 USD range have fallen into two broad categories: everything bellow $500 USD, and the latest Prusa i3. There are plenty of respectable printers made by companies such as Monoprice and Creality to choose from on that lower end of the scale. It wasn’t a luxury everyone could justify, but if you had the budget to swing the $749 for Prusa’s i3 kit, the choice became obvious.

Of course, that was before the Prusa Mini. Available as a kit for just $349, it’s far and away the cheapest printer that Prusa Research has ever offered. But this isn’t just some rebranded hardware, and it doesn’t compromise on the ideals that have made the company’s flagship machine the de facto open source FDM printer. For less than half the cost of the i3 MK3S, you’re not only getting most of the larger printer’s best features and Prusa’s renowned customer support, but even capabilities that presumably won’t make it to the i3 line until the MK4 is released.

Josef Průša was on hand to officially unveil his latest printer at the 2019 East Coast Reprap Festival, where I got the chance to get up close and personal with the diminutive machine. While it might be awhile before we can do a full review on the Mini, it’s safe to say that this small printer is going to have a big impact on the entry-level market.

Continue reading “Prusa Unveils New Mini 3D Printer, Shakes Up The Competition”

Bolt-On Stepper Motor Driver For The Raspberry Pi

For his entry into the 2019 Hackaday Prize, [Tobius Daichi] is working on adding some motion control capabilities to everyone’s favorite Linux SBC. His 3+Pi board attaches to the Raspberry Pi’s GPIO header and gives you a convenient way to control four individual stepper motors. Perfect for a 3D printer, laser cutter, CNC, or anything else you can think of that needs to move in a few dimensions.

But such a simplistic description of the 3+Pi might be underselling it a bit. While [Tobius] says he was inspired by the classic Arduino CNC Shield that powers countless DIY 3D printers, he’s managed to improve on the concept. Rather than having the host Pi communicate directly with the stepper drivers, the 3+Pi features an onboard STM32F302CBT6 that handles the actual motor control. The Pi just needs to tell it what to do over UART.

If you’re looking to do things in real-time, having an onboard microcontroller handle the low-level aspects of talking to the stepper drivers can be a big help. A natural extension for this board could be support for the Klipper firmware, which leverages the fact that the Raspberry Pi is many times more powerful than your average 3D printer control board. With the Pi handling the math and providing the microcontroller instructions, Klipper allows for faster and more accurate printing than the microcontroller alone could accomplish.

As for the stepper drivers themselves, [Tobius] has decided to go with the Trinamic TMC2041-LA-T. This chip is notable as it puts dual drivers in one 48-QFN package, which is great if you’re looking to save space on your board. Some might complain that the 3+Pi doesn’t allow for easily swapping out the stepper drivers if you manage to cook one like on the Arduino CNC shield, but realistically you could say the same about many purpose-built stepper control boards.

[Tobius] is tackling this project by himself currently, but does mention that he’s open to teaming up with anyone who’s got an interest in this sort of thing. There have been previous attempts at creating Linux-powered 3D printer controllers in the past, but we think this approach holds particular promise if for no other reason than the Raspberry Pi’s popularity.

This Cetus Printer Is Rigged For Silent Running

The entry-level 3D-printer market is a rich one, with offerings from many vendors that are surprisingly good. But nothing is perfect, and to hit the $200 price point some compromises are inevitable. That doesn’t mean you have to live with those engineering choices, of course, which makes these cheap printers a great jumping off point for aftermarket mods.

[Linas K] took this route and in the process made his Cetus 3D-printer essentially silent. The first part of the video below reviews the shortcomings of the stock machine and the mechanical changes [Linas] made, including new brackets for the Z-axis slide, relocating the WiFi antenna to someplace sensible, and adding limit switches for each slide. Inside the case, the electronics get a complete reworking, with a custom PCB to house Trinamic stepper drivers for ultraquiet operation. The new board also supports the limit switches as well as thermostatic control of the extruder fan and pads for a platform heater. As a bonus, the new PCB is much smaller than the original, leaving room to tuck the power supply into the case, which is a nice touch. It wasn’t cheap, and it meant basically gutting the printer, but the results are impressively quiet.

We’re tempted to try these silencing mods on our own Cetus, if [Linas] ever publishes the BOM and PCB designs (hint, hint). And Cetus hacking is becoming quite a thing around here. From a trio of Cetus pro-tips to turning a Cetus into a PCB machine, the little printer has a lot to offer.

Continue reading “This Cetus Printer Is Rigged For Silent Running”

Hackaday Links Column Banner

Hackaday Links: March 25, 2018

File this one under, ‘don’t do this yourself, but we’re glad they filmed it.’ [Denis Koryakin] flew a quadcopter to 10km, or about 33,000 feet. This was just an experiment to see if it was possible. A few items of note from the video: this thing was climbing at 14-15 m/s when it first took off. It was barely climbing at 2 m/s at 10km. Second: it was really, really cold. The ground temperature was -10 C, and temperatures at 8km reached -50 C. Density altitude is on this guy’s side, and I don’t know if this would be possible in warmer temperatures.

Hold on to your hats, there’s a gigantic space station that’s going to crash sometime in the next few weeks. Tiangong-1, an 8-ton space station launched in 2011, is going to reenter the atmosphere ‘sometime between March 30 and April 6’. Because of orbits and stuff, it’s more likely to reenter at the highest latitudes, and this space station has an inclination of 42.7 degrees. If your latitude is 42° N or 42° S, you should probably pull a Liza Minnelli on this situation and spend the next month in bed.

Hey, cool! The Tindie Badge is being used to teach orphans in Bosnia how to solder.

The BBC has decided to cancel Robot Wars. No, it’s not Battlebots — the house robots always seemed to be a bit overkill and added too much drama. No, it’s not Scrapheap Challenge or Junkyard Wars, but Robot Wars was legitimately fun, and cheap-to-produce reality TV. The engineering that went into these bots was amazing, and this is a loss for the entire engineering community. Here’s a change.org petition against its cancellation, but we all know how successful those change.org petitions can be.

FREE CHIPS!. Free motor drivers, actually, which is even more impressive. Aisler puts together BOMs for projects and such — think of it as an on-demand kitting service. They’re throwing in free Trinamic drivers with orders. Someone should build a motor driver breakout.