Blaupunkt Tube Radio Is The Sultan Of Radios

According to [M Caldeira], the Blaupunkt Sultan 24300 was one of the last tube radios made in the 1960s. He’s got one but it needed some tender loving care, and you can see how he approaches a restoration like this in the video below.

The radio was actually in better shape physically than most of the old radios we see. It wasn’t perfect, but it looked good on the outside. Electrically, though, it did need some work, and the dial had problems, too. The first obstacle was identifying exactly the model of the radio since there were a number of Sultan radios produced.

Continue reading “Blaupunkt Tube Radio Is The Sultan Of Radios”

All American Five Lives Again

If you haven’t heard of an “all-American five,” then you probably don’t dig through bins for old radios. The AA5 is a common design for old AM radios that use five tubes: a rectifier, an oscillator/mixer, an IF amplifier, a detector, and a single tube for driving the speaker. [Mikrowave1] took an old specimen of such a radio from the mid-1950s and wanted to restore it. You can see how it went in the video below.

One feature of the design is that the set had a “hot chassis,” which means you really want to use an isolation transformer before you work on it. We were taught to touch a chassis with the back of our hand first because of radios like this. If it is “hot,” the muscle contraction would throw your arm away from the radio instead of forcing you to grip it uncontrollably.

The GE radio had many quality design touches you don’t always see in a radio like this. The mix of brands indicates that the radio has had tubes replaced in the past. It also had a clearly replaced electrolytic capacitor. Surprisingly, all the tubes were good, although the power output tube was marginal. However, a light bulb was bad and required a little surgery to allow for a slightly different replacement.

Some capacitors were neatly replaced, also. A lot of cleaning and testing later — along with a dropped tool — the radio was ready to play again. Fixing radios from this era is a great hobby. You can get to everything and you don’t really need anything fancy, although a tube tester is helpful. The classic method of troubleshooting is to either find audio on the volume control or not and then work your way backward or forward using a signal tracer or — since they are so readily available now — a scope. Alternatively, you could inject a signal at the volume control and work your way through the circuit until you can or can’t hear the injected signal.

Not the first tube radio we’ve watched being restored, of course. Need a tube tester?

Continue reading “All American Five Lives Again”

1920’s Claratone Radio Runs Windows 10

In the past we’ve mentioned how there are different schools of thought in terms of how to bring a vintage piece of hardware into the 21st century. You can go down the preservationist’s route, carefully grafting the original components with more modern ones, or you can take the nuclear option and blow all that dusty old gear out of the water. [Derek Traxler] clearly decided to go with the latter option on his recent conversion of 1920’s era Claratone tube radio to an Internet radio and podcast player. Not only is there little left of the original device beyond its knobs and wooden case, but he’s even managed to cram a Windows 10 computer into the base for good measure.

The core of the radio is a LattePanda, an extremely powerful Intel single board computer. It’s running Windows, and loads up a list of Internet radio streams and podcasts to play from a USB thumb drive that’s built into an old vacuum tube. The LattePanda uses its built-in Arduino to interface with the radio’s original front panel knobs, which now are used to switch between streams. A particularly neat effect is the static and cross-talk that’s artificially added when switching “stations”, making it sound like you’re really dialing in a station rather than just selecting between digital files.

On the audio side, the LattePanda is connected to a SX400 amplifier, which in turn drives the external speakers. While [Derek] mentions it isn’t quite perfected, a MSGEQ7 graphic equalizer chip is used to control LEDs mounted inside the original radio’s vacuum tubes. In the video after the break, you can see the tubes flashing madly along with the music, giving an interactive effect to the final product. Unfortunately it seems you can only see the tubes when the radio has its “hood” up, though.

If this egregious lack of historical preservation has brought a tear to your eye, never fear. We’ve covered some proper restoration work on vintage audio gear which may level you out.

Continue reading “1920’s Claratone Radio Runs Windows 10”

This IS Your Grandfather’s Radio

Tube radios have a certain charm. Waiting for them to warm up, that glow of the filaments in a dark room. Tubes ruled radio for many decades. [Uniservo] posted a video about the history and technology behind the 1920’s era Clapp-Eastham C-3 radio. This is a three-tube regenerative receiver and was advanced for its day.

If you are worried he won’t open it up, don’t despair. Around the ten minute mark, your patience will be rewarded. Inside are three big tubes full of getter and bus bars instead of wires. Add to that the furniture-quality case, and this is a grand old radio.

Continue reading “This IS Your Grandfather’s Radio”

An Electronic 90V Anode Battery

One of the miracle technological gadgets of the 1950s and 1960s was the transistor radio. Something that can be had for a few dollars today, but which in its day represented the last word in futuristic sophistication. Of course, it’s worth remembering that portable radios were nothing new when the transistor appeared. There had been tube radios in small attaché cases, but they had never really caught the imagination in the same way. They were bulky, like all tube radios they had to warm up, and they required a pair of hefty batteries to work.

If you have a portable tube radio today, the chances are you won’t be able to use it. The low voltage heater battery can easily be substituted with a modern equivalent, but the 90V anode batteries are long out of production. Your best bet is to build an inverter, and if you’re at a loss for where to start then [Ronald Dekker] has gone through a significant design exercise to produce a variety of routes to achieve that goal. It’s a page that’s a few years old, but still a fascinating read.

A problem with these radios lies with their sensitivity to noise. They are AM receivers from an era with a low electrical noise floor, so they don’t react well to high-frequency switch-mode power supplies. Thus, the inverters usually tasked for projects like this are low-frequency, at 50Hz as this is a European project, to mimic one source of electrical noise that would have been an issue for the designers in the 1950s.

We are taken through transformer selection and a variety of discrete inverter designs using multivibrators, investigating how to maximize efficiency through careful manipulation of switch-on and switch-off times. Then a PIC microcontroller design is presented, and finally a CMOS ring counter.

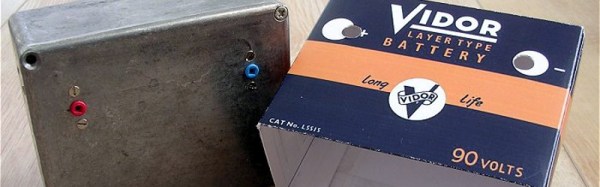
The final converter is mounted in a diecast box and covered with a printed card shell to mimic a period battery. If you weren’t intimately familiar with battery tube radios, you might mistake it for the real thing.

We’ve featured one of [Ronald]’s designs before, though only in passing. His Nixie PSU was used in this rather frightening clock with no PCB.

Hackaday Links: January 5, 2014

hackaday-links-chain

While we can’t condone the actual use of this device, [Husam]’s portable WiFi jammer is actually pretty cool. It uses a Raspberry Pi and an Aircrack-ng compatible dongle to spam the airwaves with deauth packets. The entire device is packaged in a neat box with an Arduino-controlled LCD and RGB LEDs. Check out an imgur gallery here.

You can pick up a wireless phone charger real cheap from any of the usual internet outlets, but try finding one that’s also a phone stand. [Malcolm] created his own. He used a Qi charger from DealExtreme and attached it to a 3D printed phone stand.

A while back, [John] noticed an old tube radio in an antique store. No, he didn’t replace the guts with a Raspberry Pi and an SD card full of MP3s. He just brought it back to working condition. After fixing the wiring (no ground cord on these old things), repairing the speaker cone, putting some new twine on the tuner and replacing the caps, [John] has himself a new old radio. Here’s a video of the complete refurbishment.

Here’s a Sega Master System (pretty much a Game Gear) running on an STM32 dev board. Also included are some ROMs for some classic games – Sonic the Hedgehog, Castle of Illusion, and The Lion King. If you have this STM Discovery board you can grab the emulator right here.

[Spencer] wanted a longer battery life in his iPhone, so he did what any engineering student would do: he put another battery in parallel.

Breadboarding something with an AVR or MAX232? Print out some of these stickers and make sure you get the pinouts right. Thanks, [Marius].

Homemade Regenerative Tube Radio

There are no microcontrollers in this project. In fact you wont find a single transistor. This classic regenerative tube radio, modeled after an early 20th century homebrew is complete with schematic and additional photos. For those who are not familiar with tube designs and for simplicity, the regeneration circuit can be thought of as feedback though this relation may be argued. Read the rest after the break which includes a crash course in tube operation. Continue reading “Homemade Regenerative Tube Radio”