All You’ve Ever Wanted To Know About Compilers

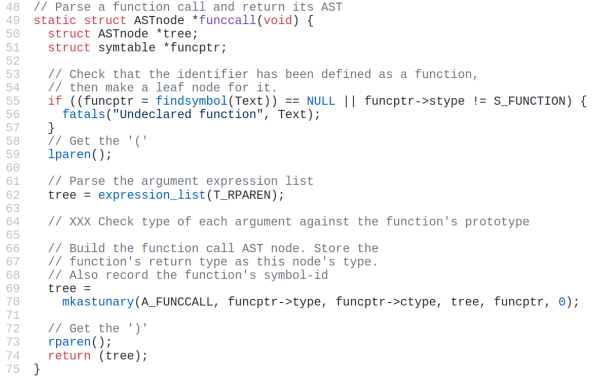
They say that in order to understand recursion, you must first understand recursion. Once you master that concept, you might decide that it’s time to write your own compiler that can compile itself as a fun side project. According to [Warren] aka [DoctorWkt], who documented every step of writing this C compiler from scratch, a true compiler will be able to do that.

Some of the goals for the project included self-compiling, focusing on a real hardware platform, practicality, and simplicity. [Warren] outlines a lot of the theory of compilers as well, including all the lexical, grammar, and semantic analysis and then the final translation into assembly language, but really focuses on making this compiler one for practical use rather than just a theoretical implementation. He focuses on Intel x86-64 and 32-bit ARM platforms too, which are widely available.

This project is a long read and very thoroughly documented at around 100,000 words, so if you’ve ever been interested in compilers this is a great place to start. There are a lot of other great compiler tools floating around too, like the Compiler Explorer which shows you generated code as you write in a higher level language.

[via Hackaday.io]

Journey Through The Inner Workings Of A PCB

Most electronics we deal with day to day are comprised of circuit boards. No surprise there, right? But how do they work? This might seem like a simple question but we’ve all been in the place where those weird green or black sheets are little slices of magic. [Teddy Tablante] at Branch Eduction put together a lovingly crafted walkthrough flythrough video of how PCB(A)s work that’s definitely worth your time.

[Teddy]’s video focuses on unraveling the mysteries of the PCBA by peeling back the layers of a smartphone. Starting from the full assembly he separates components from circuit board and descends from there, highlighting the manufacturing methods and purpose behind what you see.

What really stands out here is the animation; at each step [Teddy] has modeled the relevant components and rendered them on the PCBA in 3D. Instead of relying solely on hard to understand blurry X-ray images and 2D scans of PCBAs he illustrates their relationships in space, an especially important element in understanding what’s going on underneath the solder mask. Even if you think you know it all we bet there’s a pearl of knowledge to discover; this writer learned that VIA is an acronym!

If you don’t like clicking links you can find the video embedded after the break. Credit to friend of the Hackaday [Mike Harrison] for acting as the best recommendation algorithm and finding this gem.

Continue reading “Journey Through The Inner Workings Of A PCB”

A 3D Printer Scratch Built For Your Viewing Pleasure

Today it’s almost always cheaper to buy an imported 3D printer kit than it is to source your own parts and build one yourself. But that doesn’t stop people from doing it anyway. Whether they’re looking for something a bit more solid, or just want to do things their own way, there are still valid reasons to design and build your own machine. Luckily for us in the audience, [Rob Mech] decided to document the build of his custom “LayerFused C201” printer on his YouTube Channel.

If you’ve ever dreamed of taking the plunge and building a 3D printer exactly the way you want, but were never able to manage the time, this seven video series might be the next best thing. Each video takes you through a different step of the construction, from building the frame out of aluminum extrusion all the way to wiring up the endstop switches and the 32-bit SKR v1.3 controller. There’s even a video that introduces the viewer to the concept of a “Frankenstein” printer that uses cobbled together parts just long enough to produce its own final components.

All told, [Rob] says the Bill of Materials for the LayerFused C201 comes to at least $200, but that’s going to take shopping around for the lowest possible prices and potentially even salvaging some components from other machines and projects. Like we said, building a cheap printer is absolutely not the goal here; it’s all about building a printer you want to use. Continue reading “A 3D Printer Scratch Built For Your Viewing Pleasure”

How To Get Started With Fadecandy And LEDs

The internet is awash with millions of stunning LED projects, and for that, we are all very thankful. For those outside the hacker/maker matrix, it can be difficult to know how to approach such a build. Never fear, for [Amy Goodchild] has put together a beginner’s guide to building pretty glowables, using Fadecandy and Processing.

Fadecandy is a platform specifically designed to drive WS2812B LEDs for artistic purposes. This allows users to focus on the visual side of things without getting bogged down with the hassle of selecting the right microcontroller and choosing the applicable libraries. It works great in combination with Processing, a piece of software designed for coders experimenting with visual arts. Through a USB link, any graphics drawn by processing can be mapped to the LEDs attached to the Fadecandy controller.

[Amy] does a great job of explaining how to do everything required, from purchasing the right equipment, through wiring everything up, and then getting it all humming along with the correct software. If you’ve ever wanted to build a big flashy project with a ton of LEDs, this would be a great place to start.

We’ve seen Fadecandy put to good use before, too. Video after the break.

Continue reading “How To Get Started With Fadecandy And LEDs”

A New KiCAD Tutorial Hits The Scene

KiCAD has a rightfully earned image problem regarding beginners. The shiny new version 5 has improved things (and we’re very excited for v6!) but the tool is a bit obtuse even when coming from a electronics design background, so we’re always excited to see new learning material. [Mike Watts] is the latest to join the esteemed group of people willing to export their knowledge with his KiCAD tutorial series on GitHub that takes the aspiring user from schematic through fab and assembly.

The tutorial is focused around the process of creating a development board for the dimuitive Microchip née Atmel ATSAMD10 Cortex M0 ARM CPU. It opens by asking the reader to create a schematic and proceeds to teach by directing them to perform certain actions then explaining what’s going on and which shortcuts can accelerate things. This method continues through layout, manufacturing, and assembly.

Of note is that when defining the board outline [Mike] describes how to use OpenSCAD to parametrically define it; a neat micro-tutorial on using the two great tools to compliment each other. We also love that upon successful completion of the tutorial series the user will have developed a tiny but useful development board that can be assembled for about $3 in single quantities!

As with all open source work, if you have quibbles or want to contribute open a pull request and give [Mike] a hand!

Getting To Know Every Bit Of An ATtiny13

We recently heard it said of a hacker who pulled off a particularly nice VGA hack on an 8-bit microcontroller: “He knows all the bits, personally.” High praise, indeed. If you want to get on a first-name basis with a ton of transistors, then have a look at [Heinz D]’s Vacation Course in ATtiny13 Assembler (original in German, translated into English by robots here).

But be warned, this isn’t the easy way to learn AVRs. Not content with simply stripping away every layer of abstraction, this month-long “course” in AVR assembly starts off programming the chip initially with just two pushbuttons in its native machine language of high and low voltages. But still, especially if you can get a few assignments done in one sitting, you’re writing in the relative splendor of assembly language and uploading code with a proper programmer before long, because there’s a real limit to how much code one can toggle in before going mad.

There’s a beautiful minimalism to this entirely ground-up approach, and maybe it’s an appropriate starting point for learning how the machine works at its lowest level. At any rate, you’ll be able to lord it over the Arduino crew that you were able to get blink.ino up and running with just a pair of mechanical contacts and a battery. Real programmers

And once you’ve mastered AVR assembly language, you can recycle those two buttons to learn I2C or SPI. What other protocols are there that don’t have prohibitive timeouts? What’s the craziest code that you’ve ever entered bit by bit?

The Complete Beginner’s Guide To Building A CNC Machine

Despite appearances, [This Old Tony]’s latest series has little to do with CNC-ifying an Etch A Sketch. Although he certainly achieves that, more or less, automating the classic toy is just the hook for a thorough lesson in CNC machine building starting with the basics.

Fair warning: we said basics, and we mean it. [Old Tony]’s intended audience is those who haven’t made the leap into a CNC build yet and need the big picture. Part one concentrates on the hardware involved – the steppers, drivers, and controller. He starts with one of those all-in-one eBay packages, although he did upgrade the motion controller to a Mach4 compatible board; still, the lessons should apply to most hardware.

By the end of part one, the Etch A Sketch is connected to two of the steppers and everything is wired up and ready to go for part two, the first part of which is all about inputs and outputs. Again, this is basic stuff, like how relays work and why you might need to use them. But that’s the kind of stuff that can baffle beginners and turn them off to the hobby, so kudos to [Old Tony] for the overview. The bulk of the second part is about configuring Mach4 Hobby, with a ton of detail and some great tips and tricks for getting a machine ready to break some end mills.

For someone looking to get into a CNC build, [Old Tony]’s hard-won CNC experience really fills in the gaps left by other tutorials. And it looks like a third part, dealing with making all this into something more than an automated Etch A Sketch, is in the works. We’re looking forward to that.

Continue reading “The Complete Beginner’s Guide To Building A CNC Machine”