Upcycled Dryer Motor Makes Budget Disk Sander

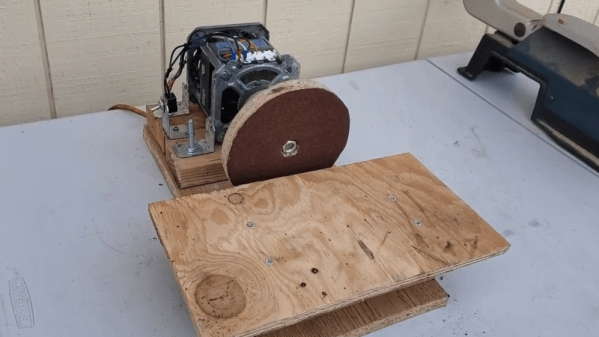
At the most basic level, most shop tools are just a motor with the right attachments. But the details are often far from simple. [DuctTapeMechanic] took a junker clothes dryer, yanked the electric motor from it, and converted it into a disk sander. The price was right at about $10. You can see it all after the break.

As you might imagine, having the motor is only half the battle. You also need a way to mount the thing securely and a way to affix the sanding disk. While this doesn’t pose the same challenges as, say, a drill press, it does take some thought. The motor in the donor dryer didn’t have threads on the shaft, so a bolt and some welding time took care of that. We suspect that’s tricky because you need the shaft and the bolt to be concentric and level.

Once you have a threaded shaft, the rest of the build is anti-climatic. A little carpentry and a little electrical. We would probably cover up the electrical connections a bit more. It seems like you’d want to know which way the motor spins so you could use a reverse thread, if necessary. From the video, we think the motor he has was spinning the right way, but we don’t know if that’s always true.

There’s something satisfying about building your own tools. If you work on smaller things, we’ve seen a miniature sander that might be handy to have around. If you want to go the other way, try finding an old floor polisher instead of a dryer.

Continue reading “Upcycled Dryer Motor Makes Budget Disk Sander”

BEAM Dragonfly Causes A Flap

Normal people throw away stuff when it breaks. But not people like us. Or, apparently, [NanoRobotGeek]. A cheap robotic dragonfly died, and he cannibalized it for robot parts. But he kept the gearbox hoping to build a new dragonfly and, using some brass rod, he did just that.

The dragonfly’s circuitry uses a solar panel for power and a couple of flashing LEDs. This is a BEAM robot, so not a microcontroller in sight. You can see a brief video of how the dragonfly moves.

Continue reading “BEAM Dragonfly Causes A Flap”

Building An RC Air Boat From Garbage

What do you get when you combine an old optical drive, some empty soda bottles, and a microcontroller? Well…nothing, really. That’s still just a pile of rubbish. But if you add in a battery, an RC receiver, and some motors, you’re getting dangerously close to a fun little toy to kick around the pond as [Antonio Rizzo] recently demonstrated.

A couple of plastic bottles lashed together make up the hull of the boat, and [Antonio] has used the internal frame of an old optical drive bent at a 90 degree angle to hold the two small DC motors. In a particularly nice touch, the drive’s rubber anti-vibration bushings are reused as motor mounts, though he does admit it was just dumb luck that the motors were a perfect fit.

For the electronics, [Antonio] has paired a custom motor controller up with the uChip, a diminutive Arduino-compatible microcontroller in a narrow DIP-16 package. Wireless communication is provided by an off-the-shelf cPPM receiver such as you might see used in a small plane or quadcopter.

The whole build is powered by a common 18650 lithium-ion battery, which could also be easy enough to recover from the trash given how common they are in laptop batteries; though if you threw a new cell into this build we wouldn’t hold it against you. Everything is put into a high-tech plastic sandwich bag to provide minimum of waterproofing with the minimum of effort.

If using a commercial RC receiver and transmitter is a bit too mainstream for your tastes, you could always roll your own radio.

Continue reading “Building An RC Air Boat From Garbage”

Empty Can Upcycled Into Portable Speaker

We aren’t suggesting you go digging through the trash looking for empty cans, but if you’ve already got some empty cans in the privacy of your own home, you could certainly do worse than turning them into unique enclosures for your electronics projects. Better than sitting in the landfill, surely.

This hack from [Robin Hartley] turns an empty Cadbury hot chocolate can into a portable speaker that’s sure to get some attention. But don’t be fooled: a surprisingly amount of engineering went into this project in the form of a 3D printed structure on the inside of the can. Even if you aren’t big on the idea of putting your next project into a piece of literal trash, there’s something to be said for how professionally everything fits together in this build.

The key to this build is the 3D printed “skeleton” that holds the speaker and circuit board in place. An especially nice touch is how [Robin] designed the mount for the speaker: as it had no flange to attach to, he made a two piece clamp that screws together around the rear of the speaker and holds it in place.

You may wonder why somebody who’s clearly as well versed in CAD and 3D printing as [Robin] is might want to use an empty can as an enclosure; surely he could just design and print a case? Undoubtedly. But the goal here is to reuse what would otherwise be trash, and that occasionally means taking the “scenic” route as it were.

To take this concept to the next level, check out the upcycled speaker box we recently covered. We’ve seen some gorgeous home audio builds that started as a curbside find, but depending on how lucky you are, it’s almost like cheating.

Continue reading “Empty Can Upcycled Into Portable Speaker”

This Clock Is Hard: No Arduino Needed

You always hear that people talk about the weather. But it seems to us we see more clocks than we do weather stations. A case in point is [frank_scholl’s] clock made from an old hard drive. We found it interesting that the clock has no microcontroller at all. The custom PCB is all digital and uses the line frequency to drive counters which, in turn, drive the motors.

The one catch is that you have to have a hard drive that uses a very particular motor scheme for this to work. The platter rotation shows the hour and the head’s track position counts off the minutes from 0 to 59. Two buttons can speed up either rotation for the purpose of setting the clock. You can see it all in the video below.

Continue reading “This Clock Is Hard: No Arduino Needed”

Line Follower Has Lots Of Recycled Parts, But Zero Brains

Line Followers are a tried-and-true type of robot; both hardware and software need to be doing their job in harmony in order to be successful at a clearly defined physical task. But robots don’t always have microcontrollers and software, as [Mati_DIY]’s zero programming analog line follower demonstrates.

For readers used to seeing a Raspberry Pi or Arduino in almost everything, an analog robot whose “programming” exists only as a harmony between its discrete parts can be an eye-opener as well as an accessible project. A video of the robot in action is embedded below.

[Mati_DIY]’s design uses two CNY70 reflective sensors (which are essentially infrared emitter/phototransistor pairs) and an LM358 dual op-amp. Together, the sensors act as two near-sighted eyes. By using the output of each sensor to drive a motor via a transistor, the presence or absence of the black line is directly and immediately reflected by the motion of the attached motor. The more black the sensor sees, the more the motor turns. Electrically, that’s all that happens; but by attaching the right sensor to the left motor and the left sensor to the right motor, you get a robot that always tries to keep the black line centered under the sensors. Playing with the spacing of the motors and sensors further tweaks the performance.

Continue reading “Line Follower Has Lots Of Recycled Parts, But Zero Brains”

Fail Of The Week: Upcycling Failed 3D Prints

Is it possible to recycle failed 3D prints? As it turns out, it is — as long as your definition of “recycle” is somewhat flexible. After all, the world only needs so many coasters.

To be fair, [Devin]’s experiment is more about the upcycling side of the recycling equation, but it was certainly worth undertaking. 3D printing has hardly been reduced to practice, and anyone who spends any time printing knows that it’s easy to mess up. [Devin]’s process starts when the colorful contents of a bin full of failed prints are crushed with a hammer. Spread out onto a properly prepared (and never to be used again for cookies) baking sheet and cooked in the oven at low heat, the plastic chunks slowly melt into a thin, even sheet.

[Devin]’s goal was to cast them into a usable object, so he tried to make a bowl. He tried reheating discs of the material using an inverted metal bowl as a form but he found that the plastic didn’t soften evenly, resulting in Dali-esque bowls with thin spots and holes. He then flipped the bowl and tried to let the material sag into the form; that worked a little better but it still wasn’t the win he was looking for.

In the end, all [Devin] really ended up with is some objets d’art and a couple of leaky bowls. What else could he have done with the plastic? Would he have been better off vacuum forming the bowls or perhaps even pressure forming them? Or does the upcycling make no sense when you can theoretically make your own filament? Let us know in the comments how you would improve this process.

Continue reading “Fail Of The Week: Upcycling Failed 3D Prints”