Casting Metal With A Microwave And Vacuum Cleaner

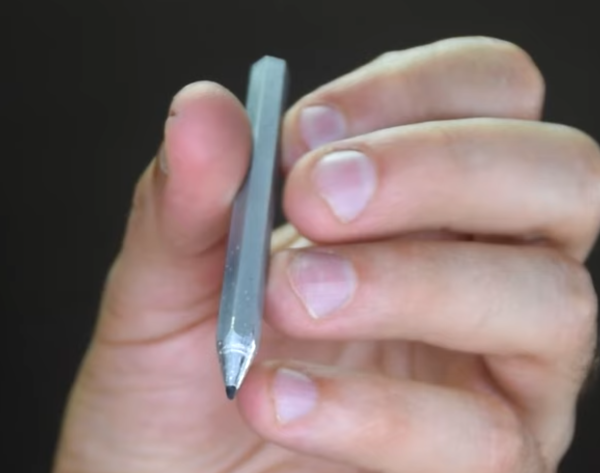
Metalworking might conjure images of large furnaces powered by coal, wood, or electricity, with molten metal sloshing around and visible in its crucible. But metalworking from home doesn’t need to use anything more fancy than a microwave, at least according to [Denny] a.k.a. [Shake the Future]. He has a number of metalworking tools designed to melt metal using a microwave, and in this video he uses them to make a usable aluminum pencil with a graphite core.

Before getting to the microwave kiln, the pencil mold needs to be prepared. A 3D-printed pencil is first created with the graphite core, and then [Denny] uses a plaster of Paris mixture to create the mold for the pencil. The 3D printed plastic is left inside the mold and placed in the first microwave kiln, which is turned on just enough to melt the plastic out of the mold, leaving behind the graphite core. From there a second kiln goes into the microwave to melt the aluminum.

Once the molten aluminum is ready, it is removed from the kiln and poured in the still-warm pencil mold. This is where [Denny] has another trick up his sleeve. He’s using a household vacuum cleaner to suck the metal into place before it cools, creating a rudimentary but effective vacuum forming machine. The result is a working pencil, at least after he wears down a few razor blades attempting to sharpen the metal pencil. For more information about how [Denny] makes these microwave kilns, take a look at some of his earlier projects.

Continue reading “Casting Metal With A Microwave And Vacuum Cleaner”

With A Little Heat, Printed Parts Handle Vacuum Duty

We don’t have to tell the average Hackaday reader that desktop 3D printing has been transformative for our community, but what might not be as obvious is the impact the technology has had on the scientific community. As explained in Thermal Post-Processing of 3D Printed Polypropylene Parts for
Vacuum Systems
by [Pierce Mayville], [Aliaksei Petsiuk], and [Joshua Pearce]
, the use of printed plastic parts, especially when based on open source designs, can lead to huge cost reductions in the production of scientific hardware.

More specifically, the authors wanted to examine the use of 3D printing components to be used in a vacuum. Parts produced with filament-based printers tend to be porous, and as such, are not suitable for fittings or adapters which need to be pumped down to below one atmosphere. The paper goes on to explain that there are coatings that can be used to seal the printed parts, but that they can outgas at negative pressures.

The solution proposed by the team is exceptionally simple: after printing their desired parts in polypropylene on a Lulzbot Taz 6, they simply hit them with a standard consumer heat gun. With the temperature set at ~400 °C, it took a little under a minute for the surface of take on a glossy appearance — the result reminds us of an ABS print smoothed with acetone vapor.

As the part is heated, the surface texture visibly changes. The smoothed parts performed far better in vacuum testing.

In addition to the heat treatment, the team also experimented with increasing degrees of infill overlap in the slicer settings. The end result is that parts printed with a high overlap and then heat treated were able to reliably handle pressures as low as 0.4 mTorr. While the paper admits that manually cooking your printed parts with a heat gun isn’t exactly the ideal solution for producing vacuum-capable components, it’s certainly a promising start and deserves further study.

Reactive Load For Amplifiers Teaches Lessons About Inductors

The sound produced by any given electric guitar is shaped not just by the instrument itself but by the amplifiers chosen to make that sound audible. Plenty of musicians swear by the warm sound of amplifiers with vacuum tube circuits, but they do have some limitations. [Collin] wanted to build a reactive load for using tube amps without generating a huge quantity of sound, and it resulted in an interesting project that also taught him a lot about inductors.

The reactive load is essentially a dummy load for the amplifier that replaces a speaker with something that won’t produce sound. Passive loads typically use resistor banks but since this one is active, it needs a very large inductor to handle the amount of current being produced by the amplifier. [Colin] has also built a headphone output into this load which allows it to output a much smaller quantity of sound to a headset while retaining the sound and feel of the amplifier tubes, and it additionally includes a widely-used tone control circuit as well.

There’s a lot going on in the design of the circuitry for this amplifier load, including a lot of research into low-frequency inductors that can handle a significant amount of current. [Collin] eventually ended up winding his own, but the path he took to it was long and winding. There’s a lot of other circuit theory discussed as well especially with regards to the Baxandall EQ that he built into it as well. And, if you’d like to learn more about tube amplifiers in general, take a look at this piece which notes one of the best stereo amps ever produced.

Sputtering Daguerreotypes, Batman!

The Daguerreotype was among the earliest photographic processes, long before glass plates or film, that relied on sensitizing a thin layer of silver on top of a copper plate. The earliest Daguerreotype plates were made physically, by rolling a copper-silver plate thinner and thinner until the silver layer was just right. Good luck finding a source of Daguerreotype plates made this way in 2022. (There are electroplating methods, but they all end up with chemically contaminated silver.)

On the other hand, magnetron sputtering is a process of depositing pure metal in thin layers using plasma, high voltages, and serious magnets, and [Koji Tokura] is making his own sputtered Daguerreotype plates this way, giving him the best of both worlds: the surreal almost-holographic quality of the Daguerreotype with the most difficult film preparation procedure imaginable.

The star of the show is [Koji]’s sputtering rig, which consists of a Tupperware glass sandwich box as a vacuum chamber and a microwave oven transformer as the high voltage source. In use, he pumps the chamber down, introduces a small amount of argon, and then lights up the plasma. The high voltage accelerates the plasma ions into a sheet of silver, and the silver particles that get knocked free coat the copper plate. A strong magnet creates a local plasma, which accelerates the coating procedure, but since [Koji] only had a relatively small magnet, he scans the plate with the magnet, using a scavenged 2D pen plotter mechanism.

Check out his video on the Hackaday.io page, and his Daguerreotype gallery as well. (We don’t think that they were all made with this procedure.)

The result is a chemically pure Daguerreotype plate produced in a seriously modern way, and we’d love to see the images in person. In these days of disposable images made by the AIs in your cell phone, it’s nice to see some people taking photography in strange directions. For instance, maybe you’d like to make your own ultra-large collodion plates. Or something else? If you do, show us!

Jigsaw Puzzles Are Defeated

To some folx, puzzles are the ultimate single-player game, but to others, they are like getting a single Tootsie Roll on Halloween. [Shane] of Stuff Made Here must fall into the latter category because he spent the equivalent of 18 work-weeks to make a robot that solves them automatically. Shots have been fired in the war on puzzles.

The goal of this robot is to beat a hybrid idea of two devilish puzzles. The first is all-white which could be solved by taking a piece at random and then checking its compatibility with every unsolved piece. The second is a 5000-piece monster painted white. There is a Moby Dick theme here. Picking up pieces like a human with fingers is out of the question, but pick-and-place machines solved this long ago, and we learn a cool lesson about how shop-air can create negative pressure. Suction. We wonder if anyone ever repurposed canned air to create a vacuum cleaner.

The meat of this video is overcoming hurdles, like a rhomboidal gantry table, helping machine vision see puzzle pieces accurately, and solving a small puzzle. [Shane] explains the solutions with the ear of someone with a technical background but at a high enough level that anyone can learn something. All the moving parts are in place, but the processing power to decode the puzzle is orders of magnitude higher than consumer machines, so that will wait for part two.

Continue reading “Jigsaw Puzzles Are Defeated”

LEGO-Sorting Vacuum Defeats The Problem

What’s the worst thing about LEGO? Most would agree that it’s the fact that those bright and colorful pieces of ABS are somehow the most evil thing that can come between your bare feet and solid ground. [Unnecessary Inventions] have done a one-eighty from their handle and made a quite useful invention — a LEGO-sorting vacuum cleaner called Suck It.

Well, technically, it’s a shop vac attachment, but it does the job beautifully. [Unnecessary Inventions] started with a never-used machine and a clear plastic cylinder cut into fourths. Then he designed some 3D printable brackets that have two jobs: they hold the cylinder together again, and they do so in stages that collect and sort LEGO by size.

The sorting brackets have no top and bottom layers to them — they are all sorting holes and infill to allow maximum suction. But wait, it gets even better, because the brackets click together satisfyingly with embedded magnets. The only thing that would make this build better is some kind of head attachment that could gather more than a narrow swath at a time. Be sure to check out the build and demo video after the break.

Of course, with this method, you still have to open up the sections and put your LEGO away. You could just vacuum them straight into the box.

Continue reading “LEGO-Sorting Vacuum Defeats The Problem”

Pressure Gauge Built In A Vacuum

Necessity might be the mother of all invention, but we often find that inventions around here are just as often driven by expensive off-the-shelf parts and a lack of willingness to spend top dollar for them. More often than not, we find people building their own tools or parts as if these high prices are a challenge instead of simply shrugging and ordering them from a supplier. The latest in those accepting the challenge of building their own parts is [Advanced Tinkering] who needed a specialty pressure gauge for a vacuum chamber.

In this specific case, the sensor itself is not too highly priced but the controller for it was the deal-breaker, so with a trusty Arduino in hand a custom gauge was fashioned once the sensor was acquired. This one uses an external analog-to-digital converter to interface with the sensor with 16-bit resolution, along with some circuitry to bring the ~8 V output of the sensor down to the 5 V required by the microcontroller. [Advanced Tinkering] wanted a custom live readout as well, so a 3D printed enclosure was built that includes both an LCD readout of the pressure and a screen with a graph of the pressure over time.

For anyone else making sensitive pressure measurements in a vacuum chamber, [Advanced Tinkering] made the project code available on a GitHub page. It’s a great solution to an otherwise overpriced part provided you have the time to build something custom. If you’re looking for something a little less delicate, though, take a look at this no-battery pressure sensor meant to ride along on a bicycle wheel.

Continue reading “Pressure Gauge Built In A Vacuum”