Simple Chemistry To Metallize And Etch Silicon Chips

We’ve been eagerly following [ProjectsInFlight]’s stepwise journey toward DIY semiconductors, including all the ups and downs, false leads, and tedious optimizations needed to make it possible for the average hacker to make chips with readily available tools and materials.

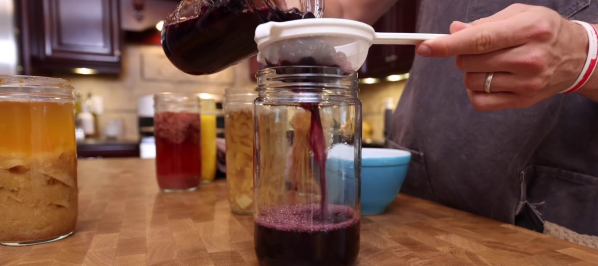
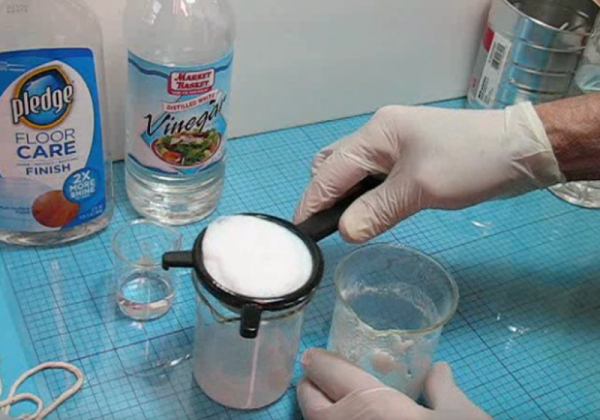
Next up is metallization, and spoiler alert: it wasn’t easy. In a real fab, metal layers are added to chips using some form of deposition or sputtering method, each of which needs some expensive vacuum equipment. [ProjectsInFlight] wanted a more approachable way to lay down thin films of metal, so he turned to an old friend: the silver mirror reaction. You may have seen this demonstrated in high school chemistry; a preparation of Tollen’s reagent, a mix of sodium hydroxide, ammonia, and silver nitrate, is mixed with glucose in a glass vessel. The glucose reduces the reagent, leaving the metallic silver to precipitate on the inside of the glass, which creates a beautiful silvered effect.

Despite some issues, the silvering method worked well enough on chips to proceed on, albeit carefully, since the layer is easily scratched off. [ProjectsInFlight]’s next step was to find an etchant for silver, a tall order for a noble metal. He explored piranha solutions, which are acids spiked with peroxide, and eventually settled on plain old white vinegar with a dash of 12% peroxide. Despite that success, the silver layer was having trouble sticking to the chip, much preferring to stay with the photoresist when the protective film was removed.

The solution was to replace the photoresist’s protective film with Teflon thread-sealing tape. That allowed the whole process from plating to etching to work, resulting in conductive traces with pretty fine resolution. Sure they’re a bit delicate, but that’s something to address another day. He’s come a long way from his DIY tube furnace used to put down oxide layers, and suffering through the search for oxide etchants and exploring photolithography methods. It’s been a fun ride so far, and we’re eager to see what’s next.

Continue reading “Simple Chemistry To Metallize And Etch Silicon Chips”

Make Your Own Vinegar

Making fermentation work for us is one of the original hacks that allowed humans to make food last longer, and festivities more interesting. [Mike G] has been experimenting with making his own vinegar, and found the end product to be a delicious addition to his cooking.

The first step is similar to making alcoholic beverages. Take something that contains sugar, like fruit, mix it with water and let stand. Wild yeast will feed on the sugar and create alcohol. Once the alcohol content reaches the 6-12% range, the resulting liquid can be separated from the solids and left exposed to the air. This allows Acetobacter bacteria to convert the alcohol into acetic acid, producing vinegar. The entire process takes around 30 days.

[Mike]’s first round of experiments was mainly with fresh fruit, with the addition of raisins. To prevent white mold from forming the mixtures should be stirred daily, but life got in the way and mold got out of control on all the fruits, except for the raisins. This gave [Mike] the to try another round with dried fruit, which was significantly less prone to mold, and produced deliciously flavored vinegar. [Mike] also demonstrated their use in a couple of mouth-watering dishes.

The DIY vinegar production process is just begging for some fermentation monitoring and automation tech. We’ve seen plenty of sourdough and beer production projects, which we suspect could also be applied to vinegar production with some minor changes.

Continue reading “Make Your Own Vinegar”

Turning Scrap Copper Into Beautiful Copper Acetate Crystals

Crystals, at least those hawked by new-age practitioners for their healing or restorative powers, will probably get a well-deserved eye roll from most of the folks around here. That said, there’s no denying that crystals do hold sway over us with the almost magical power of their beauty, as with these home-grown copper acetate crystals.

The recipe for these lovely giant crystals that [Chase Lean] shares is almost too simple — just scrap copper, vinegar, and a bit of hydrogen peroxide — and just the over-the-counter strength versions of those last two. The process begins with making a saturated solution of copper acetate by dissolving the scrap copper bits in the vinegar and peroxide for a couple of days. The solution is concentrated by evaporation until copper acetate crystals start to form. Suspend a seed crystal in the saturated solution, and patience will eventually reward you with a huge, shiny blue-black crystal. [Chase] also shares tips for growing crystal clusters, which have a beauty of their own, as do dehydrated copper acetate crystals, with their milky bluish appearance.

Is there any use for these crystals? Probably not, other than their beauty and the whole coolness factor of watching nature buck its own “no straight lines” rule. And you’ll no doubt remember [Chase]’s Zelda-esque potassium ferrioxalate crystals, or even when he turned common table salt into perfect crystal cubes.

A weld bead laid down with homemade CO2

Cooking Up A Batch Of Homebrew Welding Gas

You know the feeling — you’re making good progress on a weekend project, you’re really in the groove, things are going right. Right up until you run out of That One Thing™ that you can’t do without, the only store that sells it is closed, and you get a sudden case of whiplash as your progress hits a virtual brick wall.

Of course, every challenge holds the opportunity to hack your way around it, which is how [Lucas] ended up building this carbon dioxide generator. The “IG” in MIG welding stands for the “inert gas” that floods the weld pool and keeps the melted metal — the “M” in MIG — from rapidly oxidizing and ruining the weld. Welders often use either straight CO2 or a mix of CO2 and argon as a MIG shielding gas, which they normally get from a commercial gas supplier, generally on non-weekend days.

[Lucas] turned to grade-school chemistry for his CO2 generator, using the vigorous reaction of baking soda and vinegar to produce the gas. Version one was sketchy as all get-out; the second iteration still had some sketch factor thanks to the use of ABS pipe, but the inclusion of a relief valve should prevent the worst from happening. After some fiddling with how to get the reagents together in a controlled fashion, [Lucas] was able to generate enough CO2 to put down a decent bead — a short one, to be sure, but the video below shows that it worked.

Could this be scaled up to something for practical use? Probably not. But it’s cool to see what’s possible, and something to file away for a rainy day. And maybe [Lucas] can use this method to produce CO2 for his homemade laser tube. But again, probably not.

Continue reading “Cooking Up A Batch Of Homebrew Welding Gas”

DIY Closed-Cell Silicone Foam

Most of us have a junk drawer, full of spare parts yanked from various places, but also likely stocked with materials we bought for a project but didn’t use completely. Half a gallon of wood glue, a pile of random, scattered resistors, or in [Ken]’s case, closed-cell silicone foam. Wanting to avoid this situation he set about trying to make his own silicone foam and had a great degree of success.

Commercial systems typically rely on a compressed gas of some sort to generate the foam. Ken also wanted to avoid this and kept his process simple by using basic (pun intended) chemistry to generate the bubbles. A mixture of vinegar and baking soda created the gas. After a healthy amount of trial and error using silicone caulk and some thinner to get the mixture correct, he was able to generate a small amount of silicone foam. While there only was a bit of foam, it was plenty for his needs. All without having a stockpile of extra foam or needing to buy any specialized equipment.

We appreciate this project for the ingenuity of taking something relatively simple (an acid-base reaction) and putting it to use in a way we’ve never seen before. While [Ken] doesn’t say directly on the project page what he uses the foam for, perhaps it or a similar type of foam could be used for building walk-along gliders.

Photo via Wikimedia Commons

Not Just A Floor Wax But An Embossing Powder!

The embossing process used in the creation of some of your fancier wedding invitations and business cards is an interesting one. It’s often called thermography or thermographic printing. Slow-drying, wet ink is applied to a substrate. The ink is dusted with a thermoplastic polymer called embossing powder, and a heat source raises the ink while drying it.

Commercial embossing powder costs about $10 an ounce. As [Ken] discovered, its manufacture is quite closed-source to boot. He set about creating his own embossing powder, and succeeded with a combination of commonly available floor finish and distilled white vinegar. A standard-sized bottle of floor finish yielded about four ounces of homemade embossing powder.

How does this work? The floor finish is an acrylic-based stable emulsion. Adding vinegar destabilizes the emulsion, decreasing its pH and setting the polymer free.  It’s a fairly fast process, which you can see in the second video that accompanies [Ken]’s write up. From there, it’s mostly a matter of straining the material, letting it dry, and pulverizing the coarse matter into powder. In the first video, [Ken] performs a comparison test of Ranger, a commercial powder, and his own concoction.

For a completely different take on home embossing, check out this soda-can-turned-keepsake-box.

Camry Battery

Fixing A Toyota Camry Hybrid Battery For Under Ten Dollars

[scoodidabop] is the happy new owner of a pre-owned Toyota Camry hybrid. Well at least he was up until his dashboard lit up like a Christmas tree. He did some Google research to figure out what all of the warning lights meant, but all roads pointed to taking his car into the dealer. After some diagnostics, the Toyota dealer hit [scoodidabop] with some bad news. He needed a new battery for his car, and he was going to have to pay almost $4,500 for it. Unfortunately the car had passed the manufacturer’s mileage warranty, so he was going to have to pay for it out-of-pocket.

[scoodidabop] is an electrician, so he’s obviously no stranger to electrical circuits. He had previously read about faulty Prius batteries, and how a single cell could cause a problem with the whole battery. [scoodidabop] figured it was worth testing this theory on his own battery since replacing a single cell would be much less expensive than buying an entire battery.

He removed the battery from his car, taking extra care not to electrocute himself. The cells were connected together using copper strips, so these were first removed. Then [scoodidabop] tested each cell individually with a volt meter. Every cell read a voltage within the normal range. Next he hooked up each cell to a coil of copper magnet wire. This placed a temporary load on the cell and [scoodidabop] could check the voltage drop to ensure the cells were not bad. Still, every cell tested just fine. So what was the problem?

[scoodidabop] noticed that the copper strips connecting the cells together were very corroded. He thought that perhaps this could be causing the issue. Having nothing to lose, he soaked each and every strip in vinegar. He then wiped down each strip with some steel wool and placed them into a baking soda bath to neutralize the vinegar. After an hour of this, he reassembled the battery and re-installed it into his car.

It was the moment of truth. [scoodidabop] started up his car and waited for the barrage of warning lights. They never came. The car was running perfectly. It turned out that the corroded connectors were preventing the car from being able to draw enough current. Simply cleaning them off with under $10 worth of supplies fixed the whole problem. Hopefully others can learn from this and save some of their own hard-earned money.