The Unity ‘Candle’ With A 30 Foot Flame

candle

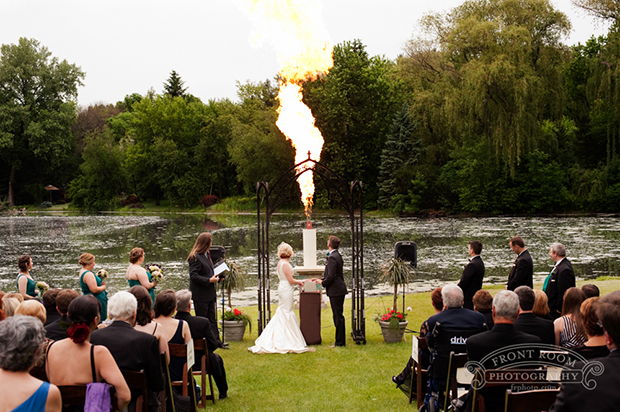
[Quinn]’s friends were getting married, and while the couple wanted something like a ‘unity candle’ ceremony, they though simple candles were entirely unimpressive and ultimately not very entertaining for the guests. They decided a unity fireball would be a much better representation of their relationship, and were lucky enough to have a good friend that could build one.

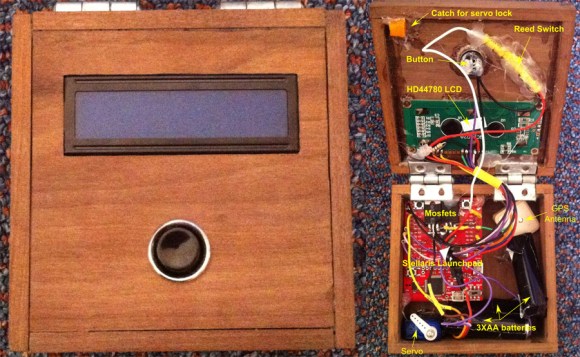
The design of [Quinn]’s unity candle consisted of a control box with two key switches, a giant button, and the gigantic propane fueled candle set well back from the bride, groom, and guests at the ceremony. The candle itself releases the entire contents of an accumulator tank over a hot surface igniter, creating a thirty foot fireball without a visible pilot light, or the loud jet-like sound you would get from a traditional ‘poofer’.

As with all giant fireballs in front of an audience, safety was of the highest concern. [Quinn] didn’t use a full propane tank for this build, instead, a new, purged, and never used tank was used as an accumulator, storing just enough propane for one giant fireball. All the valves, regulators, and plumbing were rated for LP, and [Quinn] even filled out the proper forms and got the local fire department to sign off on it. It’s safer than [Caleb]’s Mario fire flower, but you still shouldn’t try this at home.

Video of the ceremony below.

Continue reading “The Unity ‘Candle’ With A 30 Foot Flame”

GPS Engagement Ring Box

gpsEngagementRingBox

[James] got engaged recently, in part thanks to his clever GPS Engagement Ring Box, and he sent us a brief overview of how he brought this project to life. The exterior of the box is rather simple: one button and an LCD. Upon pressing the button, the LCD would indicate how far it needed to be taken to reach a pre-selected destination. After carrying it to the correct location, the box would open, revealing the ring (and a bit of electronics).

Inside is a GPS antenna and a Stellaris Launchpad, which are powered by three Energizer lithium batteries to ensure the box didn’t run out of juice during the walk. To keep the lid closed, [James] 3D printed a small latch and glued it to the top of the box, which is held in place by a micro servo. Once the box reaches its destination, the microcontroller tells the servo to swing out of the way, and the box can then open. As a failsafe, [James] added a reed switch to trigger an interrupt to open the box regardless of location. It seems this was a wise choice, because the GPS was a bit off and the box didn’t think it was in the correct place.

Swing by his blog for more information on the box’s construction and the wiring. We wish [James] the best and look forward seeing his future hacks; perhaps he’ll come up with some clever ones for the wedding like our friend Bill Porter.

Backlit PCB Panel As Wall Art

For his buddy’s wedding [Saar Drimer] wanted a one-of-a-kind gift, and what’s more unique than a piece of art? He set out to design something that would speak to his geeky game-loving friend. This full-panel PCB is what he came up with. It’s a wall hanging that uses addressable LEDs and a PCB for the enclosure and as a diffuser.

On the right you can see the panel as it was delivered to him. He used routed slots to separate the main body of the enclosure from the four side pieces and the mounting bracket. This design lets him snap off the parts and solder them in place. The only thing you need to add to it is a pair of screws (well, and the components that make it light up).

We’re shocked by how well the PCB works as a diffuser. The substrate is translucent when not covered with silk screen or the copper layers. The outline of the letters uses that, as well as circular areas along the side pieces. The letters themselves are copper fills that have artistic patterns removed from them. This really adds to the visual appeal when the piece is illuminated by 42 WS2812B LEDs. The video below shows the piece in action. It really takes PCB as art to the next level

Continue reading “Backlit PCB Panel As Wall Art”

Centerpieces For A Geeky Wedding

[Bill Porter] is a married man now, and evidently his new wife, [Mara], is awesome. They put together one of the geekiest weddings that included custom side-lit LED centerpieces.

Instead of laser engraving the dozens of plastic panels for each centerpiece, [Bill] tricked [Mara]’s Silhouette Cameo home vinyl cutter – the same one they made their invitations with – into engraving acrylic panels. They’re made out of very thin plastic, but the fact that the couple were able to snap apart the engraved plasic after putting sheets though the machine is very impressive for something that’s generally used for scrapbooking.

As for the base of each centerpiece, [Bill] whipped up a few enclosures on his 3D printer and built a few battery packs out of 18650 lithium ion cells. The nine LEDs in each base were leftovers from a previous project involving LED strips, perfectly suited to run for a few hours in a reception hall.

It’s a great build for a wonderful occasion, and we’re really impressed with the plastic cutting ability of the Sihouette Cameo. Very nice work there.

Really, Really Geeky Wedding Invitations

invitation

Being real, ultimate geeks, [Bill] and [Mara] didn’t want to settle for plain, paper-based wedding invitations. No, they wanted something cooler, and came up with their own DIY electronic wedding invitations.

Since they would be making the invitations themselves, [Bill] and [Mara] needed a simple circuit that could be easily mass produced. They turned to the classic microcontroller-powered blinking LED circuit powered by an ATtiny13.

The first order of business was producing 50 printed circuit boards for each of the invitations. For this, [Bill] picked up an Xerox Phaser laser printer off of ebay and a few sheets of copper-clad kapton film. The etch resist was printed directly onto the kapton film and etched in a bath of ferric chloride, effectively making a flexible PCB.

These circuit boards were soldered up and laminated between the printed invitation and the card stock cutter with the help of a Silhouette Cameo paper cutter. After the cards were assembled, the battery was wired up and the cards shipped out.

The microcontroller inside the card was programmed to be asleep most of the time, waking up only every few seconds to check a light sensor to determine if the card was opened or not. If the microcontroller sensed the card was open, the lights began blinking, making it one of the most memorable wedding invitations [Bill] and [Mara]’s guests will ever receive.

You can check out a demo of the invitations after the break.

Continue reading “Really, Really Geeky Wedding Invitations”

Robot Bar Tender Records Wedding Guests Getting Drunk

Having an open bar usually means hiring at least one bar tender. But this hack does away with those labor costs (and someone to make sure your teenage cousins aren’t drinking) by putting a robot in charge of things. But the fun doesn’t stop there. One of the features of this bartender is that it records a 30 second video every time it dispenses a beverage. We’d image these get a bit funny as the night wears on before taking a dramatic turn into sadness.

The link above shares a ton of details on the device so make sure that you click-through the different pages in the navigation bar. The mechanical page shows off all of the effort that went into designing the machine in Solidworks. The ingredients start on the top layer in inverted bottles. Each feeds to a valve which has its own nozzle. Like a round version of the Inebriator, a glass is placed in a trolley at the bottom that pivots around the center of the machine. Once it gets back to the opening in the acrylic case you can grab your drink, give it a quick stir, and off you go.

Check out the video after the break to get a look at the user interface which includes that recorded video greeting for the happy couple.

Continue reading “Robot Bar Tender Records Wedding Guests Getting Drunk”

Wedding Gift Fail Has Happy Couple Cursing Your Name

[Superluminal] received an invite to his friend’s wedding. He got together with some mutual acquaintances to take up a collection as a wedding gift. But as things go, a suitable present couldn’t be found. The pooled money itself ended up being the gift, but apparently a greeting card with a money pocket inside of it wasn’t good enough. The group decided to encase the coinage in a block of sugar that doubles as a lamp.

Now as with many well-meaning projects this started out with a rendering of what the final product would look like. That image came out great, with a high-gloss dark amber cube lit from the bottom with the coins suspended throughout catching a bit of a glint. They bought 43kg (almost 100 pounds) of refined sugar, and made a base/mold combination out of sheet metal. A lot of induction cooking went into producing thick syrup that could be poured into the mold. The problem is the final product is basically opaque. Not a sign of the 300 Euros within.

But don’t feel too bad for the groom and his bride. The image above shows him trying to get at the prize. He must do some hacking himself because he has a pressure washer, jack hammer (or is that big drill?), humongous cold chisel, and sizable hatch already at his disposal.

We can’t help but wonder if a heat gun could have polished the sides of the cube and helped add translucence?