How do you even?

An Incredible Clock Made Of Popsicle Sticks

[alvenh] has come a long way since he was a kid, but he kept the bag of popsicle sticks from his childhood. When he set out to build a clock for himself, he remembered his stored treasure and made something unexpectedly good out of the humble material. We’ve seen some neat stuff made with popsicle sticks before, but they usually retain their familiar shape.

[alvenh] began by choosing a style for his clock. We don’t know how he looked at a bag of sticks and thought, “Old English Georgian bracket clock with a bell top,” but if Hackaday teaches anything, it’s that some people just have a wider vision for the world. Next he laminated the sticks together or used them as a veneer for a thinner sheet of plywood to make his base materials.

An incredible amount of work went into the clock as he did things like sanding large contours using a jar for a form, or cutting mortise and tenons into craft sticks. [alvenh] even painted the face of the clock using his German Shepard as a model. Finally he installed an antique movement into the creation. The final result is stunning, and the build log is fun to read through.

Continue reading “An Incredible Clock Made Of Popsicle Sticks”

Woodworking Blemish Removal Technique Pops Your Clamping Dimples

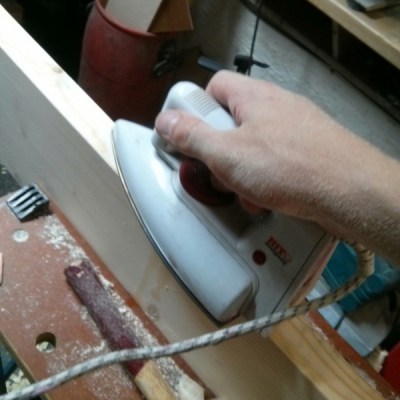
If you’ve done any woodworking in the past, odds are likely that you’ll eventually end up fixturing your stock in the crushing grip of a vise or C-Clamp. The results are painful, leaving a lasting impression of the clamp jaws on your beautiful, otherwise-unmarred piece of stock. Often, you’ll need to design around this issue, fixture it gently, or cushion the grip with a softer intermediate material. [Chimponabike] had other thoughts, though, and developed a technique for successfully popping the dimples out, returning clamped wood to its perfectly unmarred form.

wood-ironing-thumbThe Technique itself is dead simple and takes only a few minutes to perform. Simply apply a small amount of water, let it seep into the wood, and then bring a hot iron down onto the soaked wood to evaporate off the soaked water–instantly inflating the wood back into its original form!

It’s not the first time we’ve abused our tools and home appliances to do some clever things with wood, but it’s certainly worth adding to that “Tome of Techniques: Wood Edition” that you’ve been building in your browser’s bookmarks bar.

Thanks for the tip, [James]!

Puzzle Box

Puzzle Box Is Rigged To Blow

[Sande24] needed a gift for his father’s birthday. He decided that rather than simply give his father the gifts, he would present his father with a unique challenge. The gifts are locked inside of a multi-stage puzzle box. This isn’t your average puzzle box though. This one is rigged to blow.

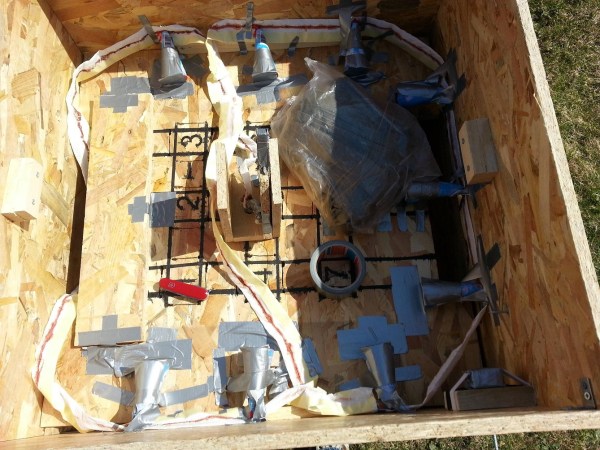
The puzzle box was designed to test his father’s reflexes, mind, and luck. The finished product looks sort of like a wooden crate made from particle board. The box contains three levels, each with its own gift and its own task to be completed.

With the lid opened, the first compartment and puzzle is revealed. Inside of the compartment were a new pair of gloves, meant to protect the father’s hands when working on the puzzles. The first puzzle is built into a sheet of wood with several custom-made levers. The levers must be moved into position in order to remove the wooden sheet and reveal the next level.

The first lever triggers a home-made detonator that eventually lights a series of fireworks placed around the box. You need to solve the puzzle box fast enough to prevent the fireworks from destroying the gifts that lay inside. [Sande24] was unable to legally purchase fuses where he lived, so he had to make his own.

The second level held a gas mask, also meant to protect the father from the booby traps of this mysterious box. This level, also made from a sheet of wood, has nine squares drawn on it. Each square is labeled with a different number which goes into solving a mathematical function (x^5-25x^4+233x^3-995x^2+1866x-1080 = 0). The solution to the function would reveal the safe path to be used to cut the wooden platform in half. Unfortunately [Sande24’s] father cut the wrong squares and released a huge amount of vinegar into the box. Oops.

The bottom level contained the final puzzle and the locked treasure compartment locked with an ordinary padlock. To find the key, another puzzle had to be solved based on a series of wooden levers labeled with different shapes. The shapes provided clues to the order in which the levers should be pulled. Once the levers were moved into position, two compartments were unlocked. One of them contained the key to the treasure box. The other contained another booby trap which would set off more fireworks, destroying the final gift of four cans of Kuld beer. That’s a lot of work to get a a few cans of frothy beverage!

[Thanks Ellery]

wood bowl cutting

Making A Wooden Bowl Without A Lathe

Typically, when creating a wooden bowl a crafts person would do so on a lathe. A chunk of wood would be bolted to the head stock and the bottom of the bowl turned to an appropriate shape. Then the half-bowl-shaped wood is flipped around on the lathe so that the material on the inside of the bowl can be removed. This traditional method of bowl turning requires a lathe, turning tools, and the serious technique and skill required for the task.

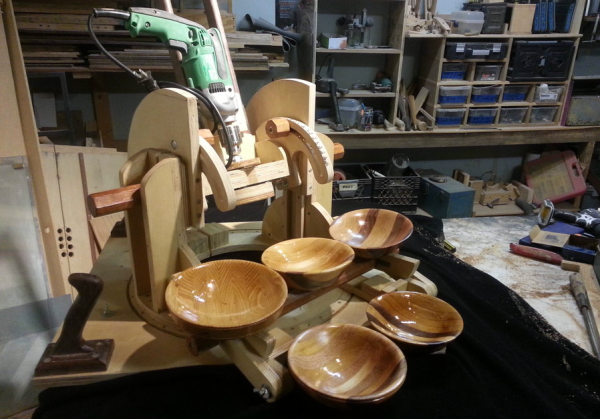
The master maker of weird wood working tools, [Izzy], decided to make a wooden bowl without the use of a lathe. He created a unique fixture to cut the shape of the bowl on a table saw, a piece of equipment that is a bit more common for the average DIYer to have. The fixture itself is made of wood and supports a standard hand drill in a vertical position. The soon-to-be bowl is bolted to the drill and hovers just above the table saw blade. The table saw is turned on and the fixture allows the work piece to rock back and forth creating the bowls outside shape. The drill rotates the piece so that the contours are consistent around the bowl.

The bowl is then flipped over and re-attached to the drill. This time to cut the inside of the bowl, the fixture is locked in the vertical position and the wood is dropped straight down on the spinning blade while being rotated. The saw blade cuts a perfectly hemispherical cavity in the wood. The final bowl looks great after a little sanding and an application of oil. Check out the video after the break.

This isn’t the first time [Izzy’s] projects have been here on Hackaday, check out his DIY Band Saw and Wooden Sphere Cutter.

Continue reading “Making A Wooden Bowl Without A Lathe”

Down Draft table

Down-Draft Table Keeps The Shop Dust Free

Wood working is great but it can certainly get the shop dusty. [BigD] is a wood worker and needed a way to keep his shop from getting super dusty while sanding or routing. He ended up making a pretty slick dual-use downdraft table with a hidden filtration system.

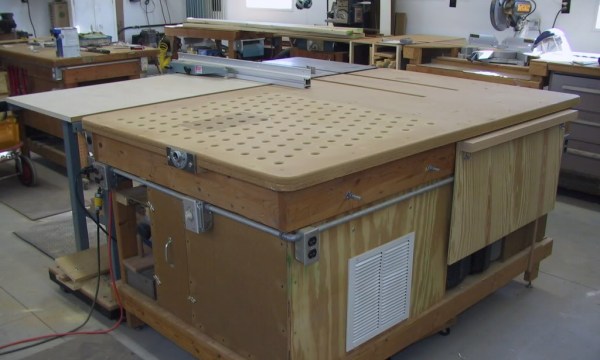
The table’s frame is made from standard 2-by dimensional lumber you’d likely see most shop tables made from. It was built so that the top of the table would be flush with the table of the table saw. This allows the down-draft table to also act as an out feed support for the table saw, making it easier to cut longer pieces of wood.

To allow airflow to pull any generated dust down, a plethora of holes were drilled in the table top. Down below are a couple sealed chambers, one for the incoming dust and one for the air blower that creates the down-draft air flow. The two chambers are separated by a pair of filters which keep the dust from being blown back into the shop. A little door on the side of the table allows access to clean out the accumulated dust and debris. Now [BigD] can sand up a storm on his down-draft table without breathing in a sapling worth of dust.

slab flattener

Router Jig Makes Quick Work Of Flattening Irregular Shaped Wood

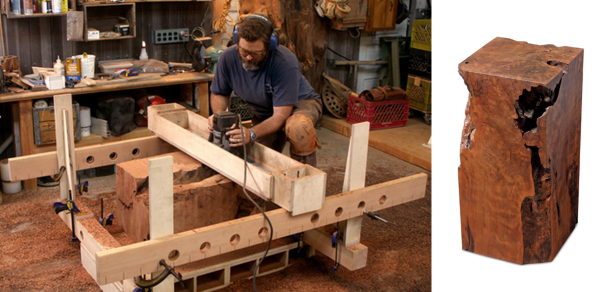
[Nick Offerman] is a pretty serious wood worker. He likes to make crazy stuff including organic looking tables out of huge chunks of wood. Clearly, the wood doesn’t come out of the ground shaped like the above photo, it has to be intensely worked. [Nick] doesn’t have a huge saw or belt sander that can handle these massive blocks of wood so he built something that could. It’s a jig that allows him to use a standard wood router to shave each side down flat.

The process starts by taking a piece of tree trunk and roughing it into shape with a chainsaw. Once it is flat enough to not roll around, it’s put into a large jig with 4 posts. Horizontal beams are clamped to the posts and support a wooden tray which a wood router can slide back and forth in. The router’s cutting bit sticks out the bottom of the tray and slowly nibbles the surface flat. Once one side is flat, the block is rotated and the flat side is used as a reference to make all the other sides square to the first. After flattening, sanding and finishing the block results in a pretty sweet piece of functional artwork.

wooden wood lathe

Mini Wood Lathe Made Of….. Wood?

When someone says ‘wood lathe’ the average person would think of a lathe used for turning pieces of wood into ornate shapes. But what if that lathe was also made of wood. Would that be a wood wood lathe? Instead of wondering the answer to that very unimportant question, young 15 year-old [laffinm] decided to actually build a wood wood lathe from plans he found in a magazine.

As you would expect, a 15 year-old’s budget is certainly not going to be very large. [laffinm] started by gathering plywood scraps left over at construction sites. The lathe bed, head stock, tail stock, tool rest and motor mount are all made from 3/4″ plywood. The tool rest and tail stock have knobs that allow loosening of each part so that they can be moved to any location on the bed.

Out back, [laffinm] made his own live center for the tail stock out of a chuck and bearing assembly that he pulled from an old drill. The tail stock supports were drilled out to fit the bearings which were epoxied in place. The live center and tail stock combination supports the right side of the work piece that is being turned on the lathe.

In the end the lathe came out pretty darn well. We here at Hackaday love projects that make use of recycled parts and this project sure does that as most of the parts were scavenged or obtained for free with the only exceptions a v-belt and some nuts and bolts. If you’d like to see the build process in detail, [laffinm] has a very complete Instructable with 3 build videos, the first of which you can find after the break.

Continue reading “Mini Wood Lathe Made Of….. Wood?”