mechanical seven segment display

Mesmerizing Mechanical Seven-Segment Display

Seven-segment displays are ubiquitous. From where I’m writing this, I can see several without even having to swivel my chair. We’re all familiar with their classic visage; slightly italicized numbers that are brought to life by LEDs. There are a boatload of variants available– you can get displays with a decimal point, ones with multiple numbers, and even versions in just about any color you desire, but at the core they’re all basically the same thing- an array of LEDs sitting behind a faceplate. Except for those ones that have some gears inside.

Wait, what?

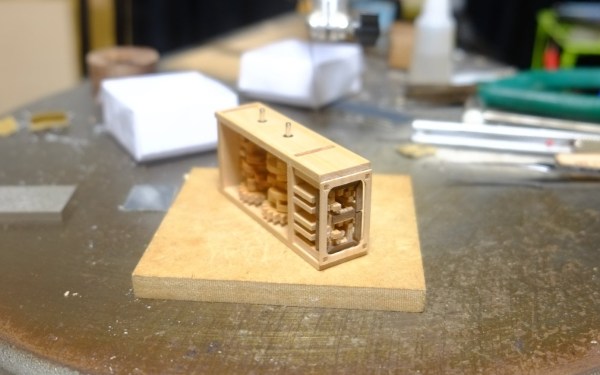
You read that right– a seven-segment display that contains gears, along with a handful of cams for good measure. Artist [Kango Suzuki] created this stunning all-mechanical seven-segment display that sequentially counts up from zero to nine when a thumbwheel is spun. All of the components are cut from wood and mesh together beautifully, complete with a satisfying click when the display rolls into a new digit, which you can hear in the video at the above link. You may recognize [Kango]’s style from this incredible mechanical clock he made a few years back. Unlike his earlier work, the seven-segment display is tiny, relatively speaking. Maybe we’ll see it integrated into a larger project some day, like a mechanical-digital clock.

We just love when somebody uses intricate mechanisms to artfully emulate some piece of existing tech. This isn’t even the first time we’ve seen a mechanical seven-segment display; [Peter Lehnér] built one back in 2019, and judging by [Kango]’s twitter feed, it appears to have inspired his design. There have even been a few other 3D printed ones over the years, but as far as we know this is the first wooden one– and, in true [Kango] fashion, its beautiful.

Thanks to [J. Peterson] for the tip!

Continue reading “Mesmerizing Mechanical Seven-Segment Display”

Vintage TV play The Brady Bunch on loop using modern electronics

Groovy TV Gets A Very Brady Makeover

Here’s the story of an old Sharp TV, which was donated to [mandy] to be hacked. Just one look and you can see, very clearly, it plays old Brady Bunch tracks.

Upon inspection of the old television, [Aaron] and [mandy] found that the unit first hit the local Montgomery Ward in 1969. And what just momentous event played on televisions across North America in 1969? Well yes, the Apollo moon landing. And David Bowie’s Space Oddity. And Abbey Road. And Woodstock. But no, we’re talking about that other momentous event that would shape young minds for generations to come:

The pilot episode of The Brady Bunch.

Vintage TV play The Brady Bunch on loop using modern electronics
The wood base keeps all the electronics in formation.

Yes, The Brady Bunch, that campy TV show that first aired in 1969 and ended in 1974. It just so happens that [mandy]’s favorite TV show is The Brady Bunch, so when the bright orange Sharp TV came along, she knew what had to be done.

While the style of the television may be timeless, the internals weren’t. They were removed, and a new internal frame was built from a naturally occurring cellulose/lignin composite adorned in Brady Blue. Inspired by in-store advertising displays and billboards that play the same content on a loop, [mandy] and [Aaron] added an Eyoyo 7” monitor and an Aptek video player.

Leaving no question as to what era the TV came from, the revamped piece now plays about 50 of [mandy]’s favorite Brady clips on loop, all modified to be centered properly on the off-center screen. Groovy! To round out the experience and keep things mellow, the knobs were re-attached using Lego pieces, and are reportedly very satisfying to spin.

If you’ve got a thing for vintage hacks, you might like this Pi-powered NuTone home intercom or this vintage camera flash turned clock. And if you have any awesome hacks you think we’d like to see, be sure to send them on over to the Tip Line!


Minimalist Robot Arm Really Stacks Up

There’s nothing like a little weekend project, especially one that ends up better than you expected. And when you literally build a robotic arm out of workshop scraps, so much the better.

Longtime readers will no doubt recognize the build style used here as that of [Norbert Heinz], aka “Homofaciens” on YouTube. [Norbert] has a way of making trash do his bidding, and has shown us all kinds of seemingly impossible feats of mechatronics with just what’s lying around. In this case, his robot arm is made from scrap wooden roofing battens, or what we’d call furring strips here in the US. The softwood isn’t something you’d think would make a great material for building robots, but [Norbert] makes its characteristics work for him, like using wax-lubricated holes for hinge points. Steppers and lead screws cannibalized from an old CNC build, along with the drive electronics, provide the motion. It’s a bit — compliant — but precise enough to pick up nuts and stack them nicely. The video below gives an overview of the build, and detailed instructions are available too.

We always appreciated [Norbert]’s minimalist builds, and seeing what can be accomplished with almost nothing is always inspirational. If you’re not familiar with his work, check out his cardboard and paperclip CNC plotter, his tin can encoders, or his plasma-powered printer.

Continue reading “Minimalist Robot Arm Really Stacks Up”

Good Enough For The Spruce Goose, Good Enough For Satellites

Wood products have a long history in aviation even though modern materials have eclipsed them in many areas. But lately we’ve noticed several plywood satellites, including this one the ESA plans to launch. The WISA Woodsat is a test of WISA plywood, a particular brand made in Finland to show how it can withstand the orbital environment.

Why not? Plywood is cheap and easy to form. You probably don’t want to make a pressure vessel with it, but most satellites don’t need that anyway.

Continue reading “Good Enough For The Spruce Goose, Good Enough For Satellites”

Disguising The PS5 With A Custom Wood And Carbon Fiber Enclosure

The PlayStation 5 has a very distinctive enclosure that some love and others hate. Its design certainly does not lend itself to lying on its side, even though this is a more practical orientation for putting on a shelf in a TV console. [Matt] from [DIY Perks] decided to address this and built a custom wood and carbon fiber PS5 enclosure that looks good in any orientation.

He started by disassembling his PS5 and taking out only the main electronics unit, fan, and power supply. These were mounted on a carbon fiber baseplate using hexagonal threaded standoffs. The sides of the enclosure were constructed from dark walnut, with holes cut in the front and back for connectors and airflow. A long recess was cut in the front hole and covered with an ingenious carbon fiber cover which opens if you press it at one end and acts as the power button if you press it at the other end.

Matt paid close attention to the airflow routing of the original enclosure and copied it to the new one. Like the original, he used adhesive foam strips to direct the air through the heat sinks. The top cover is also carbon fiber, with an elegant honeycomb hole pattern with wood inserts for the air intake.

This is not [Matt]’s first custom PS5 enclosure. The other was a significantly more flashy brass incarnation of the original. Other custom enclosure he’s made include a wood PC case and a brass encased USB-C monitor. Continue reading “Disguising The PS5 With A Custom Wood And Carbon Fiber Enclosure”

Wood Enclosure Lends Warmth To This DIY Ribbon Microphone

We love it when someone takes an idea they’ve seen on Hackaday and runs with it, taking it in a new and different direction. That’s pretty much what we’re here for, after all, and it’s pretty gratifying to see projects like this wooden ribbon microphone come to life.

Now, we’re not completely sure that [Maya Román] was inspired by our coverage of [Frank Olson]’s homage to the RCA Model 44 studio mic rendered in walnut veneer, but we’re going to pat ourselves on the back here anyway. The interesting thing with [Maya]’s build is that she chose completely different materials and design styles for her project. Where [Frank] built as much of his mic from wood as possible, [Maya] was fine with a mixed media approach — CNC-milled plywood for the case and stand, laser-cut acrylic for the ribbon motor frame, and 3D-printed pieces here and there as needed. The woven brass cloth used as a windscreen is a nice detail; while the whole thing looks — and sounds — great, we think it would be even better with a coat of dark stain to contrast against the brass, as well as a nice glossy coat of polyurethane.

The video below shows the whole design and build process, which was a final project for [Maya]’s audio production class this semester at college. Here’s hoping that it got as good a grade as we would give it.

Continue reading “Wood Enclosure Lends Warmth To This DIY Ribbon Microphone”

A Trip Down The Vacuum Clamping Rabbit Hole

We all know how easy it is to fall down the rabbit hole,  something that turns a seemingly simple job into an accidental journey of experimentation and discovery. And perhaps nobody is more prone to rabbit-holing than [Matthias Wandel], at least judging by his recent foray into quantitating different techniques for vacuum clamping in the woodshop. (Video, embedded below.)

To understand where this all came from, you’ll have to dial back to [Matthias]’s first video, where he was just trying to make a simple corkboard. In an effort to get even pressure over the whole surface of the board, he came up with a shop-expedient vacuum clamp, made from a sheet of thick plastic, some scraps of wood and clamps, and a couple of vacuums. With the workpiece sandwiched between a smooth, flat table and the plastic sheet, he was able to suck the air out and apply a tremendous amount of force to the corkboard.

The comments to the first video led to the one linked below, wherein [Matthias] aimed to explore some of the criticisms of his approach. Using a quartet of BMP280 pressure sensor breakout boards and a Raspberry Pi, he was able to nicely chart the pressure inside his clamping jig. He found that not only did the sensors make it easy to find and fix leaks, they also proved that adding a porous layer between the workpiece and the vacuum bag wouldn’t likely improve clamping. He was also able to show which of his collection of vacuums worked best — unsurprisingly, the Miele sucked the hardest, although he found that it wasn’t suitable for continuous clamping duty.

We can see a lot of uses for a jig like this, and we really like it when trips down the rabbit hole yield such interesting results. Especially quantitative results; remember [Matthias]’s exploration of basement humidity?

Continue reading “A Trip Down The Vacuum Clamping Rabbit Hole”