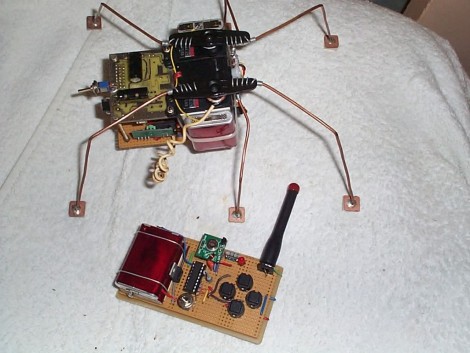
Here’s a fantastic project that lets to drive a hexapod around the room using an RC controller. [YT2095] built the bot after replacing the servo motors on his robot arm during an upgrade. The three cheapies he had left over were just begging for a new project, and he says he got the first proof-of-concept module put together in about an hour. Of course what you see above has gone through much improvement since then.
The three motors are epoxied together, with the one in the middle mounted perpendicular to the motors on either side of it. Those two are responsible for the front and rear leg on each side, with the third motor actuating the two middle legs. It’s a design we’re already familiar with having seen the smaller Pololu version. You might want to check that one out as there’s some slow motion video that shows how this works.
[YT2095] added control circuitry that includes an RF receiver. This lets him drive the little bot around using a transmitter with four momentary push switches on it. We love the idea of using copper clad for the foot pads.


That’s an amazingly cute little robot. I like the 90 degree angled pcb – makes it look very homebrew :)
It’s a classic alternate tripod but building is great, servos being chassis at the same time
Thanks ;)
also, someone asked me on Twitter for the Code and diagrams etc…
I have no diagrams, but the stuff I used was a SCON board from: http://www.sconcon.com/
the designer of these boards is a real nice guy and plenty helpful!
the RF side used a pair of 433MHz Rx/Tx pair (cheap chinese ones), and also the HT12E and HT12D chips digital Encoder and Decoder respectively.
the outputs of the HT12D go through a simple hex inverter to the SCON boards input lines.
the Code is really simple too, here:
address 0
begin
If input 1=1 goto forwards
If input 2=1 goto test4
If input 3=1 goto backwards
If input 4=1 goto left
goto begin
forwards
Move 10000
output 15 on
Move 10001
output 15 off
goto begin
backwards
move 10300
output 15 0n
move 10301
output 15 off
goto begin
right
Move 10100
output 15 on
Move 10101
output 15 off
goto begin
left
move 10200
output 15 on
move 10201
output 15 off
goto begin
test4
if input 4=1 gosub wobble
goto right
wobble
move 10400
output 15 on
move 10401
output 15 off
goto begin
Address 10000
Position s1=17000 s2=17500 s3=17000
Position s1=13000 s2=12500 s3=13000
address 10100
Position s1=13000 s2=17500 s3=17000
Position s1=17000 s2=12500 s3=13000
address 10200
Position s1=13000 s2=12500 s3=17000
Position s1=17000 s2=17500 s3=13000
address 10300
Position s1=17000 s2=12500 s3=17000
Position s1=13000 s2=17500 s3=13000
address 10400
Position s2=12500
Position s2=17500
the Nice part about the boards controller is that the Stack Pointer goes back to the line directly following the initial Jump command from a key press, allowing Multiple key`s to be pressed at once, so you can have turn right/left on the spot, OR Forwards turn, or backwards turn, and if you press all 4 keys down at once it`ll do a little dance :)