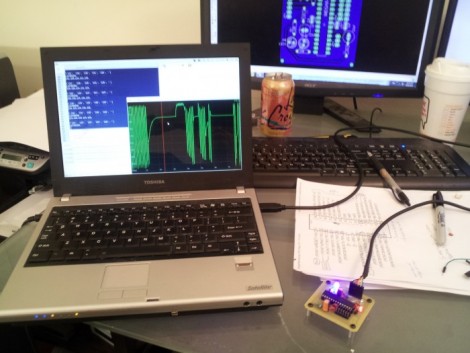
[Scott Harden] has already produced some projects which measure analog inputs. But he’s got plans for more and wanted a base system for graphing analog signals. You can see the small board next to his laptop which offers the ability to sample up to six signals and push them to a PC via USB.
The ATmega48 and a few supporting components are all you’ll find on that board. The USB connection is taken care of by an FTDI cable. He went that route because the cables are relatively cheap, easy to come by, and already have driver support on all the major operating systems. If you look at the screen you can see a window graphing one analog input in real-time. He wrote this in Python (which is once again a cross-platform tool) and it has no problem graphing all six inputs at once.
This is immediately useful as an upgrade to [Scott’s] ECG machine. His future plans include a Pulse Oximeter, EEG, and EEG.


Great little device, will definitely speed up protoing.
Why such deep Q waves in his ECG? I don’t think he had the pads in the correct places.
No mention of maximum sample rate, should be one of the most important spec’s of a data acquisition device.
I was thinking the same thing. The serial connection will almost certainly be the bottleneck here. I hate to say this but couldn’t this have been done with an Arduino (clone)? They cost $13 to $30 depending on where they are made, features, DIY, etc.
Yes, it could have been done with an Arduino. But Scott states in the article that minimum price is one of the primary goals, and that he has no problem re-inventing the wheel if necessary to achieve it.
I’m a PIC programmer, and I know I could replicate this for under $4 and an evening’s worth of work. Including firmware written completely from scratch with no libraries, like Scott appears to have done. I applaud those willing to start from a bare chip and write their own code for using MCU peripherals; rather than just throw an Arduino at any problem.
The $4 doesn’t include the FTDI USB-to-serial adapter, but that is a separate module that can be reused for other projects. Modularity/reusability seems to be important to Scott too, since the low-noise preamp is going to be a separate board.
Creating minimalist modular building blocks like this allows you to take them apart and put them together into something completely different for a quick experiment, often with very little work.
Scott’s ADC-to-serial module would look very much at home with the modules I’ve been building. The only thing missing is the supermagnets I glue to the bottom of the standoffs, which allow me to keep multiple modules from sliding around my workbench by snapping them to a sheet metal panel.
Nice!
I think that it’s a good idea to also add an expansion connector to use the remaining pins as digital I/O .. in this way it becomes a complete I/O system that can be connected to the PC.
@Chris C
I’ve nothing against PIC or it’s use in this project. People should use what they like! I don’t get this price argument on ‘duino vs PIC though. I have a friend who is always making the same argument but it just doesn’t add up.
For example you state you can get your MCU for $4. So? I just priced out an ATMEGA328PU, 2 18pf caps and a 16Mhz Crystal over at Mouser for $2.57 and it was only that high because I only considered through-hole parts. Afterward i did remember another 10k resistor is required for programming plus a .01uf cap if you don’t want to have to hit reset manually when uploading sketches but you probably get the idea.
Now, comparing developing on a PIC chip vs a full Arduino board, yes, the Arduino board is much more expensive. The Arduino board isn’t a micorocontroller though, it’s a development platform. I’m not sure what makes development platforms so much more expensive than the sum of their parts but compare Arduinos to just about any other platform (except for the MSP430 launchpad). The Arduino is pretty cheap!
Personally, I like to just breadboard a chip plus the few necessary support components though and save the money. I haven’t tried it w/o the crystal yet but I will soon.
lol @ “I haven’t tried it w/o the crystal yet”, just remove the crystal and two supporting capacitors (save some cash) and set a fuse bit to use the internal oscillator.
If using the Arduino bootloader you also must switch to a modified version and also anything relying on timing will have to be scaled. I’ve mostly used them for generating tunes (christmas cards) so far and that would definitely require some changing to get the notes and durations right.
Fairly sure he meant in it’s entirety.
I always seems to be able to find a cheaper PIC to handle my needs than the satisfactory AVR.
May depends on your prefered supplier (farnell). Also if you’re willing to use ASM ( as I always do) you can find some very cheap PICs.
You’ve misunderstood me.
I wasn’t comparing PIC vs. AVR, but rather the cost of a bare chip and necessary support components vs. a dev board like the Arduino.
PIC is just what I’m most familiar with, so that’s what I built my offhand $4 estimate around (including full bill of materials – support components, headers, raw PCB material, etc). An AVR would probably be pennies more.
Yah. I was thinking of Arduino as AVR + bootloader + Adruino IDE. Not quite the same as just AVR straight but not the expensive board either.