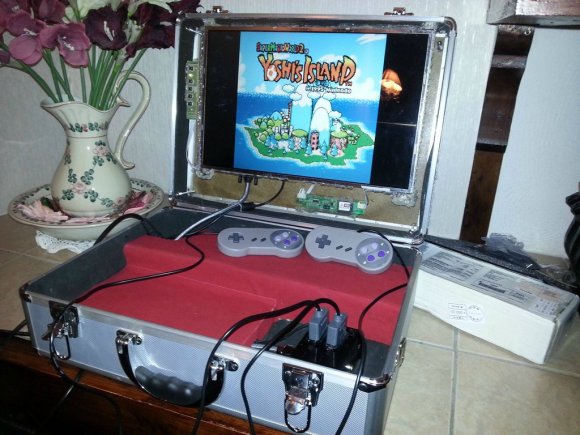
You can look and look, but you won’t find a Super Nintendo inside of this retro gaming rig. [Webrow] is giving his vintage hardware a rest, and taking this all-in-one game emulator suitcase wherever he goes.
The machine at the heart of his build is of course a Raspberry Pi. You really can’t beat the ubiquitous board for cost, power, and hardware extensibility. An LCD panel from a broken laptop comes along for the ride having been mounted in the lid. For a long time there was no hope for reusing these panels, but [Webrow] found an adapter board (for nearly the same price as the RPi) which converts the DVI from the Pi to the LVDS needed by the screen. The connections and mounting scheme for the screen were where most of the project work was done. Connecting the controllers simply involved soldering some SNES controller sockets to an RPi breakout connector. We do have to compliment him on the red bezel which hides all of the power cords and other unsightly bits. The case look sturdy and ready to play!


This is so awesome, I wanna…. oh wait, I have a laptop and USB controllers.
Though I’m probably gonna pick over how the laptop LCD was utilised…. and probably start eyeballing the couple of portable DVD players in the “fix or hack” pile.
The laptop LCD is the most interesting part! I’ve been saving laptop LCD panels for a while now, and if LCD controllers are down to $35, then awesome!
There’s not so much of an economic imperative now though. When desktop LCds were $400 or so and the pre-built screen controllers were $200-300 standalone or PCI card, it was barely worth it… now we’re seeing 15-18″ desktop LCDs on sale at $70 to $80, and from $20ish for a working used ones, so you’re thinking you may as well start with the desktop ones, since their controllers present a standard interface to the world.
A little disappointed to see it was just a plug’n’play module, even if they are a lot cheaper not. Kinda funny to see how all the smarts looked so lost in that big case though, and how just the power connections dwarf them…. kinda leaves you thinking, you could stick it all in the “lining” as it were for a suitcase with upgrades :-D
It depends on the size + resolution you want. Not saying I exhausted the world’s choices in my search, but when I wanted a 17″ LCD panel @ 1920×1080, the easiest was to go on ebay and get a laptop panel & controller. You can witness the crude project into which that went, here:
http://blog.lmorchard.com/2013/02/10/building-my-couch-computing-station
I really wanted to see a RaspberryChromePibox someday.
I always hated that Yoshi’s Island game.
this is great. i introduced emulators and retro gaming to my wife a few weeks ago. now maybe she will let me get a pi
Anyone know what is he’s using, and which emulators?
1 Standard Raspbian Image
2 RetroPie Project – petrockblog.wordpress.com
3 Basically it’s RetroArch, Ported by Toadking to Arm architecture, With a nice GUI made by Aloshi@Github.com, wrapped together in a nice script by Petrockblog, ( Tho ive set it up manually caus eI needed soem adjustments, which you can find in petrockblogs script nowdays.
I hate the word BEZEL, one fancy name for a frame not a cover. One is needed for the LCD screen and drive boards.
Is this really a hack? Putting a RaspberryPi in to a cheap Chinese case? Whats next, Hello World on a Audrino?
no. it will be a basic arduino spelling course, just for you ;)