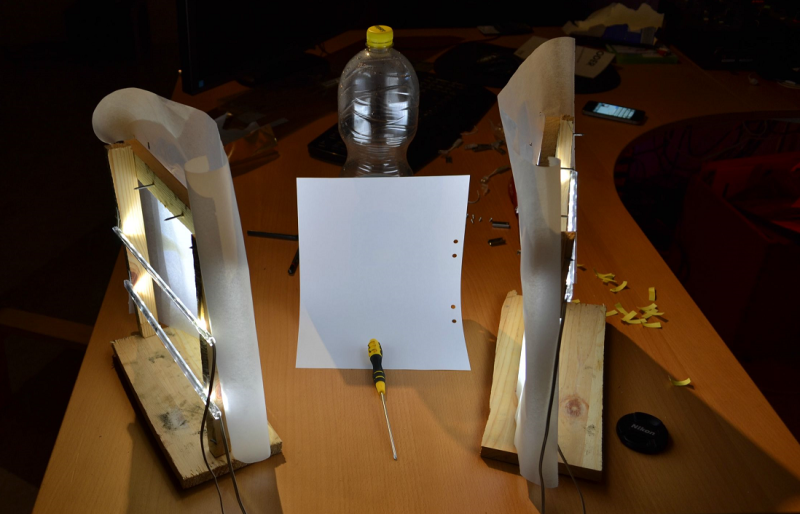
If you’ve ever tried to take nice photos of small objects in your home, you might have found that it can be more difficult than it seems. One way to really boost the quality of your photos is to get proper lighting with a good background. The problem is setting up a stage for photos can be expensive and time-consuming. [Spafouxx] shows that you don’t need to sink a lot of money or energy into a setup to get some high quality photos.
His lighting setup is very simple. Two wooden frames are built from scraps of wood. The frames stand upright and have two LED strips mounted horizontally. The LEDs face inwards toward the object of the photos. The light is diffused using ordinary parchment paper that you might use when baking.
The frames are angled to face the backdrop. In this case, the backdrop is made of a piece of A4 printer paper propped up against a plastic drink bottle. The paper is curved in such a way to prevent shadows. For being so simple, the example photo shows how clean the images look in the end.


Very ingenious. I’ll consider it next time I need to photograph small stuff.
The main problem is with autoexposure on cameras. If you take a photo of an item on a white background the camera’s auto exposure will see that as overexposed and and adjust accordingly. You then end up with an underexposed object and a grey background.
To get good results you ideally want to turn off autoexposure. One easy way to get the right setting is to take a picture of a grey object under the same lighting conditions and note the auto exposure settings. Then turn off the autoexposure and use the same settings in manual mode. You can now take your pictures against a white background with the correct exposure.
Or just set the camera to pick the lighting from the center bracket instead of averaging.
If you have a manual mode, that option should be there in like 99% of cameras.
Specifically 18% grey for “correct” exposure… Yeah yeah..let it go…
http://en.wikipedia.org/wiki/Middle_gray
Many cameras (even fully automatic compact cameras) have adjustment for the auto exposure, just up it by a few notches and white background comes out ok.
you will get a LOT more good quality light using diffusers from old/broken LCD panels (32′ TVs are very nice for that, pick them up on the street whenever you see one)
Thirty two foot televisions? Things really are bigger in America, huh?
he meant 32″ or 2′ 8″
I’m sure we would buy them if we could!
made me think of this video https://www.youtube.com/watch?v=qk5hHNsAcec
That example piston photo is really bad.
Shameless plug: here is mine example how simple stage (read, not expensive, built from the household items, in the kitchen) could look like: http://pavuk.7gods.org/product_photo_set_up_2.jpg
Built on the kitchen table, table cloth used as background, lit with one desktop lamp, one flood lamp bought some time ago for a few bucks and two small crappy cheap flash lights. Few wood planks, clamps and baking paper, piece of plexiglass, yogurt pots.
And the result: http://pavuk.7gods.org/Product_photo_Whisky_Bottle-Februar_2011/
I like the idea and it’s always a good thing when anyone makes something from scratch. However, I can say from experience that one will get far better results using a small cardboard box and either painting the inside white or lining it with a thick white paper like poster board. You then cut windows in two sides and the top and cover the windows with tracing paper or vellum. Then use your light sources of choice to place on the outside of the windows. Someone mentioned an issue with auto exposure but that’s easily remedied with a free image editing program like gimp. You simply adjust the levels and you’re good. Besides, you should always do some post editing with product photos. A much bigger issue than auto exposure is your white balance. White balance can be fixed in an image editing program but it’s far more difficult to fix than over/under exposure. To help ensure you have good white balance you need to make sure that all your lighting sources are the same, or at least as close as possible. LEDs, flourescents, incandescents, etc all cast a subtle hues that most cameras can compensate for but you run into issues if you mix them. Which leaves you with color tinted photos that don’t look right. Of course, having a camera that lets you pre-adjust white balance helps a great deal as well.
” Someone mentioned an issue with auto exposure but that’s easily remedied with a free image editing program like gimp. You simply adjust the levels and you’re good.”
Nope, because photos are 8 bits per channel, and you’re throwing out a significant amount of information by not using the camera’s full range. Banding is among several problems you’ll have.
Damn near any digital camera has exposure compensation, almost as many as have a histogram display. Use it. The white background should be at the very edge of the histogram (ie there should be a very big peak right at the end of the histogram.)
Take butcher paper outside. even horrible cameras take excellent pictures in the sun’s beautiful daylight
Take your photos outside in the shade or on a cloudy day. Studio lighting’s goal is to emulate really good diffuse sunlight.
Needs some top lighting
any suggestion for selfie lighting ..out door at night?
http://hackaday.com/2015/05/21/build-a-100w-led-flashlight/
Pointed directly to the face.