If you’ve always wanted to build your own pinball machine but have no idea where to start, this is the project for you. [Chris] is in the process of building a 3/4 size pinball table and is currently in the waiting-for-parts stage. As they arrive, he is testing them in a sandbox he built in an afternoon. Let [Chris]’s proving ground be your quick-start guide to all the ways  you could approach the two most important parts of any pin: the flippers and targets.
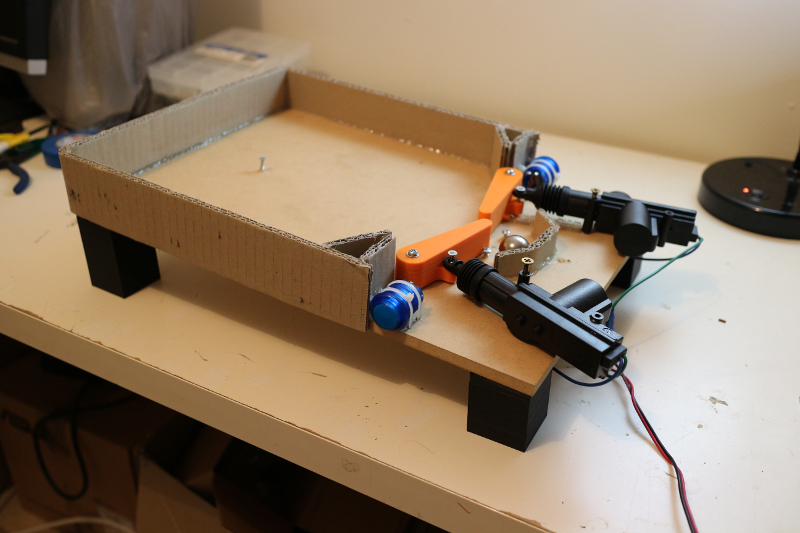
The field of play is a sturdy piece of particle board, and the cardboard walls are attached with hot glue. [Chris] designed and printed a pair of flippers that are driven by some cheap remote door lock motors he found at a popular online auction house. You can see how snappy are in the test video after the break.
We love the crisp action and elegant simplicity of the spring-loaded drop targets [Chris] designed. Right now he resets them manually, but soon they will be reset by a solenoid or maybe a motor. We can’t wait to see how the table turns out. In the meantime, we’ll have to go back to drooling over this amazing life-size 3D-printed pinball machine.


I guess the door lock motors handicap instead of faster solenoids for the reduced size field? Could be done by just running solenoids at reduced power.
The speed can be changed arbitrarily by adjusting the leverage. Solenoids are just too fast for the purpose, because you want the paddle to be a bit slow to be controllable.
12v solenoids are just too weak and slow for flippers, the doorlock actuators have plenty of grunt but lack the speed of commercial pinball solenoids. Dax is right, it’s all about the lever action with this setup.And there is a direct trade off between speed and power, gotta hit that sweet spot :)
These actuators work best when the ball is some distance from the flipper, they seem to lack a bit of off the line grunt.
Apart from the high electrical power aspect of commercial pinball solenoids, the supporting hardware for them is just too pricey, around the $60-$80 mark for each flipper. Using the doorlock actuators and 3d printing you can get that cost down around $10-15 per flipper. it’s a decent trade off i think.
If you want a full size playing field i would suggest 2 sets of flippers (which i plan on adding to my table anyway) but still it would add to the challenge of the game, especially since the smaller top field flippers will be grossly overpowered making it all the more satisfying doing a trick shot from the main flippers.
“You can see how snappy are in the test video after the break.” I was surprised to see how well they worked. Although I recon that a real solenoid would work even better and I’m sure that if the flippers had a rubber band of some kind (like a real flipper) then it would be even snappier.
What scared me (as a electronic engineer) was the way how the motor interacted with the sound of the video. Every time the flipper flipped the audio had some very heavy noise, the music was unable to hide that. So the motor wires need some extra filtering. So not only these motors are really snappy… they are really noisy to, I’m sure Marconi could have used them for his first spark-gap-radio-transmission experiments, haha.
Other then that, pinball is fun and using door openers is really creative. Those drop targets seem to work really well. Good to see that this a mechanical version and not a PC + very large screen. Pinball should be mechanical for the proper experience and this little project hit’s that feeling spot on. I’m sure that the builder will improve this creation and I’m sure we’ll be reading more about it on hackaday.
I have since added rubbers to the flippers and the pin, indeed it is much better with them on :)
The crackling in the audio is from OpenShot, an open source video editing program that can’t handle adding two sound tracks together without clipping the audio. The search continues for a decent cheap/free video editor (since MS decided i don’t need Movie Maker anymore RIP)
Thanks for the kind words d:)
Thanks for clarifying the noise in the audio. If you found a decent free video editor, feel free to post it here. I could use one in the near future.
As it turns out it seems that movie maker is available for free now http://www.windows-movie-maker.org
I’m pretty sure i tried this a while back and it asked me for money when i published a video but as of today when i installed it, i can create 5+ minute videos without the nag so maybe MS stepped in and called foul. either way, i find it the easiest way to throw images, videos and music together so long as your source material doesn’t need editing (gamma/colour grading etc).
Hitfilm Express 2017 (https://hitfilm.com/express) is quite amazing for the money (nothing!)
Are you going to make it like commercial pinball games with built in ‘cheat shots’ that shoot the ball straight down the middle where the flippers can’t touch it, and others that fling it down the ‘drains’ that go behind the flippers?
Perhaps. I want it to be enjoyable to play, nothing too hard. I actually own a 1975 Williams Toledo electromechanical pinball machine but it’s in storage and a few years off from being something that i can restore. I am quite happy with it’s layout and game play so i’ll be basing this machine roughly on that design.
I’ve been thinking i might make it a pacman themed pinball where you need to hit the inserts (roll over buttons in the table, making the video now) like power pellets to make the ghosts edible. The “ghosts” would be the drop targets so if you hit one without a power pelette it’s like a tilt/freeze but if you get a power pellet and drop all the targets you get an extra ball.
Having 3 balls in game play isn’t out of the question either. maybe some feedback on this project will help make my mind up on how the game will function :)
For video editing I’m using the free version of Davinci Resolve for a while and I’m very happy with it.
I’m calling it just bad sound editing.
A possible further development: make all moving parts (bumpers, targets, flippers, slingshots etc.) independent with their own rechargeable battery and capable of communicating each other where needed through low power wireless RF or IR, so that they can be moved, added or removed to change on the fly the pinball arrangement.
The problem with that idea is that all of those parts require holes in the playfield and (normally) parts under it, so they can’t be moved around very easily and running wires to them isn’t a challenge anyway.
Pinball 2000. The last great innovation in pinball. Only two models using the system were built before Bally Midway closed their pinball division.
It did away with a general illumination circuit. Every lamp on the playfield was individually controlled, along with many other electronic things new to pinball.
The concept was the cabinets would all be the same, changeable with a swap of playfields and art panels.
That’s kind of crap of them really. i like that each pinball machine has a unique way to play it. knowing one doesn’t mean that i know the other etc. Those little quirks in game play are what makes me want to drop a coin in a particular machine.
For lighting though I’ll be using APA102’s so multiple effects and their brightness will be rather inundating. i have 100 of them and i’ll be building 2 tables so with a maximum of 50 LED’s per table that should rather enough hehe.
Wouldn’t dedicated sockets or turning the bottom of the field into a giant PCB work better? Simply route everything to a main bus you can wire the controls into as you move things around.
Each obstacle or feature requires mounting brackets already, why not turn part of the bracket into power transmission while you’re there? It could certainly keep the trapworks tidy no matter how you arrange it.
Peg board..
Those flippers are way too slow for any fun gameplay. You NEED solenoids for it to work. These actuators are good to reset the drop target banks and for many other things too like lane diverters and such.
hi i was wondering if you could display a wiring diagram. thanks!
I’ve set up a test rig with two car lock actuators. they work nicely, not yet tested with flippers, I’m waiting for a 3d print to arrive, but right now I’m facing some problems. When powered up with 12v 2A wall charger, one flipper works great and draws 2.5A, when I add another one to the same circuit, so same power supply, they work exactly the same way after the button press but only when pressed individually, when I hit both buttons, they will work once and then freeze for a couple of seconds. I also tested a laptop brick I had laying around 19V 3.5A, on which actuators work even better with a return action, but again also individually. They each draw 4.5A, and don’t work a the same time. Of course they also overheat quickly. Right now I don’t see any other option than powering them individually. Did you have similar experiences?