One of the great unsolved problems in the world of DIY electronics is a small keyboard. Building your own QWERTY keyboard is a well-studied and completely solved problem; you need only look at the mechanical keyboard community for evidence of that. For a small keyboard, though, you’d probably be looking at an old Blackberry handset, one of those Bluetooth doohickies, or rolling your own like the fantastic Hackaday Belgrade badge. All of these have shortcomings. You’ll need to find a header for the Blackberry keyboard’s ribbon cable, the standard Bluetooth keyboard requires Bluetooth, and while the Belgrade badge’s keyboard works well, it’s a badge, not a keyboard you would throw in a bag for years of use.
[bobricious] might have just cracked it. For his Hackaday Prize entry, he’s created a tiny USB keyboard out of tact switches. What’s the secret? An entire panel of PCBs. It looks great, and it might just hold up to the rigors of being tossed in a random bag of holding filled with electronics.
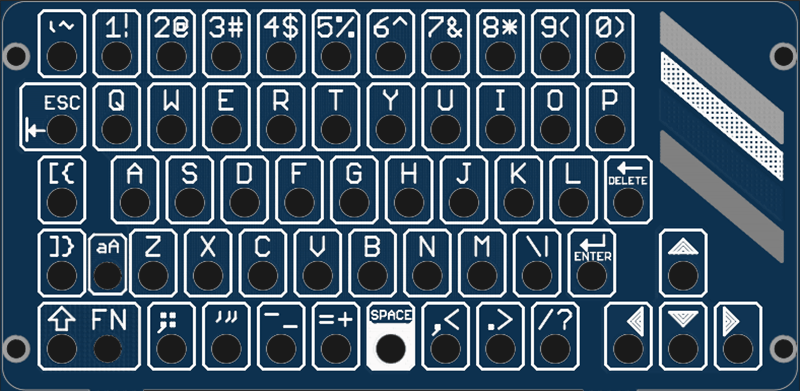
The electronics for the keyboard are simple enough; there are 56 standard through-hole tact switches, and an SAMD21 microcontroller. Connections to the outside world are through a micro USB port, serial, or I2C. it’s small, too, coming in at just under 5 cm by 10 cm.
The real trick here is using a stack of PCBs to label the buttons and provide a bit of mechanical support. The panel for this project consists of one base board holding all the electronics and a secondary board that gives the entire project a finished look while adding a bit of structural support.
If you’ve never looked at the options for small keyboards, there aren’t many. Blackberries are a thing of the past, and there’s no good way to add a QWERTY keyboard to small projects. This project does that in spades. Since the basic idea is, ‘put holes in a second PCB’, this idea is transferable to other keyboard layouts too.


I kind of want one of these
Blackberries aren’t a thing of the past (the key2 was released this week…) but they’re not as common as they once were. I’d bet you can still find aftermarket keyboards. They’ve got capacitive sensing on the keys now which has some funky applications.
This is really clever. Very nice results too.
I wonder how flexible the PCB material is and how expensive it would be to add routing operations to the PCB. The reason is I wonder if, instead of the holes for the switches, if a top layer PCS could be cut in such a way for the keys to be depressable (I think I have seen something similar done with laser cutting MDF). This would need an extra spacer over the current design, so maybe it makes my idea even sillier.
The “ELLO 2M” kit computer uses a stack of PCBs where some are hollow and flexures are made out of the top layer of PCB (with the key labels) .. is that what you’re talking about?
I was thinking [matt] meant just using a PCB layer as the keycaps, so you’re not pressing directly on tiny switch buttons, but it looks like ELLO 2M uses pcb contacts as the switches themselves (possibly capacitive?). I’d prefer the discrete switches myself, since these give some tactile feedback. But hey, both of these work.
That’s right, I was thinking of a layer as key caps. It’s more a question of it it can be done rather than should be done.
I thought I remembered seeing something similar here. I was trying to look at the kerf bending and flexible surfaces created via laser cutting but my google-fu is weak. Maybe it was something I saw 3D printed instead.
I think the FRB4 is too rigid and brittle to work, but I could be wrong. And if it did work, maybe use the copper as a light mask for a cool back lit keyboard :)
Yes, I think you’re onto something here. Do look at the ELLO 2M https://hackaday.io/project/9692-ello-2m; it uses thin, thin FR4 laminate for the top half of the switches, and you could certainly do the same. I’ve got some that’s about 0.2 mm, and it is plenty flexible enough for this. ELLO 2M has three sides of each key routed out, so there’s still just enough rigidity to it. He uses white soldermask and black silkscreen to get the look he wants, but I like your idea of putting that in the copper – you can even use the copper on the back side, for more muted captions that will never wear off. But that’s only if you like the look of bare FR4. It’s kind of an acquired taste.
The unfortunate part is that I don’t think any of the cheap PCB fab sources do odd thicknesses, because they only do full panels, putting many projects on a single board, and there’s not a lot of call for very thin PCBs. The developer of ELLO 2M could do thin PCBs because this was a crowd funded project, so he was basically ordering full panels. I also don’t know if you can laser cut FR4, but you can certainly use a CNC router or engraver to do the job. Just use dust protection if you do this yourself – fiberglass dust can cause silicosis. Which they tell me is bad.
The big attraction for me in this article, is that [bobricious] found a way to make a keyboard without having any tools of his own for doing this kind of work. If it were me, because I have a 3D printer and a CNC engraver, I would use a different approach, but his method pretty much guaranteed success on the first try, since farming out PCB fabrication is a “solved problem.”
And thank you for bringing up the ELLO 2M – I’d seen this before, but forgot about it. The idea of building a handheld computer out of stacked PCBs is a great one.
Don’t forget the chappy who did the Psion 5 keyboard adapter (available on tindie I believe?)
We have done similar things in the past for input in industrial gear hidden behind a panel, a serious pain if you ever want to input on this all day long, but for quick configuration and calibration that you might need to use once every few months and if you have the PCB space, its a fantastic solution
especially over trying to enter data using the 10 key front panel or a joystick and teaching people how to use a serial terminal (and making sure they actually keep that terminal around and not just use the laptop for other things)
I remember building a keyboard for my Sinclair Spectrum also with similar tact switches (like these: http://creative.tradekorea.com/product/detail/P483601/TACT-SWITCH-(CTT-1103S).html?minisiteprodgroupno= ), to replace the old membrane when it broke. I also used key caps from an old, capacitive keyboard, gluing them onto each switch, and the result was impressive: it was really comfortable, and I loved it.
Finally! I’ve been planning to build one myself. Thank you!
I like to use good old XBOX 360 chatpad either as they are or with the open keyboard software. You can still find them on ebay for decent price but they are starting to be rare.
no alt graphics
no polish chars ąźłó etc.
Wold dont ended on usa
“Since the basic idea is, ‘put holes in a second PCB’, this idea is transferable to other keyboard layouts too.”
Knock yourself out.
dde: I’m sure no offense was meant. When people build things for themselves, they usually build them only for their own needs, and then if they release the plans for others to build it, there is usually implicit or even explicit permission given to modify the design as needed for them to adapt it to their own needs. More keys costs more money and more space, and takes longer development time, which could make the project impractical, if he had to build it for the whole world. “Perfect” is the enemy of “good enough”. The point of the article is to show a technique for easily building a small keyboard. If you want one that includes all of they keys that you use, of course you should build it that way. But I bet you won’t include the Chinese characters when you do, even though the world doesn’t end in Europe.
These may be in the phone or device used. A different silkscreen might be used for use in other countries. I wonder where polish jokes started. I love and prefer old HP calculators, which use polish notation, and of the few Poles I know, they have all become amongst my best and smartest friends, and most human of human beings I know. Love them dearly.
“CLICK!” seriously, though, that’s kinda awesome!
Dude, you’ll regret moving backspace! And also putting space in as just a normal sized key. Typing is muscle memory. You’ll end up making so many mistakes with that keyboard, any convenience would be cancelled out, and then some, by the wrong layout.
Apart from that though, nice idea to have a tiny keyboard, but surely using tact switches is a bit expensive?