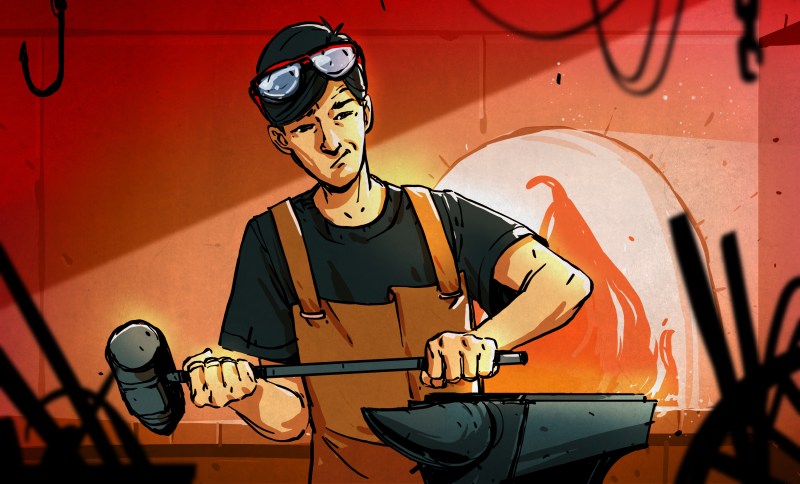
When you grow up with something as the constant backdrop to your life, it’s easy to forget as an adult that not everyone else shares your instinctive knowledge of the subject. My dad is a blacksmith, he’s now retired, but as I was growing up his very active forge was in a workshop next to our house. This is the second part of a series based upon that experience, exploring blacksmithing for people who have maybe always fancied a go at the anvil but have little idea where to start.
The Most Obvious Blacksmithing Tool: The Anvil
Having considered the hearth in our previous outing, it’s time to turn our attention to what is the signature piece of blacksmithing equipment: the anvil. This has the function of providing a high-mass hardened working surface against which metal can be forged, and it has a distinctive shape with various parts for particular metalworking tasks. There are many minor and major variations of anvil design depending upon where in the world your anvil hails from, but since my experience comes from the English counties, the anvil I will be describing is the pattern you’ll find in the British Isles.
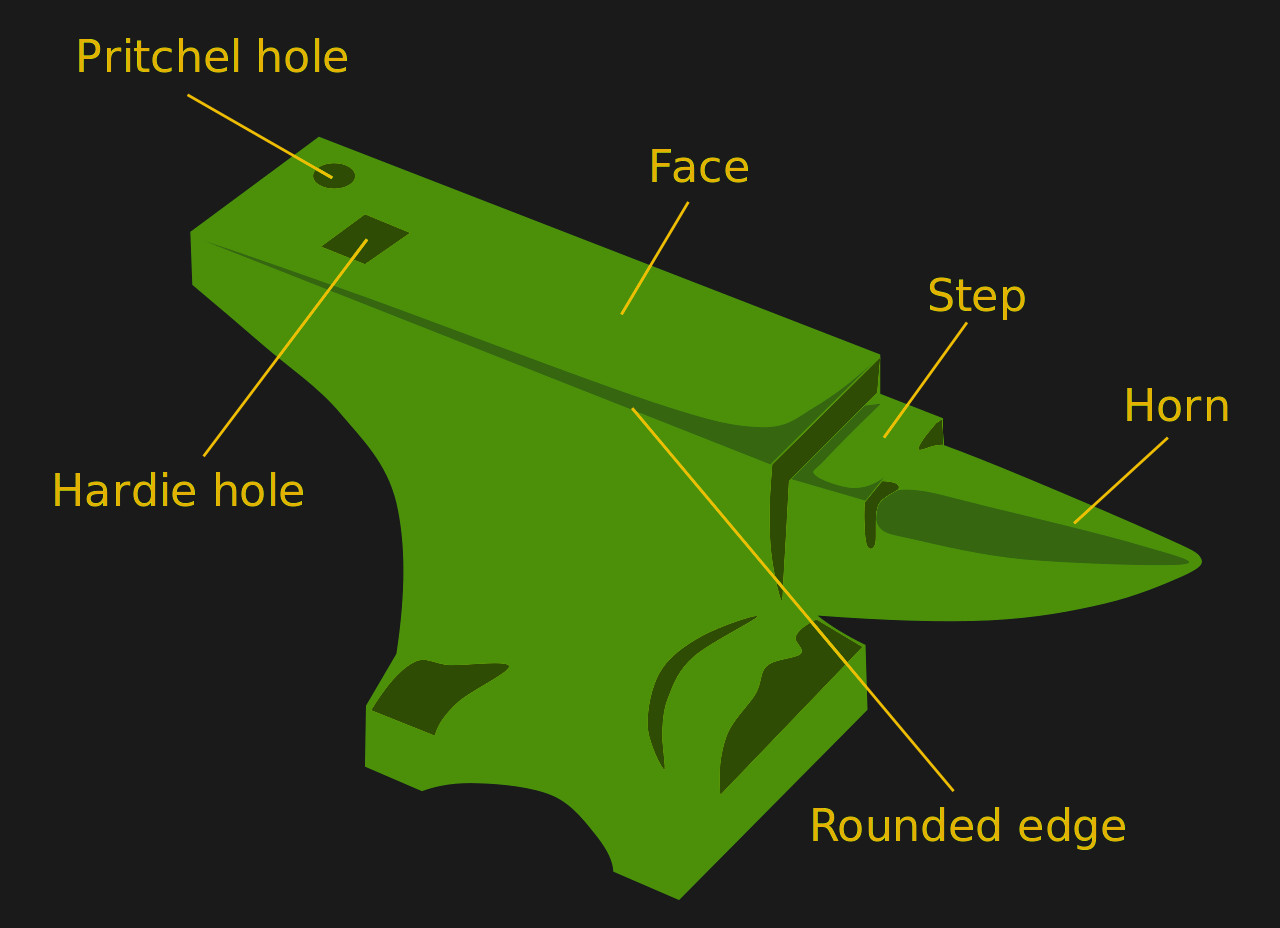
A blacksmith’s anvil is a large block of iron, which is to say forged steel or in some much older anvils wrought iron, but sometimes and usually in cheaper anvils, cast iron. It has a flat rectangular top surface for working metal referred to as the face which is made of hardened steel, on many anvils this can be a separate piece welded to the top of the body of the anvil. At one end of the face is a conical tapered point referred to as the horn which is used to form curves, and at the other is as squared-off edge referred to as the heel, which tapers away underneath towards the base of the anvil. In the face towards the heel are usually two holes, a large square opening called the hardie hole which is designed as a receptacle for tooling, and a small round one called the pritchel hole which is designed as a place to use a punch or similar tool on a piece of work without damaging the face of the anvil. You will sometimes see anvils with different shapes, perhaps with protrusions on their sides or with a horn at each end, these will either be of an overseas pattern or designed for a specific task such as shoeing horses.
Your Hammer Will Know the Difference
There is a “feel” to a good quality anvil, if you strike it with a hammer. This is something that you will understand from experience once you have tried it, but on the ideal anvil there would be a ring sound and the hammer would rebound as though bouncing. It’s a good indication of the quality of a surface for use as an anvil, and it’s one you can readily appreciate if you test a few surfaces. Compare the note and feel of a hammer blow to a good anvil with that of hitting a piece of cast iron such as a scrap engine block, or hitting a piece of steel, and what you will learn will help you judge the quality of any anvil you consider.
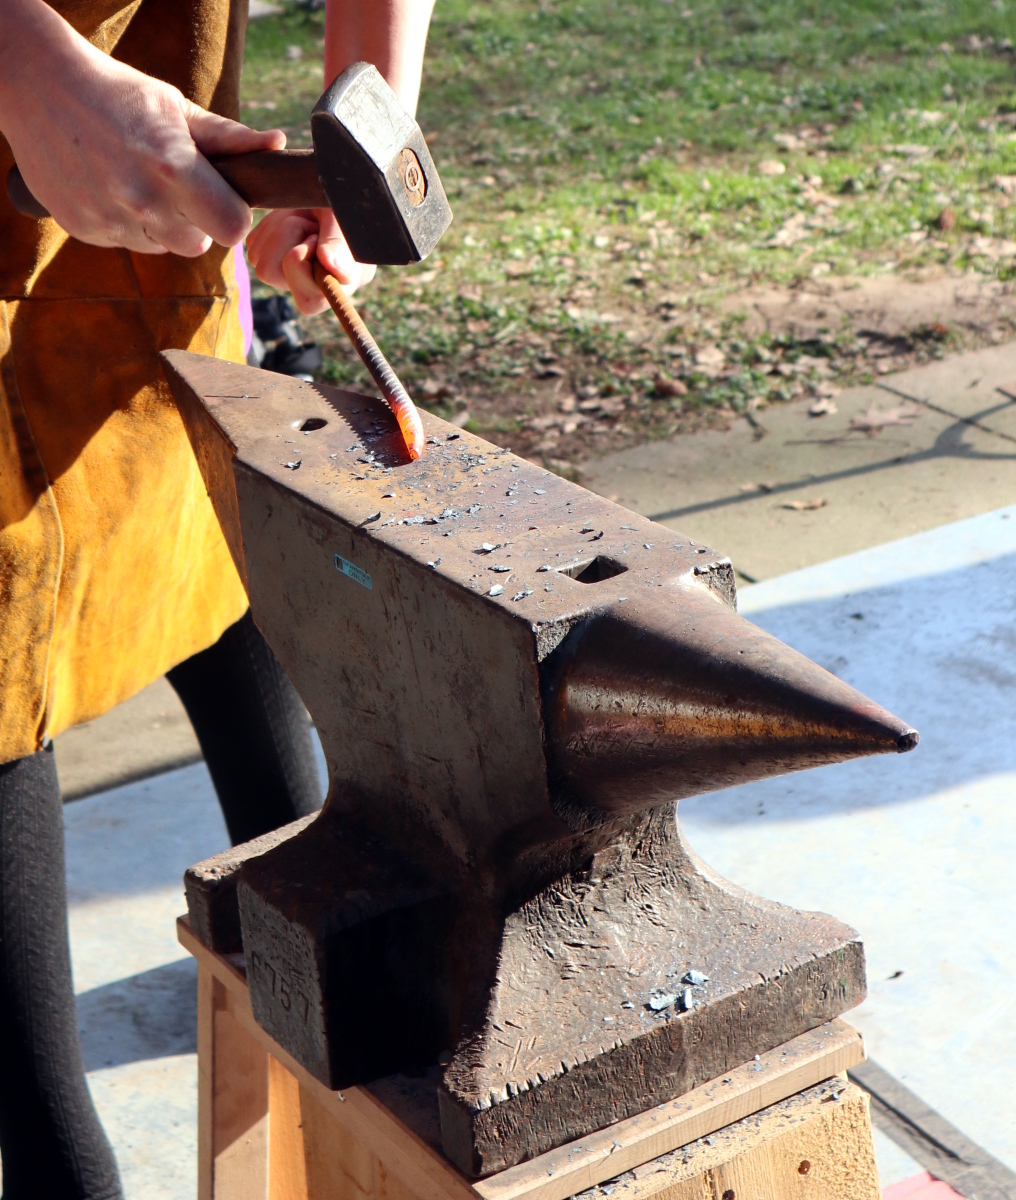
As a youngster growing up around a forge, the first thing I learned is that the face of the anvil must be treated with care and only used for hammering of hot metal, never for drilling or the use of a punch except when over the pritchel hole. It is possible to excessively wear or even break an anvil by using more force than it can take, thus it is important to use an anvil of appropriate size for the hammering to which you will subject it. You will see plenty of small bench-top anvils, these are too small for all but the lightest of this kind of work. Ideally something a bit larger should be in your sights, perhaps something like the 50 kg (110 lbs) anvil my dad used for portable work.
Where do you find an anvil? Obviously a blacksmith supply company will happily sell you a good-quality new one for a suitably hefty price. It can be tempting to go for a much cheaper alternative that you might see from a mass-market tool retailer, for example. Any anvil is better than no anvil, but I would always counsel the buyer to consider why a new anvil might be cheap, and whether it might be a very low quality piece of cast iron and a poor purchase decision. If you’re considering any anvil, always go for the best you can afford as it will very likely serve you for the rest of your life and your offspring for their lives too if you are lucky enough to be able to pass it on. Our community has few problems considering many hundreds of pounds an acceptable price for an oscilloscope or a laptop computer, an anvil should be considered in the same light but with the added bonus of far less depreciation.
Old Anvils Do Not Retain The Skills Of Their Previous Owners
Of course, it’s not impossible to find neglected second-hand anvils. The problem is as always one of perceived worth, so you may find top dollar demanded for something that is worn or even broken beyond repair. Good quality older anvils are not intrinsically better than their modern quality equivalents simply because of their age, and while it’s cool to own something that’s been worked on for centuries you will not somehow inherit the skills of those who used it before you by doing so. Be careful not to be sucked in by the romance of owning an aged anvil if you are being asked to pay more than a brand-new one of the same or better quality, and especially not if what is on offer is damaged or worn. It’s not uncommon to find something whose face resembles the surface of the Moon on offer for the cost of a trip to the Moon, so be prepared to say no. If the anvil face is not flat, if the face is broken, cracked, or coming away from the body, or if the heel or horn are broken, walk away unless the anvil is very cheap or even free. It is possible to find a bargain for the cost of a repair if you know what you are doing, but you should beware of time and money pits. You are better served in many such cases buying a new one.
Of course, you may just get lucky and find someone who simply sees a large block of iron as a huge removal problem, but it’s more likely you’ll have to hunt for one whose price is fair rather than eye-watering. I’d suggest starting by asking around in hope of that lucky find, and haunting your local machinery auctioneer.
Happily it is not impossible to make your own anvil if you possess a reasonably well-equipped metalwork shop. You may not be able to create something with as much mass as a commercial anvil, but if you are starting out you should certainly be able to come up with something. The classic small home-made anvil is produced from a piece of rail cut to form a horn at one end and usually with a piece of hardened steel forming the face welded on the curved surface where the train wheel would run. At a pinch you can even do work on almost any large piece of steel stock or very thick plate, as long as it has a significant mass it should be able to be pressed into service. If you ask around engineering shops for some of their weightiest offcuts you might be able to find an impromptu anvil for a surprisingly low investment. Avoid cast iron though, it is brittle and can easily shatter when hammered.
If you were expecting this page to dive right in and start with the forge work, then sadly we must disappoint you. Instead it makes sense to keep going through the basics of what you should find in a forge before we take you to the metal. This is by no means the sum of the blacksmith’s equipment, and we’ll continue it in our next installment with a look at some of the other tools in the blacksmith’s arsenal as well as talking about safety equipment. Then we’ll be ready to take you into the forge and show you some work.


I’ve seen on rare occasion, a piece that fits in the Hardie hole, it has a sharp edge on top to aid cutting hot metal.
Oh, a little duckduckgo turned up this…
A Hardie is what you put in a Hardie hole!
” The first anvil tool was the hardy or hardie, a small steel cutting tool with the edge facing upward. It fit into the small square hole made for it in the top of an anvil. Thus the square hole is called a “hardie hole. It is a common mistake to call all tools made to fit this hole “hardie tools”. Their correct names are “bottom sets” or “anvil sets”, anvil swages and shanked tools. ”
http://anviltools.com/
I have four tools that fit into the hardie hole, I didn’t know they were called hardies, one of them is metal cutting chisel, two are four inch squares with semicircular grooves of different diameter cut into them and the other is a tall pyramid with a rounded top.
pikies, the scourge of society is why I don’t have an anvil.
I have never seen an anvil with the face welded on, it should be fastened on there by braising. I would think that with the face welded on you will never get the correct response from any hammer and that response is what separates a good anvil from a crap one.
Many anvils had / have their face welded on. They did it by preheating the tool-steel face to welding temperatures and casting the molten cast iron / steel in the rest of the mold. They would then fuse ( weld ) in the mold. Fisher anvils are the probably the most famous for it.
Refacing one of those must be a real pain.
In general you don’t want to reface an anvil if you don’t have to. If you have significant chips in the corners it may be worth it, but the weld will heat the local area up enough to have lost the temper in the immediate area surrounding it, making the face softer. You can get hard facing rods to redo an entire surface, it won’t be manufacturer hard, but it will be serviceable enough. However, it is expensive and time consuming, enough so that you would only really want to do it if you had no other means of getting a serviceable anvil.
You beat me to it. Not all welding is arc welding.
We had blacksmithing classes at school. The forge was a gas powered one, the anvils sat on small sections of a trunk. We would spend like 3 hs a day hammering a piece of metal, took us like 2 months to produce two nails out of a 20 cm cylinder. We were 14 didn’t have that much force then. Schools was at times lots of fun.
Same here, the forge was coke with a blower, made pokers with twisted section, a cold chisel which I still have, amongst other things, a vat of whale oil for quenching and blueing, lathes, drills, kilns, bandsaw, etc, teacher would show us what to do, then left us to it, if we hurt ourselves it was our own stupid fault.
I could do that when I was 14. But then again, I had something of an advantage. :)
For five years I carried a medium ball bearing in my pocket everywhere, just in case I found an anvil for sale cheap. If the ball bearing bouced off of the face very well, then I would make an offer on the anvil.
I have heard of that elsewhere.
In audiophile circles a there is a similar test, as put forth by Stereo Review magazine back in the early 1980’s.
The Elastic Rebound Characteristic or ERC.
It is height a phono cartridge bounces when dropped 1 meter onto a polished marble surface.
Ha that’s hilarious
I love it! :)
So….
Did you obtain any anvils that way?
Yeah, I got a decent large anvil for about $150, with a cast iron stand. Checked it with the bearing before buying, as it will barely bounce and kind of just go “clunk” on a cast anvil, but it rang as it bounced, and came up to about 80% of the height it was dropped from, so at least the upper part is forged. Even for as old as it is, you can clearly see where the forged part is welded onto the bottom two inches of base, so it wasn’t the top of the line from 100 years ago, but good enough and still better than a Horror Fright A.S.O. (Anvil Shaped Object).
I would have to walk a different path to find an anvil for sale. Perhaps that is why I enjoyed this article so much. Keep it up Jenny, I am still making up my mind if I want to work metal with a hammer and tools.
I hope I encourage you.
Really good idea. I would have hit it with a hammer, but hammers aren’t as portable.
I had an anvil with half the face beaten off, which is a common condition to find them. I built the broken face section up with hardfacing welding rod and ground it down flat. It made a passable repair.
There’s a use case for a CNC 3D weld-printer. First grind the top of the anvil down. Second, evenly weld it up. Third, surface grind it flat.
… First, load whole-anvil STL into printer… :)
I’ve heard tales of that being done, though never worked such an anvil. What annoys me is when I see anvils with that scale of damage for sale at solid-gold prices.
Like this one?
B^)
https://madison.craigslist.org/tls/d/elroy-anvil/6860211837.html
I wish I could attend this sale…
(drool!)
https://minneapolis.craigslist.org/hnp/tls/d/milwaukee-huge-anvil-and-blacksmith/6857746576.html
Anyone looking to get an anvil at a reasonable value may want to consider going to Quadstate in late September. It’s in southwest Ohio and (supposedly) the largest gathering of blacksmiths in the world. You’ll find tons of anvils there for sale, and people are willing to haggle a bit, because they don’t want to have to pack the anvil back up and haul it back home.
my SO has six nice old anvils, but blacksmiths hate her because she does this with them:
https://www.youtube.com/watch?v=-xLtSzpDlcg
can you make a cheap cast iron anvil workable by wielding a piece of 4160 or other hard plate to face of it I know you would have to heat every thing if so what kind of rod to use with AC welder I was thinking 1/4 to 1/2 inch plate just cannot afford price for a good One what I am using now is a 10x8x1 plate welded to 4 pieces of 2 and 1/2 inch x8 inch round stock with heavy angel steel on each end with a total weight about 80 pounds