There was a time when most of us thought the next logical step for desktop 3D printing was to add additional extruders and hotends, allowing the machine to print in multiple colors or materials. Unfortunately such arrangements quickly become ungainly, and even with just two extruders, calibration can be a nightmare. Because of this, development has been trending towards systems that use just one hotend and simply alternate the filament being fed into it. But such systems have their own problems.
Arguably the biggest issue is how long it takes to switch filaments. The Palette 2 uses a physical buffer of spliced filament to try and keep ahead of the printer, but as [Kurt Skauen] demonstrates, there are considerable performance gains to be had by building a bigger buffer. He says there’s still some calibration issues to contend with, but judging by the video after the break, we’d say he is certainly on the right track.
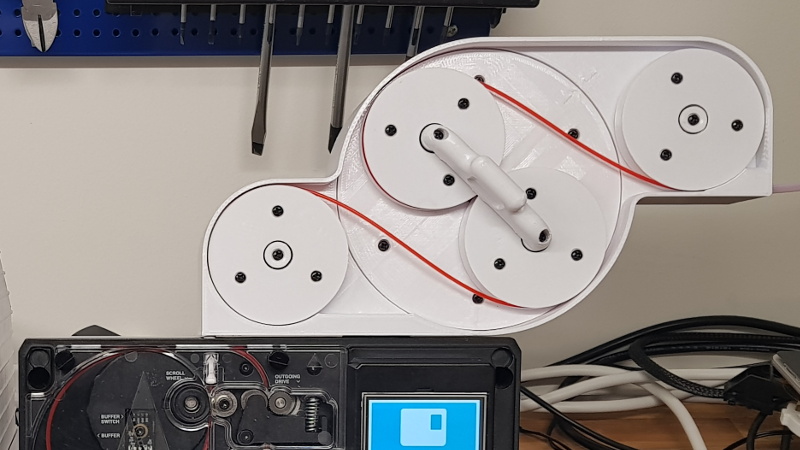
 The buffer is necessary to give the spliced filament time to cool and bond before being fed into the printer, but as currently designed, the machine simply can’t store enough of it to keep up with high print speeds. The stock buffer area holds 125mm worth of spliced filament, but the modification [Kurt] has designed adds a whopping 280mm on top of that to reach more than three times the stock capacity.
He’s successfully tested printing at speeds as high as 200mm/s with his upgraded buffer, a big improvement over what he was seeing with the original buffer area. This despite the fact that Mosaic (the company that produces the Palette) claim the original buffer size was already more than sufficient. It seems we’ve found ourselves in the middle of a debate between Mosaic and some very vocal members of the community, and while we don’t want to take sides, it’s hard to ignore [Kurt]’s findings.
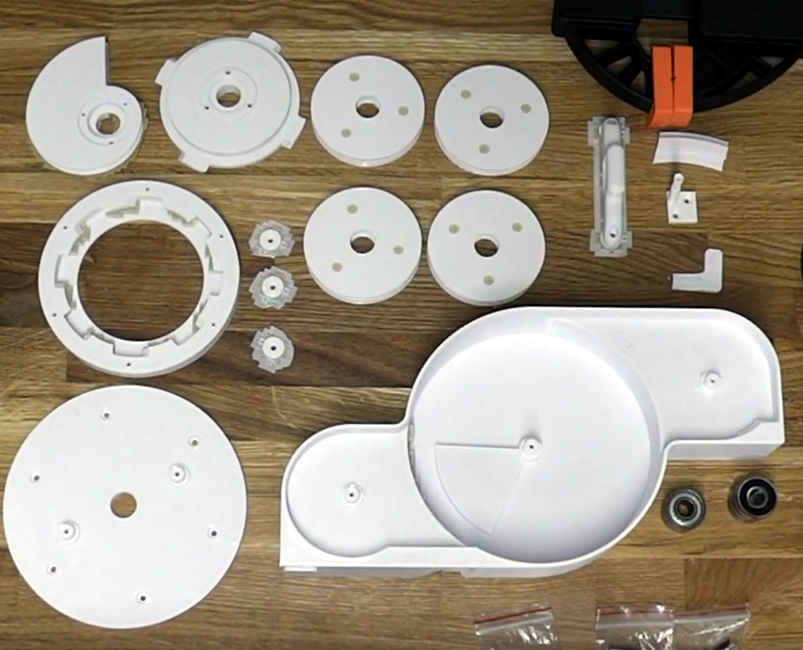
Want to make your own? [Kurt] has released all the information necessary for others to duplicate his work, including the STLs for all printed parts and a list of the bearings, springs, and fasteners you’ll need to put it together. It looks like a fairly large undertaking, but with the potential for such a considerable speed boost, we don’t doubt others will be willing to take the plunge. One person who printed and assembled an earlier version of the buffer upgrade reports their print speeds with a 0.8 mm nozzle have more than doubled.
The Palette has come a long way from we first saw it in 2016, and since then, Prusa has thrown their orange hat into the ring with their own filament-switching upgrade. Neither machine is without its niggling issues, but they’re still probably our best shot at taking desktop 3D printing to the next level.


It might be easy to use two colors by have two mechanisms that approach the printed object from opposite directions, so the machine needs to be bigger, and how many heads and directions a print heads can come from, are all proportional to the size of the machine. Then the firmware would know to change heads when the color changes. it would pull back on the current head and color, then bring in the new head and color until that was done, then keep going like that. this would take a lot of time, but would work.
Prusa printers with the multi material upgrade do this with a single nozzle, there is an extreme amount of waste changing colors. The palette 2 is a great option that turns any 3d printer into multi color 3d printer.
Sadly the Palette 2, which appears to work well, also costs more than many printers in its own right. Single Shared Nozzle (Many/2 to 1) setups do waste filament, but its like mm of filament, in financial terms its inconsequential compared to what $500 plus shipping cost of the Palette works out to.
Prusa MMU2 and Palette both have to use either a wipe tower or wipe-to-infill as there’s no other way to flush all of one color out of the nozzle before starting the next. The amount of waste is similar in the general case, and both need to crank up the volume of purging to really make sure there’s no mixing.
I’m partial to the MMU2 due to the open source nature, but can’t help but admire the engineering of the Palette. Still, the raw performance in the end (when both are properly tuned) should be similar.
– or – two (or more) separate extruders spaced every (bed length) down the line and thus the bed slides all the way over to be under another extruder and becomes isolated to the other extruder .. and moves on or back ..
Have 10 filaments (10 x 200mm bed = 2,000mm 3D printer)
With multiple extruders height and nozzle diameter must be exactly the same for a good print and that is the difficulty and why splicing filament is the better solution.
Agreed; the last few years have seen most (not all) manufacturers go from multi-extruder to single-extruder with multiple feed. E3D is even going as far as developing a standard tool-change platform rather than have multiple active extruders.
Great stuff and rather well documented too!
But he shouldn’t have bothered making a video, it’s pretty much unintelligible…
FYI
There is longer a build video on YT with slightly better sound quality:
https://www.youtube.com/watch?v=nBWEPgncPjw
Sorry about the sound quality. Just curious. Are you talking about the actual sound quality? Or the fact that my narrating is seriously horrible (especially in the speed-demo video)? I can totally hear the latter myself, but when I play the video here the actual sound quality is not bad enough to make it hard to parse. So with “sound quality” did you actually mean my narrating sounding like I had not been sleeping for the last 3 days? Or that the sound was to distorted to be able to hear what I was trying to say?
And thanks for linking to the less horrible video too :-)
Hi !
The narration wasn’t great but I was talking about the actual sound quality.
I suppose you recorded the sound with the built-in microphone of your camcorder?
It just sounds very washed-out and the mic doesn’t seem to pick up the frequency band around 2kHz very well (crucial for recording spoken language).
More information:
https://www.dpamicrophones.com/mic-university/facts-about-speech-intelligibility
Maybe you want to invest in a lavalier mic.
Even the cheap ones work reasonably well.
Keep up the great work!
Yes, I record all audio with either my camcorder or my webcam. The speed-test was with my webcam, the build video with my camcorder. So I knew it was not going to be great. But I didn’t feel it was that bad when listening back on it myself on the PC where I edited. But I also got feedback now on another of my videos that the sound quality was bad, so I will have to look into how I do audio. Thank you very much for the feedback and the tips!
“There’s something in the buffer. We need to get it spliced before the device fails.”
“Accessing buffer. Splicing…”
“Filament… Hello… Buffer… Accessing final transmissions… C’mon, c’mon, final transmissions…”
Just a note, the speed in the video is not 200mm/s. Probably your acceleration is too low
What is the actual speed? And how did you determine that?
Like I mentioned in the description and in the video the acceleration is 3000mm/s^2. So the average is of course lower than 200mm/s. Like I say in the video (go to 1:00 and listen for about half a minute) the total average over a full layer including travel and the purge block is about 160mm/s. The average in the corners of the purge block will of course be lower than when doing the lengthwise printing on the test object.
With 3000mm/s^2 acceleration it should reach 200mm/s in about 7mm. So I actually thought it spent most of the time at it’s target speed.