If you want to add a keypad to your Arduino project, the options are pretty limited. There’s that red and blue 4×4 membrane we’ve all seen in password-protected door lock projects, and the phone layout version that does pretty much all the same tricks. Isn’t it time for a full Arduino-compatible keyboard? [ELECTRONOOBS] thinks so.
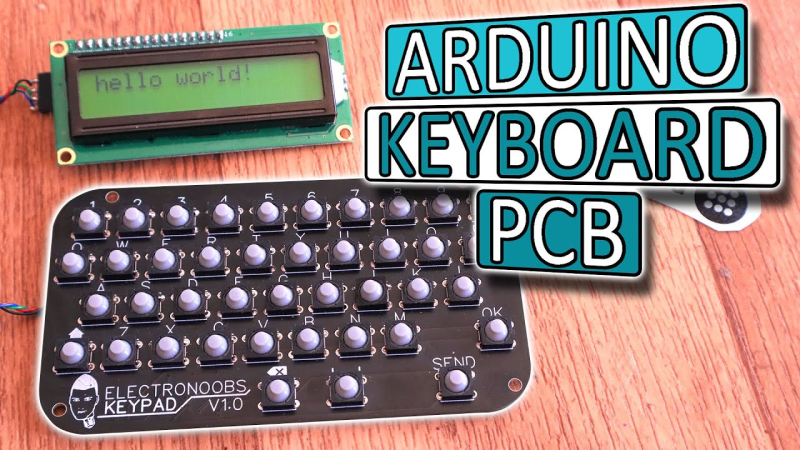
This 41-button Arduino keyboard PCB is a stepping stone to his next project, a pair of two-way texting machines. (Which is nice, because we were totally going to suggest that). It’s based on that ubiquitous red/blue keypad, but it has a full QWERTY layout. There’s also a shift button that opens up special characters and uppercase, and the addition of return, ok, and send keys puts it over the top. The best part of this keyboard, hands down, is the soft, soundless buttons. Though you trade clicky feedback for comfort, it will be well worth it after a few dozen presses.
The keypad uses an onboard ATMega328P to scan the matrix for button presses, decode them, and send them via UART or I²C to an Arduino. [ELECTRONOOBS] has the PCB files available via Patreon for now, though they will be open in the future. The code is already available for download on his website.
Future plans include an LED to indicate when shift is pressed, and adding the special characters next to the numbers on the silkscreen (whoops!). Be sure to check out the build video after the break.
Want an Arduino-driven keyboard for longer hauls across the alphabet? Saddle up and ride this candy-colored mechanical unicorn.


I’d be adding series diodes to each key switch… these *can* be replaced with wire links if you want to be cheap, but putting diodes in will prevent ghosting when multiple keys are pressed simultaneously.
You can prevent ghosting without diodes
Michal, making a very brief statement without at least a link to back up what you are saying is… unwise. It makes you look arrogant and is only helpful in that the person you are talking to now knows that someone has a different opinion that may or may not be valid; not too useful. If, on the other hand, you want to be taken seriously and listened to, you need to provide evidence so that A) the other person knows that you know what you are talking about and B) they can gain the information that they need to be convinced in their own minds concerning your position.
Like in this rather n-depth discussion about the subject here: http://forum.arcadecontrols.com/index.php?topic=12544.0
Hope this helps!
PCB outside of those 50mmx100mm or 100mm x 100mm aren’t exactly cheap. I would take a sub- $10 wireless keyboard and replace its decoder PCB. There is also the option of using HC05 to talk to bluetooth keyboard.
Hard to beat the look and feel of a bluetooth keyboard with printed keycaps and injection molded case vs your soldered together one.
That’s a point. I’ve not looked at really cheap or tiny keyboards, but earluer “IBM” type keyboards had the microcontroller on a tiny board. Useful if you don’t need a keyboard but tge comohter won’t boot withiut one. Just take this small board from a cheap keyboard, and the computer thinks a keyboard is attached.
But since tge microcontrolker had been separate, that leaves a keyboard and matrix, and then put in your own decoder.
Michael
could have saved a pin with a 6×7 matrix.
No control key.
No ESC key.
Not worth it.
True; but they’re easily added in software.
Here is an example of an Altoid size keyboard that does have the CTL and ESC keys http://sunrise-ev.com/photos/1802/vip2k-assembled.jpg. Top card is the keyboard (nothing on it but the switches). Bottom card is the computer, which also includes serial I/O and NTSC video output.
The project is a recreation of the RCA VIP, a micro from 40 years ago. More info on it is at http://sunrise-ev.com/vip2k.htm
You do know it’s possible to swap those keys with two others just by updating the sketch? Two trivial changes to the source code is an odd reason to dismiss the project out of hand. And he’s building it for a project that doesn’t require those keys.
Tough crowd.
I mean exactly how am I to use Emacs on my Arduino?!
Also the idea of a dedicated 328 does tickle my recursion bones.
How about this version? http://sunrise-ev.com/photos/1802/vip2k-assembled.jpg
Top is the keyboard, and bottom is the computer. It’s a recreation of the RCA VIP computer from 40 years ago.
The keyboard has CTL and ESC, and can generate all of the ASCII codes. The computer board has a serial port, and also NTSC video output. The whole project is described at http://sunrise-ev.com/vip2k.htm
Add a GPIO expander over I2C like MCP23017 and you have 16 additional GPIOs. Need more keys? Add a second one of a different address on the I2C bus. And they cost 0.80eur on Ali.
I’ve used the MCP23S17 (the ‘S’ denoting the SPI version) to drive LCDs when I’ve been short on I/O before. RThe software also becomes easier, as there’s no dealing with pesky 4-bit mode to save a few pins. Now I’ve written a set of libraries for PIC C and ASM, this method has become my goto when using HD44780 LCDs. Even if I have enough I/O.
If you need more GPIOs under a Linux laptop, you could also use those:
http://elektranox.org/2017/05/0018-collabora/
http://www.faschingbauer.co.at/de/howtos/gpio-mcp23017/
too few keys better create this http://klawiatura.wordpress.com/