Owning a Microscope is great fun as a hobby in general, but for hackers, it is a particularly useful instrument for assembly and inspection, now that we are building hardware with “grain of sand” sized components in our basements and garages. [voidnill] was given an Eduval 4 microscope by a well-meaning friend during a holiday trip. This model is pretty old, but it’s a Carl Zeiss after all, made in Jena in the erstwhile GDR. Since an optical microscope was of limited use for him, [voidnill] set about digitizing it.
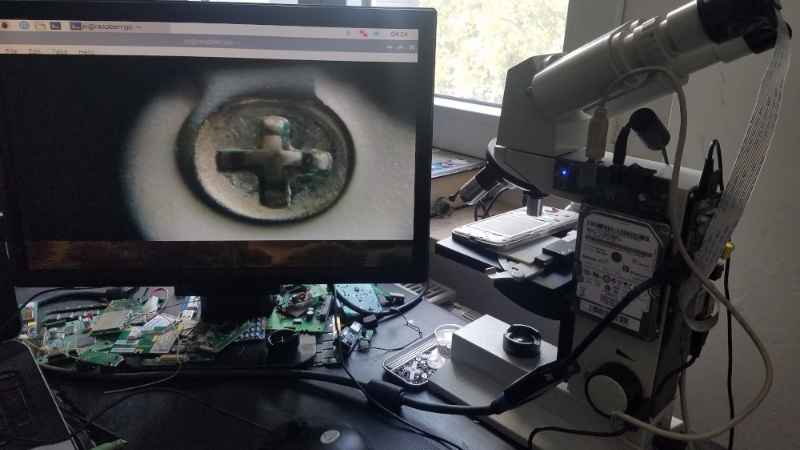
He settled on the Raspberry-Pi route. The Pi and a hard disk were attached directly to the frame of the microscope, and a VGA display connected via a converter. Finally, the Pi camera was jury-rigged to one of the eyepieces using some foam. It’s a quick and dirty hack, and not the best solution, but it works well for [voidnill] since he wanted to keep the original microscope intact.
The standard Pi camera has a wide angle lens. It is designed to capture a large image and converge it on to the small sensor area. Converting it to macro mode is possible, but requires a hack. The lens is removed and ‘flipped over’, and fixed at a distance away from the sensor – usually with the help of an extension tube. This allows the lens to image a very small area and focus it on the (relatively) large sensor. This hack is used in the “OpenFlexure” microscope project, which you can read about in the post we wrote earlier this year or at this updated link. If you want even higher magnification and image quality, OpenFlexure provides a design to mate the camera sensor directly to an RMS threaded microscope objective. Since earlier this year, this open source microscope project has made a lot of progress, and many folks around the world have successfully built their own versions. It offers a lot of customisation options such as basic or high-resolution optics and manual or motorised stages, which makes it a great project to try out.
If the OpenFlexure project proves to be an intimidating build, you can try something easier. Head over to the PublicLab where [partsandcrafts] shows you how to “Build a Basic Microscope with Raspberry Pi”. It borrows from other open source projects but keeps things simpler making it much easier to build.
In the video embed below, [voidnill] gives a brief overview (in German) of his quick hack. If you’ve got some microscope hacks, or have built one of your own, let us know in the comments section.


Does the hard drive have a imaging purpose since it’s part of the write-up? I would expect it to be hacked and do some optical duty at least (lens/voice coil) etc …
As it is a platen hard drive (not SSD), which vibrates, I would not mount it directly to the microscope, to prevent vibration.
where is the hack?
really!
That’s a bit harsh?
“Converting it to macro mode is possible, but requires a hack. The lens is removed and ‘flipped over’, and fixed at a distance away from the sensor – usually with the help of an extension tube.”
that only got him very crude results comparing to what the microscope could already deliver in stock form. (that’s a very good microscope)
I think my 5$ chinese usb “microscope” could deliver comparable images to what he got out of that.
Motorizing the axis, and fitting a DSLR camera to one of the view ports using an adapter would get him a much better instrument.
I would not get enough “raspberryduino” cred. That is celebrated way too much hence my ramblings about it.
I don’t think you will get very good results or cost/benefit from this. I recommend (if your budget can accomodate it): buy an Amscope from Amazon ($300 for a reasonable Compound Transmission Light Microscope with a camera port), a cheap (several generations old) DSLR (another $300), and a lens adapter ($20). The results are fantastic. I made this image (http://gigapan.com/gigapans/15172) by taking hundreds of photos while moving the slide under the scope, then assembled in Hugin.
You can also make a decent microscope by buying various components- for example, a FLIR Blackfly S (https://www.flir.com/products/blackfly-s-usb3/), extension tube, and cheap objective can be assembled and mounted into a 3D stage (for example, an X-Carve) to make a surprisingly effective scope.
I have an Amscope with the camera port, but it would be awesome to have an adapter to a Raspi cam for video, problem is it doesn’t work when sticking the camera in front of the port as the optics are all wrong but I’m not smart enough to figure out what optics are meeded…
https://imgur.com/a/Hfak3TH