
About a year back, [BogdanTheGeek] found himself in need of a new case for this TS100 soldering iron. Unfortunately, while the product is often billed as being open source friendly (at least in the firmware sense), he was surprised to discover that he couldn’t find the detailed dimensions required to 3D print his own replacement case. So he took it upon himself to document the case design and try to kick off a community around custom enclosures for the popular portable iron.
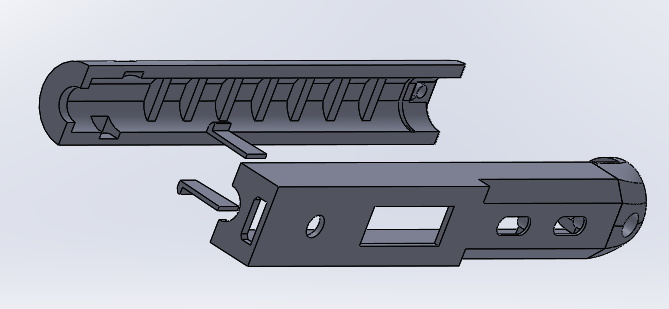 The main goals while designing the replacement case was to make it printable without support, and usable without additional hardware. He also wanted it to be stronger than the original version, and feature a somewhat blockier design that he personally finds more comfortable. The case was designed with PLA in mind, and he says he’s had no problems with the lower-temperature plastic. But if you’re still concerned about the heat, PETG would be an ideal material to print yours in.
It took him many attempts to get the design to where it is today, and still, there are improvements he’d like to make. For one, there’s no protective cover over the iron’s OLED screen. He’d also like to make the switch from SolidWorks over to FreeCAD so the project is a bit more accessible, and says he’d appreciate anyone who wants to chip in. We’re excited to see what develops once the hacking world realizes that there are accurate open source CAD files for the TS100 floating around out there.
Our very own [Jenny List] put the TS100 through its paces not so long ago, and found a decidedly solid little tool. While it won’t replace your high-end soldering station, it’s very convenient for quick repairs and simple tasks, especially if you find yourself away from the workbench proper.


They do tend to crack near the front set screw, don’t they?
Very nice repair!
mine cracked as well after a year of heavy use – replacements are cheap at about 8EUR tho. I wish there was a metal case.
8€ is actually very expensive IMO for plastic p.o.s. For 8$ I can have >350g of recycled PET filament here in Brno, Czech Republic. + no waiting time which is actually much more important.
I meant for 8€, not 8$. (Typo)
350g of (recycled PET do not give you a replacement casing. You need a working 3D printer and design files. And you need to accept (or like) the “3D printed look”.
You don’t need to accept the 3D printed look. You can finish the part using fundamental practices. I would recommend printing in ABS, then give it a quick sanding. Finish off with a few light passes with hot air to remove bleaching from sanding.
The ultimate goal for this project is to have 3 or more designs or a parametric design that can be adjusted for the following manufacturing methods:
– 3d printing
– cnc milling
– casting and hand machining
Once I get my cnc up a running I can start doing some prototypes and maybe sell a batch. Follow the Hackaday.io project page to see when I do that.
Mine cracked on the back, arond the power connector, and entire back piece fell off, on day 2
You can have it printed in metal at any prototyping 3d printing and machining shop.