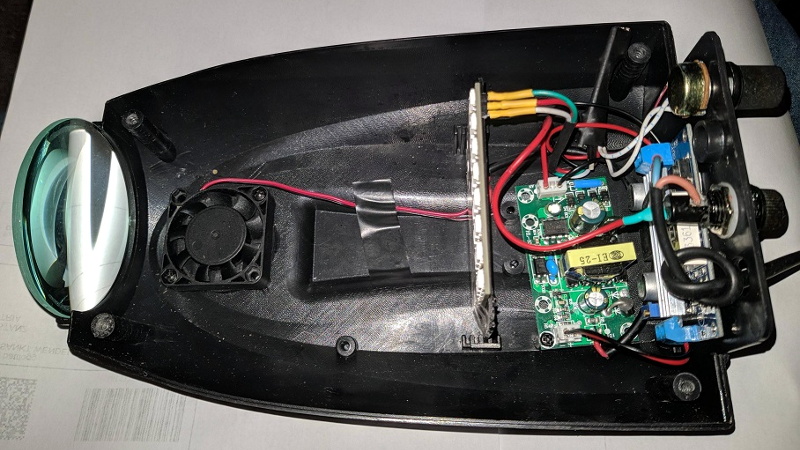
If you’ve got a party coming up and are looking to add a little bit of excitement, you might be interested in this recent project from [Gav Lewis]. The build is based on a commercially available party light, but with some upgraded components the final product is brighter and more dynamic than it was stock.
Realistically, [Gav] has changed out almost every component of this light except for the enclosure and the front lens. The original 5 mm LED array was replaced with a new 8×8 WS2812B panel, and the electronics completely replaced with an Arduino Nano. He’s still using the light’s original power supply, but as it only puts out around 4.2 V, he’s added a boost converter to provide a stable 5 V for the new hardware. He also added a small 12 V cooling fan, which he says is basically silent since it’s only getting half its rated voltage.
[Gav] has developed a number of lighting patterns with FastLED that do a good job of emulating what you might see from a much more expensive laser scanner. In the video after the break, you can see how multiple colored beams of light exit the housing at once, projecting patterns on the opposite wall. He says he’s like to restore the device’s original sound activation mode, but as of yet hasn’t gotten the code sorted out.
This project uses a off-the-shelf 8×8 matrix of WS2812B LEDs, but if you ever find yourself needing to piece together your own array from individual LEDs, we recently covered a great tip for making it a bit easier.


I’ve got the same thing, also upgraded with an arduino – it does Game of Life.
But I’m still using the original LED-panel.
That’s awesome! I’m not skilled enough to be able to figure out how to address that original board. Thankfully the fastLED matrix route was easy enough to figure out for me :)
It’s just a 74hc595 shiftregister per column, the rows are not in order
here is my code:
https://git.it-syndikat.org/robelix/ledprojector/src/branch/master/src/main.cpp
(sorry, a bit messy)
the “magic” reordering of the rows is done with the rowmask in pushout()
just wondering what would the strength of the lens be? I might try and build one from scratch.
Strength in diopters should be approximately equal to the reciprocal of the distance from the LEDs to the lens.
I am not sure what the magnification is of the original lens, however it measures about 70mm diameter and is around 20 to 30mm thickness in the middle.
I tried looking for similar lenses on ebay and amazon but found mostly 50mm meant for experiments. I also found its probably cheaper to buy the light to source a lens in most cases.
Congrats Gav for getting on Hackaday! — This project is such a great idea! – Going to make one myself so I can get on the dev!
Thanks Luke! Looking forward to seeing what people can do with it as a base, and hoping they upload some new patterns and ideas too!
The PSU has a feedback circuit (opto, SOT-23 probably a 431) near the lower left corner. I would try to trim up the output voltage by changing the voltage divider.
Thanks! I would need more of a how-to though if possible. My electronic knowledge is bare minimum at best.
Modding is risky when you don’t have the experience as the wrong part in the feedback circuit can damage things.
For those who want to mod:
Your feedback circuit looks like: https://electronics.stackexchange.com/questions/377252/voltage-feedback-using-tl431 (RF1 shorted probably for cost reasons)
TL431 is a 2.5V shunt regulator, so the values RH1, RL1 should be the same for a 5V output.
Just a wild guess that the current values are probably 6.8K and 10K common values that gives the right ratio for 4.2V.
The voltages for these kind of mods shouldn’t be drastically different as that can over-stress the parts.
Yeah that is a little beyond my skills, thanks for the breakdown though! Thankfully the 5v boosts are cheap :)
Would be great to tweak the software to work with a circuit similar to that in the Sparkfun sound detector for some hardware beat detection. I can feel an new project coming on….
I would love to see that! I was intending to use a voltage divider and a line output from my amplifier for audio input. I had it wired up and could see analogue readings in the serial monitor just have no idea how to make a beat / peak detector…
Check this out. The hardware is an excellent beat detector and works really well.
https://learn.sparkfun.com/tutorials/interactive-led-music-visualizer/all
That looks like exactly what we need! I’ll see about ordering in some over the next week…
Wasnt Big Clive tinkering on something like this before?
https://www.youtube.com/watch?v=rv_Nb-EiPSI
Yes! Same light but another build. He makes custom LED boards for them whereas I used an off the shelf WS2812b matrix from Amazon :)
OOOH, a new project I won’t have time to start. Would love to make this part of my Christmas light show.
Oh, and from a former lighting guy back when I was in college where I serviced hundreds of the lighting effect systems of the time….BRAVO!
Thanks man! I have always had a curiosity for disco lights and plan a few more arduino / LED upgrades for some other lights I have too which used to use expensive, hot and fragile halogen bulbs. I can’t get anything as bright as the halogen in LED obviously, but can make something useful for home / house party use I think :)
Taking it a step further, lookup “Adafruit 15×7 CharliePlex LED Matrix Display FeatherWing” – pop one of those in and you could then in theory project text, but you’d likely have to mirror/flip the matrix so the projected result is correct!