For the vast majority of us, computer memory is a somewhat abstract idea. Whether you’re declaring a variable in Python or setting a register in Verilog, the data goes — somewhere — and the rest really isn’t your problem. You may have deliberately chosen the exact address to write to, but its not like you can glance at a stick of RAM and see the data. And you almost certainly can’t rewrite it by hand. (If you can do either of those things, let us know.)
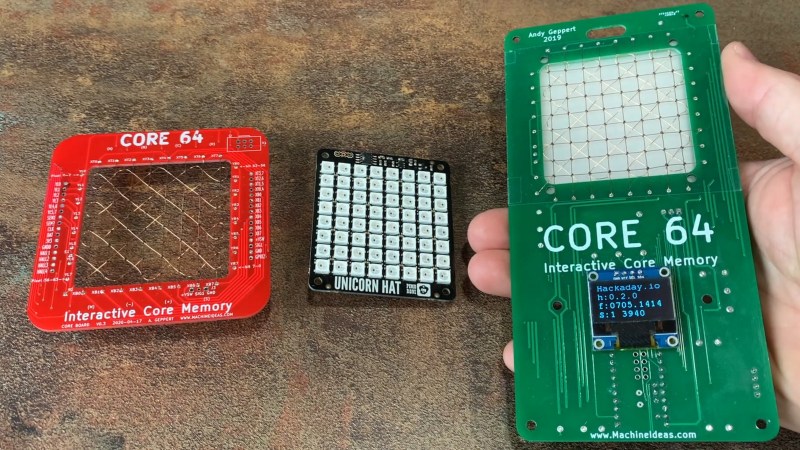
These limitations must have bothered [Andy Geppert], because he set out to bring computer memory into the 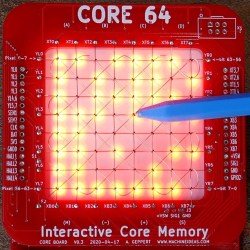 tangible (or at least, visible) world with his interactive memory badge Core 64. [Andy] has gone through a few different iterations, but essentially Core 64 is an 8×8 grid of woven core memory, which stores each bit via magnetic polarization, with a field of LEDs behind it that allow you to visualize what’s stored. The real beauty of this setup is that it it can be used to display 64 pixel graphics. Better yet — a bit can be rewritten by introducing a magnetic field at the wire junction. In other words, throw a magnet on a stick into the mix and you have yourself a tiny drawing tablet!
This isn’t the first time we’ve seen cool experiments with core memory, and not even the first time we’ve seen [Andy] use it to make something awesome, but it really illuminates how the technology works. Being able to not only see memory being written but to manually write to it makes it all so much realer, somehow.


Here’s a photo of a core memory plane from a Collins 8500 computer. I salvaged it from a system that was being scrapped at work. Back in the late 70s and into the 80s, when I was a computer tech, I used to repair core memory. Later computers used dynamic memory. This core plane contains 4096 cores and 32 of them were stacked for 16K bytes in a module and 4 modules in the computer for a total of 64KB. The 16K module was about the size of a large desktop computer. I still have this core plane on the shelf behind me, so I don’t have to visualize it.
https://drive.google.com/file/d/0B5LapMwk8iPrNkFZUXA4cmd5dTg/view?usp=sharing
Nice! It boggles the mind to think you’d need 4 million of those to equal the RAM in the 3″ x 5″ x .5″ smartphone in my hand.
Two questions;
1) I’m having trouble with scale, how big is this thing, and..
2) I can’t imagine something as mechanical as this being very easy to build with 4K little cores. Given the yields on something so delicate and hand built, the odds of a few fails somewhere in 32 copies would seem very high,
I don’t see how you could test it as you go, since you’d constantly have to connect and disconnect the ‘bus wires’ and the strategy of ripping up a densely packed field to repair one core would seem to imperil entire rows and columns in the area.
How were manufacturing defects dealt with? Are there spare cores or something?
I don’t know the actual process they used, but they hired women from the textile industry to do the work early on, I suspect they were just really good at what they do.
its not easy and yeilds were low … that is why it cost more than a car to have less ram than a pocket calc back in the day
Very cool. Thank you for sharing that.
I wish I have a core memory from one of the first computer I worked on. It was a TI airborne computer thyat had 64K x 18 bit memory in a series of 4 cards (plus 4 memory driver cards).
It also was about the size of a large tower PC but weight some 45 lbs.
The smallness of those ferrite rings is wild, I imagine it was frustrating to get all three wires threaded through each of those!
Awesome project, I enjoyed seeing the show-and-tell during Remoticon last weekend. Glad to see it written up here as it reminded me to go and take a look at the weaving technique. You sure managed to get a perfect grid with the jig you printed.
Also, I wanted a refresher on core memory electrical behavior, this video has a perfect explanation starting at 2:40
https://youtu.be/AwsInQLmjXc?t=160
Thanks Mike. The weaving isn’t too bad, but you definitely can’t rush it. It’s very satisfying to complete it with a nice tight looking result. The most frustrating part can be pulling the wires too tight and breaking them just above the solder joint. But it is recoverable with patience!
That video by CuriousMarc was part of my education during this project – very well done and super-helpful to me as I was troubleshooting.
I’ve had the pleasure of checking out the early prototype and chat tingwith Andy, it’s a great concept and super fun to play with. D34DBEEF C0D3C4F3!
Morgan is the reason D34DBEEF C0D3C4F3 shows up in my videos. His was a great suggestion – he wanted to see the hex representation of those 64 bits in real-time. It’s a fun mode to tinker with.
Also see ‘Williams–Kilburn tube’, an early RAM technology that give a whole new meaning to “read out”
https://en.wikipedia.org/wiki/Williams_tube
Woah. That’s unique. Another example from history that brings us to the modern computer era.
The core memory on the Singer/ICL System Ten (1970-1980) had a cycle time of 2.2us.
When I worked at NCR (National Cash Register) we had an online terminal/cash register used in department store (JC Penney P A Bergner Macys ) that used magcor to hold its local program. It had an analogue power supply and a helical impact printer and was dumb as a stump when it was offline from the data multiplexer in the back office. I should have kept a core because when they failed we used to pitch them.
https://www.google.com/url?sa=i&url=http%3A%2F%2Fwww.geocities.ws%2FNCR605%2FPage5.html&psig=AOvVaw1b40bP9i6qvQXpVcm2Bcax&ust=1605225660103000&source=images&cd=vfe&ved=0CAIQjRxqFwoTCLicodzZ–wCFQAAAAAdAAAAABAJ
Bad link. Dont click on it. My appologies. Google the NCR 280 instead.
Just find yourself an old Seeburg select-o-matic jukebox from the 60’s. The whole selection system was a core memory unit, 100 to be exact. Just watch the read out voltage, it will light you up like a Xmas tree!