Many of the hardware orientated hackers among us will likely have been following along with the story of [Stephen Hawes] and the Lumen pick-and-place project but kind of waiting a bit for the project to mature some more before maybe taking the plunge and ordering a kit. One reason for this might be that whilst the basic machine design is there and working, the tape feeders did need a fair bit of work, and a lack of usable feeders does not make a great PnP machine. [Stephen] has been working on a newer design that addresses some of the identified shortcomings, and has started documenting his progress (video, embedded below) along the way.
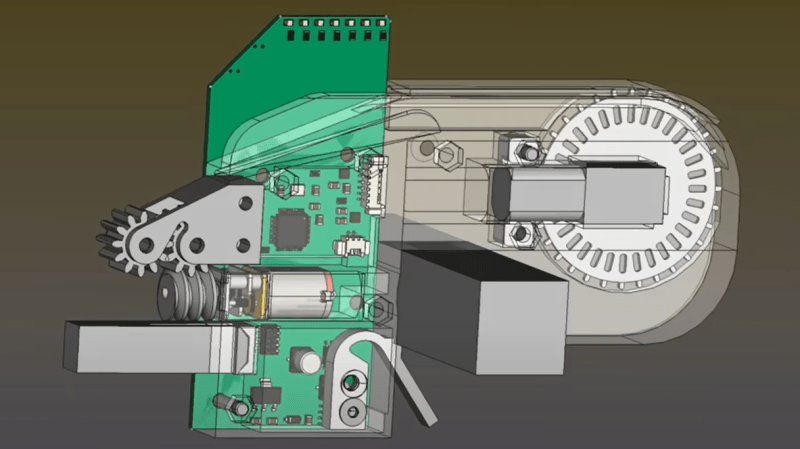
Gone is the PCB-based ‘case’, reverting back to a 3D printable affair and a much smaller PCB. After flip-flopping a bit between different geared DC motors, [Stephen] settled back on the original, smaller unit, which after a wee spot of hacking, was convinced to accept an optical encoder stripped from another unit, and this proved that it was indeed more than up to the tape-advancement duty. The reason for this change was physical size — the original motor resulted in an assembly 38mm wide — this limited the number for feeders on the front rail to barely eleven units. This is not really enough, but with the narrower assembly, the width is reduced to 15.5mm allowing 27 feeders to snuggle together on the rail, and that should make the machine much more usable.
Another area of concern was the cover tape peeler. It is critical that as the tape advances, for each picking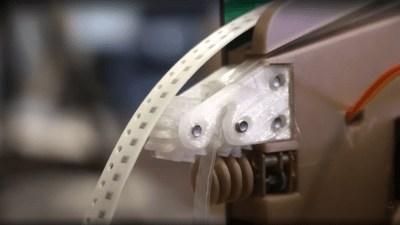 operation, the cover film is peeled back at the correct rate, with sufficient tension to overcome any extra sticky areas of glue holding it down. The original design used a separate motor to wind the film around a spool, but again that spool was quite wide, and a narrower solution was needed. This was improved by feeding the film into a pair of opposed straight gears, driven from one side by a worm gear. The film is peeled off on one side, passed through a guide groove in the feeder body and then onwards to the puller mechanism. Simple and effective.
One final area for concern was that the mounting method of the feeder unit onto the front rail (which looks like a length of 2020 extrusion) was a bit wobbly, allowing movement in a few directions, and that’s not great for repeatable picking, even with the awesome OpenPNP vision system dialling it in as best it can. The redesigned enclosure is shaped to the rail profile, allowing it to fit tighter and is retained under tension with a replaceable 3D printed flexure. A quick ‘snap’ and it now locks in place under tension and the wobble is history.
We’ve obviously covered the LumenPnP recently, and here, a little earlier and we’re not going to end the story just yet. The machine is now starting to look a lot more viable for those of us who do a lot of PCB assembly runs in small quantity, and we’ll sure be watching progress closely in the coming months!
Thanks to [Abe] for the tip!


Stephen’s persistence with this is truly admirable.
That’s some fine looking engineering there! Kudos to [Stephen Hawes].
I read the Title as Tape Reader, and wondered how many paper tapes needed to be read.
The 2020 flexture works well on printed stuff (especially with PETG) I used pretty much the exact same method to hold a raspi 7in touchscreen display on a printer. No screws needed. https://flic.kr/p/2iSwW3b
I also made some static feeders for my PnP using DIN rail flextures. They print very well and lock solid. https://flic.kr/p/2mZXpte Only issue is when you try to take one off the rail while the other strips are exposed…bit of a bouncing issue (still a work in progress).
I mean, I get not wanting to watch the video, but could you try to read the video description? The links are all there. It seems like you’re just feigning ignorance so you can comment on how you don’t like the video.
FYI it’s “oriented.” “Orientated” is not a word.
I speak the Queen’s English with a British accent. Sorry about that.
https://dictionary.cambridge.org/dictionary/english/orientated
Whilst on the subject, one reverts not reverts back.
You are moving the tape only in one direction, so backlash from the motor gearbox should not be a huge issue.
Nice engineering work.