We’ve seen a lot of practical machines built using Lego. Why not? The bricks are cheap and plentiful, so if they can get the job done, who cares if they look like a child’s toy? Apparently, not [Yuksel Temiz]. He’s an engineer for IBM whose job involves taking pictures of microscopic fluidic circuits. When he wasn’t satisfied with the high-power $10,000 microscopes he had, he built his own. Using Lego. How are the pictures? Good enough to appear in many scientific journals.
Clearly, the microscope doesn’t just contain Lego, but it still came in at under $300. According to an interview from Futurism, the target devices are reflective which makes photographing them straight-on difficult. After experimenting with cameras on tripods, [Yuksel] decided he could build his own specialized device. You can see a video of the devices in question and some of the photographs below.
Tensegrity structures are an impressive demonstration of how to achieve mechanical stability through tensile forces. Since the topic is currently trending it was probably only a matter of time before somebody like [Alexandre Thiery] came with the idea to build a tensegrity model from Lego.
In the GIF below that [Alexandre Thiery] shared on his Twitter account you can see his kids admiring the model. Tensegrity structures consist of elements under constant tension – in most cases strings – and components under compression, in this case beams of Lego. By combining these elements, one can build stable structures that seem to float in midair. A simple daily-life example for tensegrity is a balloon where the skin is the tensional element while the air inside is the component under compression.
[Alexandre Thiery] has come up with the clever idea to simply clamp the strings between two Lego blocks. This certainly paves the way for other more complicated Lego-based tensegrity structures that we will likely see in the future. [Alexandre Thiery] also recently extended his model by stacking an identical structure on top of it.
Like so many of us, [EducatedAce] has been quelling the quarantine blues by resurrecting old projects and finding new challenges to fill the days. He’s just finished building this blocky macro keypad to hold a bunch of shortcuts for Photoshop, thus continuing and compounding the creative spree.
[EducatedAce] already had everything on hand except the Arduino Micro. Instead of standard key switches, this macro block uses 16 of the loudest, crunchiest tactile buttons out there — those big ones with the yellow stems that sound like small staplers.
And don’t worry — no LEGO or LEGO accessories were harmed in the making of this macro pad — the base plate and switch plate are 3D printed. [EducatedAce] has the STL files posted along with great build instructions if you want to wire one up for yourself.
This is a great project because it’s sturdy, it gets the job done without a lot of expense, and still looks like something you’d want on your desk. [EducatedAce] plans to rebuild it with uniformly colored bricks, but we think it looks great as-is, especially with those vented 1×2 pieces. If it were ours, we might use a different color for each row or column to help keep the shortcuts straight.
What? You’ve never printed your own interlocking building blocks before? Well, don’t limit yourself to 1:1 scale, otherwise the minifigs have won. Build a go-kart big enough for humans!
The LEGO Technic line is definitely the hacker’s flavor of LEGO. It brings a treasure trove of engineering uses that make axles, gears, pulleys, and motors a thing. The only problem is that it’s the inanimate minifigures having all of the fun. But not if [Matt Denton] has something to say about it. He’s building a huge 3D-printed go-kart with pieces scaled up 8.43 times the size of their LEGO equivalents. That’s large enough for an adult to fit!
You may remember seeing [Matt’s] previous attempt at something like this about three years back, but that was only around half the size of this one. He printed a blue kart for his nephew, but it didn’t quite scale up enough even for a child to ride. This one is impressively large, but that raises some interesting fabrication issues
The long beams that make up the frame of the vehicle and the axle piece (the black rods with an X-shaped profile) used for the steering column are far too long to print in one go. So the axle was printed in two parts with a square channel down the center that hides a single run of square tubing. But the beams are much more interesting. Printed in two parts, there’s a dovetail-shaped connector piece that holds the top joint together, and a hidden bolt for the bottom. Glue is also used along the joint to bolster the holding power of the mechanical fasteners.
In general, the weight and friction on this scaled up version need many considerations. [Matt] explains where he’s made design decisions — like perpendicular axle connectors that have proper bearings — to include mostly-hidden metal parts and fasteners to ensure the plastic doesn’t fail. The thing looks awesome, but just wait until you see the assembly process. It’s sooooo satisfying to watch the modular parts snap into place. The project’s still in progress and before he’s done he plans to add an electric motor to make the kart go.
Even if you’re not scaling a model up to full size, giant is a guaranteed recipe for fun. Case in point, [Matt’s] enlarged LEGO fork lift is a delight.
While Valve’s Steam Controller was ultimately a commercial failure, there’s no denying it’s an interesting piece of hardware. With dual trackpads, a wealth of buttons, and Bluetooth capability, it could be the ideal way to control your next build. Thanks to a recent project by [geggo], now you’ve even got an example you can follow.
A custom PCB holding an ESP32 and DRV8833 dual H-bridge motor controller is used to interface with standard LEGO motors using their stock block-like connectors. That means the board is a drop-in upgrade for whatever motorized creation you’ve already built.
Since the ESP32 obviously has WiFi in addition to Bluetooth, that also means this little board could be used to control LEGO projects over the local network or even Internet with some changes to the firmware.
Interestingly, while Valve officially enabled Bluetooth on the Steam Controller back in 2018, it sounds like some undocumented poking and reverse engineering was necessary to get it working here. That’s great for those of us who like a good hack, but if you’re more interested in just getting things working, [geggo] has been good enough to release the source code to get you started.
If you’re not interested in Bluetooth but want to get your creation up and moving, we’ve recently covered how one hacker used the ESP8266 to bring his LEGO train to life by integrating it into his smart home.
[Sofia] spent a lot of time looking around for the perfect LEGO clock. Eventually, she realized that the perfect LEGO clock is, of course, the one you build yourself. So if you find yourself staring at the same old boring clock, contemplating time and the meaning of time itself, why not spend some time making a new timepiece?
You probably already had the LEGO out (no judgment here). This build doesn’t take a whole lot of building blocks — just a microcontroller, a real-time clock module, some LED matrices to display the digits, shift registers if they’re not already built into the matrices, and a pair of buttons for control. [Sofia] used an Arduino Nano, but any microcontroller with enough I/O ought to work. Everybody needs a colorful new way to block out their time.
We love the way this clock looks, especially the transparent panels in front of the LED panels. Given the countless custom pieces out there from all the special sets over the years, we bet you could come up with some really interesting builds.
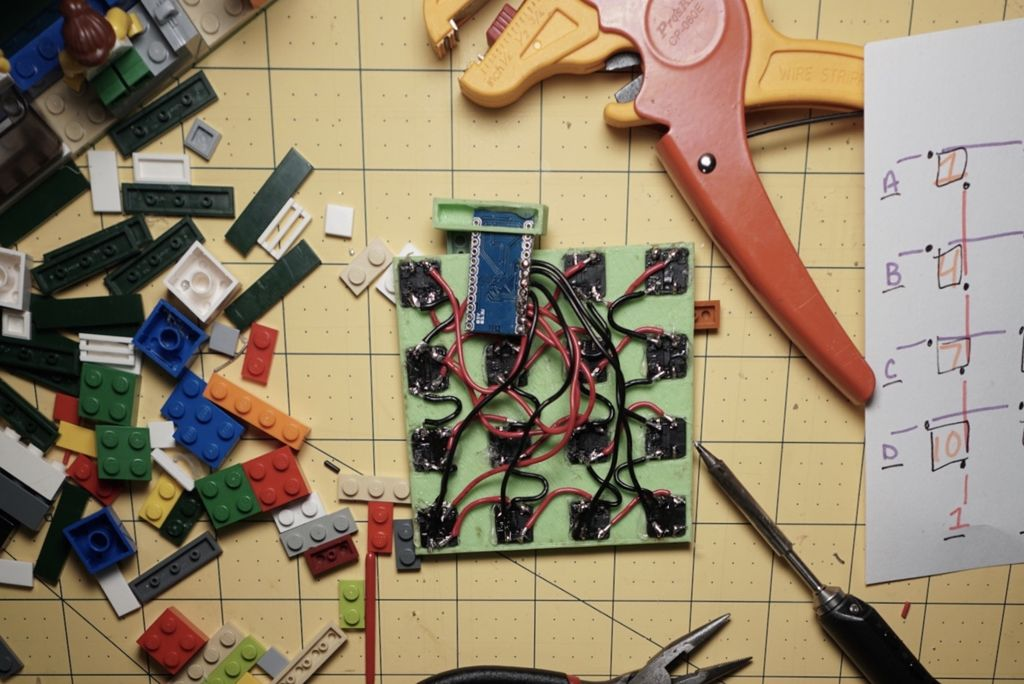
This project started, as many do, with a simple idea. [Ben Hoad] just wanted to take a static LEGO Hogwarts Express train kit and make it motorized. It was compatible with standard LEGO track pieces, so all he should have to do was figure out how to shoehorn a motor in there and be done with it. Right?
Well, you already know how things like this go. It started with adding the motor, which ended up being relatively straightforward once [Ben] used some community LEGO CAD tools to figure out which kits had the specific parts he needed to redesign the train in such a way that he’d have enough space inside for the motor without ruining the way it looked. But then the feature creep kicked in, and he found himself falling down that familiar rabbit hole.
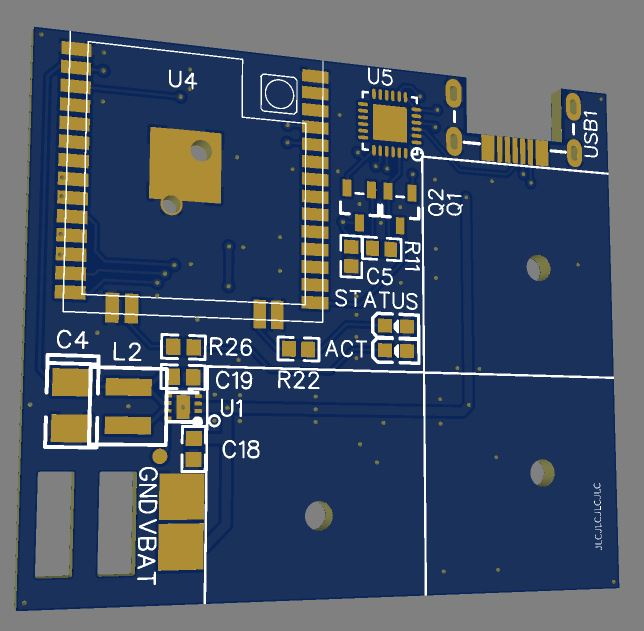
A 3D representation of the train’s internal components.
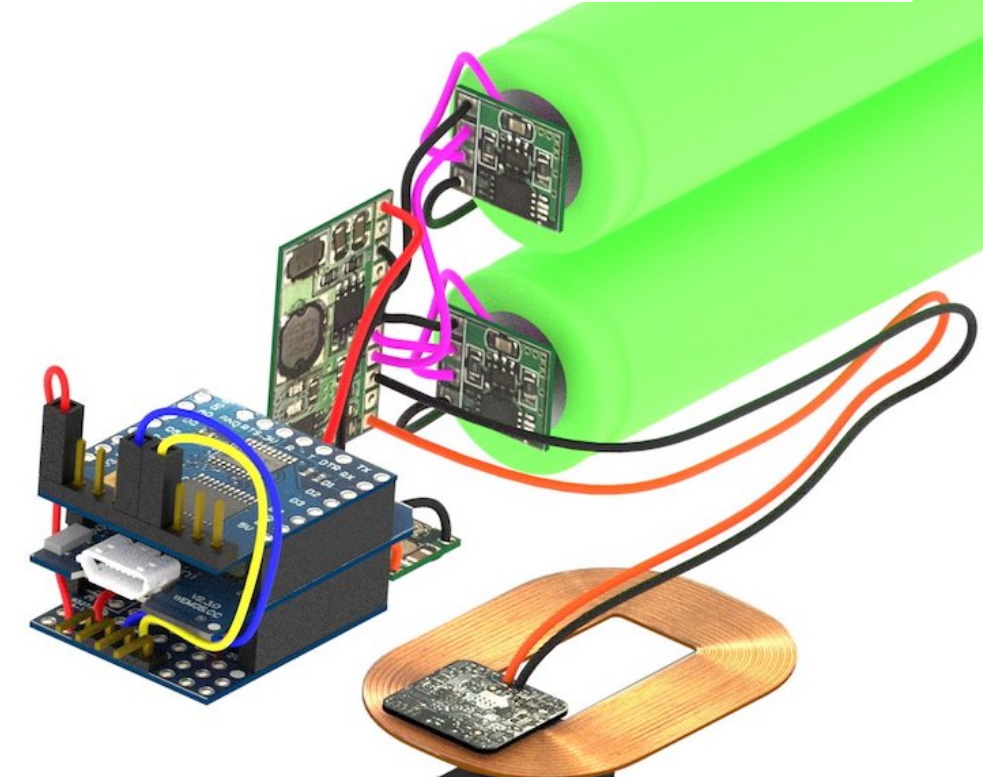
The first problem was how to reliably power the train. It turns out the rear car was more or less empty already, so that became home for two 18650 batteries (the project details say “16850” but we believe that is merely a typo). [Ben] didn’t want to have to take the thing apart every time it ran down, so he wondered if it would be possible to add wireless charging.
A Qi coil in the bottom of the train car and one in a specially designed section of track got the power flowing, but getting them lined up proved a bit finicky. So he added a Hall effect sensor to the car and a strong magnet to the track, so the train would know when the coils were lined up and automatically pump the brakes.
So now he had a motorized train that could recharge itself, but how should he turn it on and off? Well, with an ESP8266 along for the ride, he figured it would be easy to add WiFi control. With a bit of code and the Homebridge project, he was able to get the train to appear as a smart switch to Apple’s HomeKit. That allows him to start and stop the train from his smartphone, complete with a routine that returns the train to the charging station once it’s finished making the rounds. [Ben] says the next steps are to put some sanity checks in, such as shutting the motors down if the train hasn’t passed the charging station in a few minutes; a sure sign that it’s not actually moving.