An Optocoupler Doorbell Notifier

Over the years we’ve seen several attempts at adding Internet connectivity to the lowly wired doorbell. Generally, these projects aim to piggyback on the existing wiring, bells, and buttons rather than replace them entirely. Which invariably means at some point the AC wiring is going to need to interface with a DC microcontroller. This is often where things get interesting, as it seems everyone has a different idea on how best to bridge these two systems.

That’s the point where [Ben Brooks] found himself not so long ago. While researching the best way to tap into the 20 VAC pumping through his doorbells, he found a forum post where somebody was experimenting with optocouplers. As is unfortunately so often the case, the forum thread never really had a conclusion, and it wasn’t clear if the original poster ever figured it out.

DIY optocouplers wrapped in electrical tape

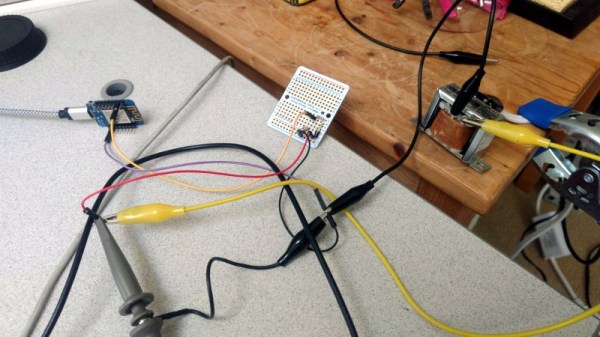
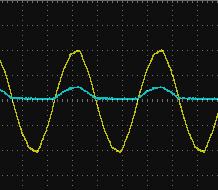
[Ben] liked the idea though, so he thought he would give it a shot. But before investing in real optocouplers, he created his own DIY versions to use as a proof of concept. He put a standard LED and photoresistor together with a bit of black tape, and connected the LED to the doorbell line with a resistor. Running the LED on 60 Hz AC meant it was flickering rapidly, but for the purposes of detecting if there was voltage on the line, it worked perfectly.

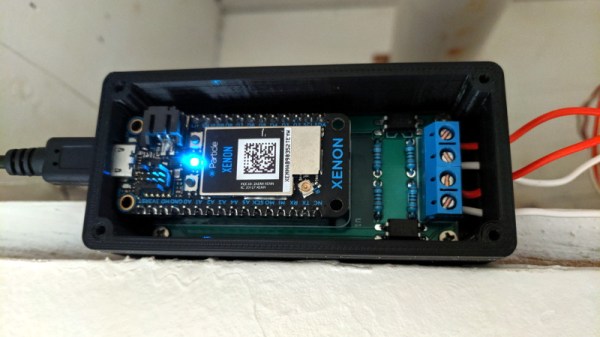
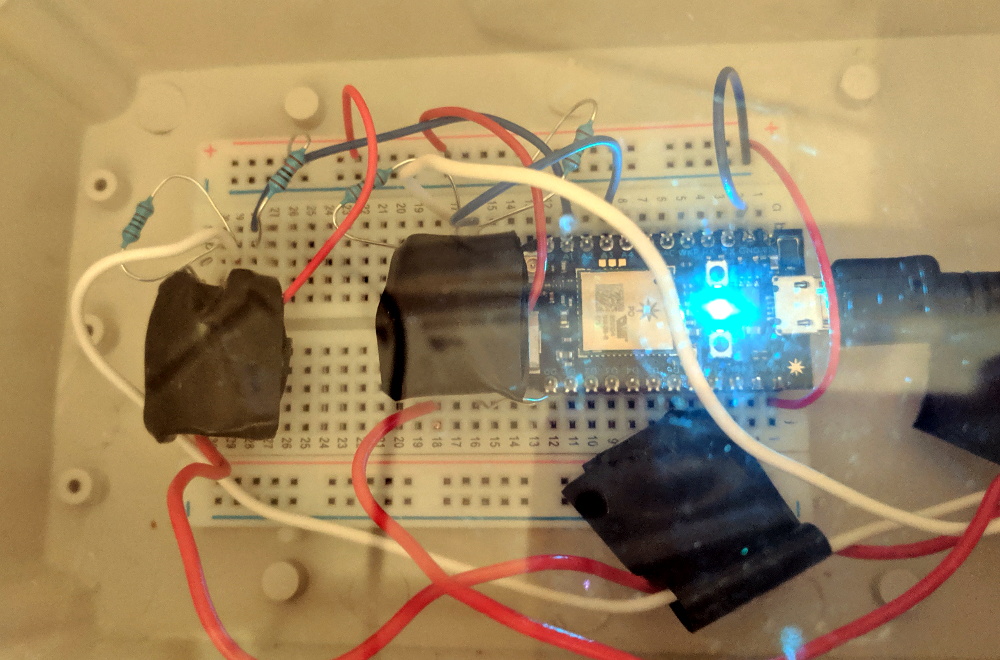
Wanting something slightly more professional for the final product, [Ben] eventually evolved his proof of concept to include a pair of 4N35s, a custom PCB, and a 3D printed enclosure. Powered by a Particle Xenon, the device uses IFTTT to fire off smartphone notifications and blink the lights in the house whenever somebody pushes the bell.

If you’re still wondering why it’s so tricky to connect a microcontroller up to your door bell, a quick look at some of the similar projects we’ve covered should give you a pretty good idea of how annoying these systems can be to modernize.

LEDs Light The Way To This Backdoor

A curious trend for some years in the world of PC hardware has been that of attaching LEDs to all the constituent parts of a computer. The idea is that somehow a gaming rig that looks badass will somehow be just a little bit faster. As [Graham  Sutherland] discovered when he wanted to extinguish the LEDs on his new Gigabyte graphics card, these LEDs can present an unexpected security hazard.

The key to their insecurity comes in the Gigabyte driver. This is a piece of software that you would normally expect to be an abstraction layer with an interface visible to your user level privilege, and a safe decoupling between that and the considerably more security sensitive hardware layer from which the LED bus can be found. Instead of this, the Gigabyte driver is more of a wrapper that simply exposes the LED bus directly to the user level. It’s intended that user-level code can easily bit-bang WS2812 LEDs without hinderance, but its effect is to provide a gaping hole in the security layers intended to keep malicious code away from the hardware. The cherry on the cake is provided by the discovery of a PIC microcontroller on the bus which can be flashed with new code, providing an attacker with persistent storage unbeknownst to the operating system or CPU.

The entire Twitter thread is very much worth reading whether you are a PC infosec savant or a dilettante, because not only should we all know something about the mechanisms of PC backdoors we should also be aware that sometimes a component as innocuous as an LED can be a source of a security issue.

Thanks [Slurm] for the tip.

Gigabyte motherboard picture: Gani01 [Public domain].

Over-Engineered Cat Door Makes Purrfect Sense

On paper, pet doors are pretty great. You don’t have to keep letting the cat in and out, and there should be fewer scratches on the door overall. Unfortunately, your average pet door is indiscriminate, and will let any old creature waltz right in. Well, [Jeremiah] was tired of uninvited critters, so he built a motorized door with a built-in bouncer. Now, only animals with pre-approved BLE tags can get in.

The bouncer is a Raspi 3 running Node-RED, which scans continuously for BLE advertisements from the cats’ collars. [Jeremiah] settled on Tile tags because they’re reliable and cat-proof. The first version used an Arduino and RFID tags for the cats, but they had to get too close to the door to trigger it.

We love [Jeremiah]’s choice of door actuator, a 12V retractable car antenna. [Jeremiah] uses the antenna itself to lift and lower the removable lockout panel that comes with the door. He removed the circuit that retracts the antenna when power is lost, so that power outages don’t become free-for-alls for shelter-seeking animals.

There’s also a nice feature for slow creatures—the door won’t close until 15 seconds after the last BLE ad, so they cats won’t ever have to Indiana Jones it through the opening. Magnetic switches currently limit the door travel at the top and bottom, though [Jeremiah] will eventually replace them with standard switches. Paw at the break until you get a walk-through video.

Cats will be cats, and the ones that go outside will probably rack up a body count. Here’s a cat door that looks for victims clenched between cat jaws and starts a 15-minute lockout period.

Continue reading “Over-Engineered Cat Door Makes Purrfect Sense”

DIY Watertight Junction Box For Serious Outdoor Sealing

Thingiverse user [The-Mechanic] shared a design for 3D printed enclosures that are made to house wire and cable junctions, which can then be rendered weatherproof by injecting them with a suitable caulking compound and allowing it to cure. It’s a cross between an enclosure and potted electronics. It’s also a one-way trip, because the result is sealed up like a pharaoh’s tomb. On the upside, it’s cheap, accessible, and easily customized.

The way it works is this: wires go through end caps which snap onto the main body, holding the junction inside. Sealant is then pumped in via the hole on the side, then the hole is plugged. Afterwards, all there is to do is wait until the sealant cures. [The-Mechanic] has a couple of companion designs, as well. For tubes of sealant that have threaded tops, one can more effectively save the contents of the tube for later with this design for screw-on caps. There are also 3D printed nozzles in a variety of designs.

One thing to keep in mind about silicone-based sealants is that thick gobs of it can take a really, really long time to cure fully. A thick gob of the stuff will tend to firm up on the outside but leave the inside gooey. If that will be a problem, maybe take a cue from Oogoo and mix in a bit of corn starch with the silicone sealant. The resulting mixture will be thicker, but it’ll cure throughout with no problems.

Building A Robot Rover For Those Tough Indoor Missions

Making an outdoor rover is easy stuff, with lots of folk having them doing their roving activities on beaches and alien worlds. Clearly the new frontier is indoor environments, a frontier which is helpfully being conquered by [Andreas Hoelldorfer]’s Mantis Rover.

OK, we’re kidding. This project started out life as a base for [Andreas]’s exquisite 3D printable robotic arm, but it’s even capable of carrying people around, as the embedded video after the break makes abundantly clear. The most eye-catching feature of the Mantis Rover are its Mecanum wheels, which allow it to move in any direction, and is perfect for those tight spots where getting stuck would be really awkward.

The Mecanum wheels are 3D printed, making the motors and the associated controllers the more complicated part of this package. Plans for the wheels involve casting some kind of rubber, to make the wheels more gentle on the floors it has to drive on. The electronics include TMC 5160 motor drivers and an STM32F407VET6 MCU, as well as a W5500-equipped custom ‘Robot Shield’.

It seems that there are still a lot of tweaks underway to make the project even more interesting. Maybe it’s the perfect foundation for your next indoor roving sessions at the office or local hackerspace?

Continue reading “Building A Robot Rover For Those Tough Indoor Missions”

This Week In Security: KNOB, Old Scams Are New Again, 0-days, Backdoors, And More

Bluetooth is a great protocol. You can listen to music, transfer files, get on the internet, and more. A side effect of those many uses is that the specification is complicated and intended to cover many use cases. A team of researchers took a look at the Bluetooth specification, and discovered a problem they call the KNOB attack, Key Negotiation Of Bluetooth.

This is actually one of the simpler vulnerabilities to understand. Randomly generated keys are only as good as the entropy that goes into the key generation. The Bluetooth specification allows negotiating how many bytes of entropy is used in generating the shared session key. By necessity, this negotiation happens before the communication is encrypted. The real weakness here is that the specification lists a minimum entropy of 1 byte. This means 256 possible initial states, far within the realm of brute-forcing in real time.

The attack, then, is to essentially man-in-the-middle the beginning of a Bluetooth connection, and force that entropy length to a single byte. That’s essentially it. From there, a bit of brute forcing results in the Bluetooth session key, giving the attacker complete access to the encrypted stream.

One last note, this isn’t an implementation vulnerability, it’s a specification vulnerability. If your device properly implements the Bluetooth protocol, it’s vulnerable.

CenturyLink Unlinked

You may not be familiar with CenturyLink, but it maintains one of the backbone fiber networks serving telephone and internet connectivity. On December 2018, CenturyLink had a large outage affecting its fiber network, most notable disrupting 911 services for many across the United States for 37 hours. The incident report was released on Monday, and it’s… interesting.
Continue reading “This Week In Security: KNOB, Old Scams Are New Again, 0-days, Backdoors, And More”

Sniffed Transformer Puts Wired Doorbell Online

There’s certainly no shortage of “smart” gadgets out there that will provide you with a notification, or even a live audiovisual stream, whenever somebody is at your door. But as we’ve seen countless times before, not everyone is thrilled with the terms that most of these products operate under. Getting a notification on your phone when the pizza guy shows up shouldn’t require an email address, credit card number, or DNA sample.

For [Nick Touran], half the work was already done. There was already a traditional wired doorbell in his home, he just had to come up with a minimally invasive way to link it with Home Assistant. He reasoned that he could tap into the low-voltage side of the doorbell transformer and watch for the telltale fluctuations that would indicate the bell was doing its thing. The ESP8266 has an ADC to measure voltage and WiFi to connect to Home Assistant, so it seemed like the perfect bridge between old and new.

Transformer voltage before and after

Of course, as with any worthwhile project, it ended up being a bit more complicated. Wired doorbells generally operate on 16-24 VAC, and [Nick] knew if he tried to put his Wemos D1 across the line he’d release the critical Magic Smoke. What he needed was a voltage divider circuit that would take low-voltage AC and drop it to an even lower DC voltage that the microcontroller could cope with.

The simple circuit [Nick] comes up with cuts the voltage way down and removes the negative component completely. So what was originally 18.75 VAC turned into a series of 60 Hz blips at 2.4 VDC; perfect for feeding into a microcontroller ADC. With a baseline to work from, he could then write some code that would watch for variations in this signal to determine when the bell was ringing.

Or at least, that was the idea. While the setup worked well enough on the bench, its performance in the real-world left something to be desired. If his house guest had a heavy hand, it worked great. But a quick tap of the doorbell button would tend to go undetected. After investigating the issue, [Nick] found that he needed to use some software trickery to ensure the ESP8266 was able to keep up with the speedy signal. Once he was able to reliably detect short and long button presses, the rest was just a simple matter of sending an MQTT message to his automation system.

Compared to the hoops we’ve seen other hackers have to jump through to smarten up their doorbells, we think [Nick] got off fairly easy. This project is also an excellent example of how learning about circuit design and passive components can still come in handy in the Arduino Era.

Continue reading “Sniffed Transformer Puts Wired Doorbell Online”