Drive A Plasma Ball With An ATV Ignition Coil And A 555

[Discrete Electronics Guy] sends in his short tutorial on building a high voltage power supply from simple things.

The circuit is a classic, but we love the resourcefulness shown. The ignition coil comes from a three wheeler, the primary power supply is a ATX supply from a computer and the oscillator is powered by a 9V battery. We do wonder whose vehicle stopped working though.

He gives a great explanation of how the circuit works and was constructed and then moves on to build his own Plasma bulb. Despite expecting something more complicated the end result was achieved by putting a lightbulb on a stick. Fantastic. The circuitry was nearly packaged into a takeaway food container and the entire construction was called complete.

All in all it shows what someone can accomplish if they’re resourceful and understand the basics. However, it’s probably that you don’t electroBoom yourself to death if you can avoid it.

It’s A TV-Scope-Guitar Amplifier!

Guitar amplifiers are a frequent project, and despite being little more than a simple audio amplifier on paper, they conceal a surprising quantity of variables in search of a particular sound. We’ve seen a lot of them, but never one quite like [Nate Croson]’s CRT TV guitar amplifier. The LM386 doesn’t just drive the speaker, he’s also using it to turn the TV into a crude oscilloscope to form a visualisation of the sound.

The video showing this feat is below the break, and it puts us in a quandary due to being short on technical information. He’s driving the horizontal coils with the TV’s 50 Hz sawtooth field timebase, and the vertical ones with the audio from the LM386. We aren’t sure whether he’s rotated the yoke or whether the connections have been swapped, but the result is certainly impressive.

So given that there’s not quite as much technical detail as we’d like, why has this project captured our interest? Because it serves as a reminder that a CRT TV is a bit more than a useless anachronism, it’s a complex analogue device with significant and unique hacking potential. The older ones in particular provide endless possibilities for modification and circuit bending, and make for a fascinating analogue playground at a very agreeable price. It’s worth pointing out however that some of the voltages involved can make them a hazardous prospect for the unwary hacker. If you’re interested though, take a look at our dive into an older model.

Continue reading “It’s A TV-Scope-Guitar Amplifier!”

Great Artificial Daylight Via Broken TVs

[DIY Perks] has long been a fan of lights that accurately mimic real daylight. Often choosing high-quality LEDs for his projects, lately he’s taken a different tack – using broken televisions to produce attractive home lighting solutions.

The hack involves removing the backlight from the damaged television or monitor. These have a powerful white light inside, but the real key is that they also features a Fresnel lens. This helps the backlight appear very similar to a real skylight, due to the way it scatters light around the room.

Due to the difficulty of driving most LED and CCFL backlights, the project strips the original lighting out and replaces it with a set of high-CRI LED strips readily available off eBay. These are easily driven from 12 volts and give a white light more similar to actual daylight compared to most backlights. With the LEDs in place, the monitor’s original diffusers and Fresnel lens are put back in place, and the light is finished off with an aluminium frame.

Fitted to an angled ceiling, the light really does look as if actual sunlight is streaming through a window on a rainy day. It’s a pleasant effect that does a great job of lighting a room, and we suspect it would be excellent for general video work, too. [DIY Perks] is no stranger to a good studio light build, after all. Video after the break.

Continue reading “Great Artificial Daylight Via Broken TVs”

Vintage Monoscope Tubes Generate Classic TV Test Patterns Once Again

Night creatures and insomniacs of a bygone era may fondly recall a TV test pattern appearing once [Jack Parr] or [Steve Allen] had had their say and the local TV station’s regular broadcast day had concluded. It was affectionately known as the Indian Head test pattern, for the stylized Native American, resplendent in a feathered headdress, that featured prominently in the graphic.

Unknown to most viewers was exactly how that test pattern and others like it were generated. But thanks to [Rich “The Lab Guy” Diehl] and his monoscope restoration project, we can all share in the retro details. It turns out that while some test patterns were merely a studio camera trained on a printed card, most were generated by a special tube called a monoscope. It functioned in basically the same manner as a studio camera, but rather than scanning the incident light of a scene with an electron beam, the image was permanently etched into a thin aluminum plate. [Rich] laid hands on two vintage monoscope tubes, one containing the Indian Head test pattern, and set about building a device to use them. “The Chief” can hold either tube in a Faraday cage of thin, flexible PCB material and 3D-printed parts, with supporting electronics like the power supply and video amplifiers in an aluminum chassis below.

It’s a nice piece of work and a great lesson in how it used to be done, and the lithophane of the Indian head is a nice touch. Hats off to [The Lab Guy] for build quality and great documentation, including a detailed video series that starts with the video below. If you need a little more background on how video came to be, [Philo Farnsworth]’s story is a good place to start.

Continue reading “Vintage Monoscope Tubes Generate Classic TV Test Patterns Once Again”

Finally, A TV For Portrait Videos

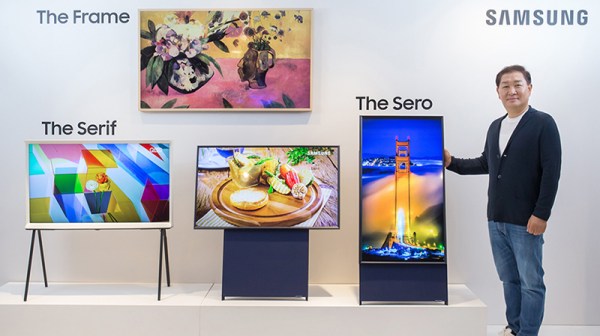
Vertical video is bad, or so we’re told, and you shouldn’t shoot a video with your phone in a vertical position. Why? Because all monitors are wider than they are tall. This conventional wisdom is being challenged by none other than Samsung. There is now a vertical TV (Korean, Google Translate link) , engineered specifically videos shot on mobile phones.

“Samsung Electronics analyzed the characteristics of the Millennial generation, which is familiar with mobile content, and presented a new concept TV ‘The Sero’ (loosely translated as ‘The Vertical’), which is based on the vertical screen, unlike the conventional TV,” so goes the press release.

Features of The Sero TV include synchronization between the screen and a mobile device, and mirroring functions based on NFC. This display is no slouch in the audio department, either: it features a 4.1 channel, 60-watt high-end speaker. A built-in microphone and support for Samsung’s Bixby voice assistant means artificial intelligence can easily control various functions of the display.

The Sero will be released in Korea at the end of May, with a reported price tag of 18,900,000 South Korean Won. A quick Google search tells us that converts to an implausible-sounding $16,295 USD, but it’s not as if you were going to buy one anyway.

Nevertheless, there actually is a market for ‘vertical’ or portrait displays; thanks to the ever-widening of aspect ratios by LCD manufacturers, it makes sense to edit documents with a vertically-oriented monitor. You can fit more code on the screen if you just rotate your monitor. Apple was one of the first companies to realize this with the release of the Macintosh Portrait Display in 1989, providing a wondrous 640×870 grayscale resolution display for desktop publishing. Of course, the Radius full page display was released a few years earlier and the Xerox Alto had a vertically oriented screen. But wait a minute, can’t you just rotate your monitor and save $16k?

A Vintage Sony Portable TV, Brought Up To Date

In the time before smartphones for on-the-go visual entertainment, there were portable TVs. You might think of a portable TV as a luggable device, but the really cool ones were pocket-sized. Perhaps if you are familiar with pocket TVs you’ll be thinking of a Citizen or a Casio with a matchbox-sized LCD, but before those devices reached the market there was an earlier generation that featured tiny CRTs. These were simply the coolest electronics that an ’80s kid could lust after, and [Nick Reynolds] is lucky enough to have one. It’s a Sony Watchman from some time in the first half of that decade, and because it’s useless in the age of digital broadcasts he’s upgraded it by installing a Raspberry Pi in its case.

The unlikely inspiration for the project came from the 1970s British sci-fi TV series Space 1999, in which portable CRT-based communicators were a prop. They were typical of the sci-fi vision of the future in shows of the period, one that got so much right but didn’t quite see the smartphone coming.

The Watchman features Sony’s angled CRT, and fitting a Pi Zero W into the limited space behind it called for some careful insulation of its parts with Kapton tape. He’s even included a Pi camera module with a contorted run of flexible cable, placing it beneath the screen where a tuning indicator once sat. He has no sound as yet, but is able to demonstrate a working videophone using Ekiga as a client. He has a few more Watchmen, and has plans for a suite of retro videophones, and a Pi 3 based model.

Surprisingly this isn’t the only Sony Watchman that’s had this kind of treatment, previously we’ve brought you one that hosted a Pong game.

This Satellite Finder Can Watch Amateur TV

Setting up satellite dishes can be a finicky business. To aid in the alignment of these precision antennas, satellite finders are often used which can display audio and video feeds from the satellite while also providing signal strength readouts for accurate adjustment. However, these devices can also be used in interesting ways for more terrestrial purposes (Youtube link).

Using the DMYCO V8 Finder, [Corrosive] demonstrates how to set up the device to pick up terrestrial amateur streams. Satellite reception typically involves the use of a low-noise block downconverter, which downconverts the high frequency satellite signal into a lower intermediate frequency. Operating at the 1.2GHz amateur band, this isn’t necessary, so the device is configured to use an LNB frequency of 10000, and the channel frequency entered as a multiple of ten higher. In this case, [Corrosive] is tuning in an amateur channel on 1254 MHz, which is entered as 11254 MHz to account for the absent LNB.

[Corrosive] points out that, when using an F-connector to BNC adapter with this setup, it’s important to choose one that does not short the center pin to the shield, as this will damage the unit. This is due to it being designed to power LNBs through the F-connector for satellite operation.

By simply reconfiguring a satellite finder with a basic scanner antenna, it’s possible to create a useful amateur television receiver. If you’re wondering how to transmit, [Corrosive] has that covered, too. Video after the break.

Continue reading “This Satellite Finder Can Watch Amateur TV”