Rethinking Automated Bed Leveling For 3D Printers

Automatic bed leveling is the next killer feature that will be found on all commercial filament printers. It’s a problem that has been solved a few dozen times already; there are just so many ways you can go about it. The Printrbot uses an inductive sensor to determine the position of the metal bed in relation to the nozzle. The Lulzbot Mini touches the nozzle itself to four contacts on the corner of the bed. There are even a few projects that will mechanically level the bed with the help of a system of cams and springs. It’s a difficult problem, and none of these solutions are perfect. [mjrice] has been thinking about the problem, and he hit upon a solution that is simple, elegant, and can be replicated on a 3D printer. It’s the RepRap solution to 3D printing, and it looks cool, to boot.

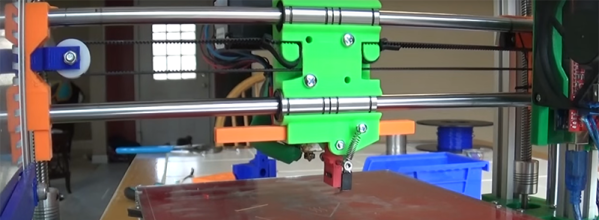
Instead of using the nozzle as a contact, getting an inductive sensor, or fabricating a baroque system of gears and cams, [mjrice] is doing this the old-fashioned way: a simple microswitch, the same type of switch you would find on the limit switches of any RepRap. Having a switch at the same Z position as a nozzle is an iffy idea, so [mjrice] made this switch retract into the extruder during printing, without using any motors, servos, or other electromechanical contrivances.

The key to this setup is a simple spring and a rack gear. When this rack gear is hit from the left side, it moves an arm and places the switch down on the bed. Hit the rack from the right side, and the switch folds up into the extruder. Combine this with a bit of G-code at the beginning of the print, and the switch will move down, figure out the actual height of the bed, and flip up out of the way. Beautiful, elegant, and the algorithms for bed leveling are already in most major printer firmwares.

You can check out the video of the mechanism below. It’s a great little device, and since it’s on a RepRap first, it’s not going to show up in a proprietary 3D printer next.

Continue reading “Rethinking Automated Bed Leveling For 3D Printers”

Kicking The Tires Before You Buy: 3d Printers

So you’re looking to buy your first 3D printer, and your index finger is quivering over that 300 US Dollar printer on Amazon.com. Stop! You’re about to have a bad time. 3D printing has come a long way, but most 3D printers are designed through witchcraft, legends, and tall tales rather than any rigorous engineering process. I would say most 3D printer designs are either just plain bad, or designed by a team of Chinese engineers applying all their ingenuity to cost cutting. There are a few that are well designed, and there is a comparatively higher price tag attached.

I’ll start by going through some of the myths and legends that show up in 3D printers. After that I’ll go through some of the common, mostly gimmick, features that typically hinder your printer’s ability, rather than adding any useful function. Next I’ll go onto the things that will actually make your printer better. Finally, I’ll add some special consideration if you’re a beginner buying your first printer.

Continue reading “Kicking The Tires Before You Buy: 3d Printers”

The 3D Printers Of CES

CES, the Consumer Electronics Show, is in full swing. That means the Hackaday tip line is filled to the brim with uninteresting press releases, and notices that companies from the world over will be at CES.

3D printing has fallen off the radar of people who worship shiny new gadgets of late, and this is simply a function of 3D printing falling into the trough of disillusionment. The hype train of 3D printing is stuck on a siding, people are bored, but this is the time that will shape what 3D printing will become for the next ten years. What fascinating news from the 3D printing industry comes to us from CES?

Continue reading “The 3D Printers Of CES”

The Effects Of Color On Material Properties Of 3D Printed Components

The strength of object printed on filament-based 3D printers varies by the plastic used, the G-code used by the printer, the percent infill, and even the temperature the plastic was extruded at. Everything, it seems, has an effect on the strength of 3D printed parts, but does the color of filament have an effect on the stress and strain a plastic part it can withstand? [Joshua M. Pearce] set out to answer that question in one of his most recent papers.

The methods section of the paper is about what you would expect for someone investigating the strength of parts printed on a RepRap. A Lulzbot TAZ 4 was used, along with natural, white, black, silver, and blue 3mm PLA filament. All parts were printed at 190°C with a 60°C heated bed.

The printed parts demonstrated yet again that a RepRap can produce parts that are at least equal in material strength to those produced by a proprietary 3D printer. But what about a difference in the strength among different colors? While there wasn’t a significant variation in the Young’s modulus of parts printed in different colors, there was a significant variation of the crystallization of differently colored printed parts, with white PLA producing the largest percent crystallinity, followed by blue, grey, black, and finally natural PLA. This crystallinity of a printed part can affect the tensile properties of a printed part, but [Pearce] found the extrusion temperature also has a large effect on the percentage of crystallinity.

Diamond Hotend Opens The Color Gamut For 3D Printing

It’s safe to say we’ve hit a bit of a plateau with hobby based 3D printers using FDM technology. Print quality is pretty high, they’re about as fast as they’re going to get, and compared to commercial machines they’re a pretty good bang for your buck. So what’s next? What about printing in color?

diamondhotend-1
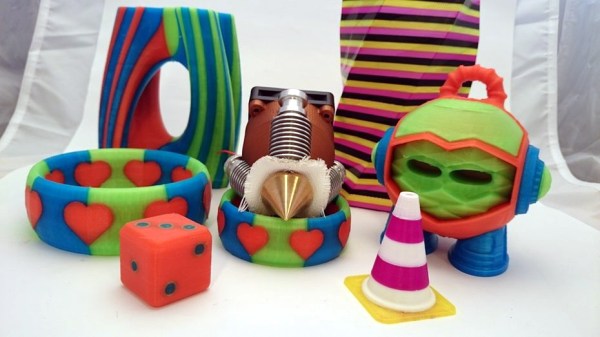
It is possible to print in color using a regular 3D printer and a bit of patience, but it’s really not economical or efficient. We’ve seen multiple extruder heads for 3D printing as well, but there are many problems with that due to calibration and trailing plastic from one head to another. So what if you could feed multiple color filaments into a single mixing head?

Well, it turns out you can. Earlier this year RepRap ran a Kickstarter for the development of the Diamond Hotend —  a single nozzle multi-color extruder. It’s in production now and appears to work quite well. It’s also compatible with many 3D printers as long as the motherboard has triple extruder support.

However, the big question remains — how do you program a colored print? Using Repetier Host actually. You’ll need to export your 3D model in the .AMF file format, but once you do, you’ll be able to configure it for a color print job inside Repetier Host.

Continue reading “Diamond Hotend Opens The Color Gamut For 3D Printing”

3D Printing Has Evolved Two Filament Standards

We’re far beyond the heyday of the RepRap project, and the Hackaday tip line isn’t seeing multiple Kickstarters for 3D printers every week. In a way, this is a bit of a loss. The rapid evolution of the low-cost 3D printer seen in the first half of this decade will never be matched, and from now on we’ll only see incremental improvements instead of the revolutionary steps taken by the first Prusa, the first Printrbot, and even the Makerbot Replicator.

This doesn’t mean everything is standardized. There’s still enough room for arguing over deltas versus Cartesians, beds moving on the Y axis versus moving along the Z, and a host of other details that make the current crop of printers so diverse. One of these small arguments is especially interesting: the diameter of the filament. Today, you can get any type of plastic you want, in any color, in two sizes: 1.75 and 3mm. If you think about it, it’s bizarre. Why on Earth would filament manufacturers, hot end fabricators, and even printer manufacturers decide to support two different varieties of the same consumable? The answer is a mix of a historical choice, engineering tradeoffs, and an absolutely arbitrary consequence of what 3D printers actually do.

Continue reading “3D Printing Has Evolved Two Filament Standards”

The Most Self-Replicating RepRap Yet

The goal of the RepRap project was always a machine that could replicate itself. The project began with the RepRap Darwin, a machine with a frame made nearly entirely of threaded rods, and progressed to the Mendel, with a slightly higher proportion of printed parts. Around 2011, the goal of self-replication fell by the wayside after some money was thrown around. The goal now, it seems, is to create the 3D printer with the best profit margins. That doesn’t mean there still isn’t a small contingent of RepRappers out there trying to improve the status quo and create a printer that can truly self-replicate. [Revar] is one of those tinkerers, and he has just released the RepRap Snappy, a snap-together 3D printer built nearly entirely out of 3D printed parts.

Other 3D printers designed around the idea of self-replication, like the RepRap Morgan and the Simpson family of printers, use strange kinematics. The reason for this is that Cartesian bots can’t print up to the limits of their frame, yet self-replication requires all parts be replicated at the same scale.

[Revar] is setting a new tack in the problem of printer self-replication and is joining parts together with snap fit connectors. The entire frame of the Snappy printer is built out of small parts that interlock to form larger units.

Another of the tricks up [Revar]’s scheme is reducing the number of ‘vitamins’ or parts that cannot be 3D printed. This includes belts, motors, screws, and electronics. You can’t really print machine screws yet, but [Revar] did manage to eliminate some belts and bearings. He’s using a rack and pinion system, all made with printed parts. It’s a technique that hasn’t been seen before, but it does seem to work rather well.

[Revar] has made all the files for the printed parts available in his repository. If you have enough filament, these files are enough to print 73% of the RepRap Snappy.

Thanks [Matt] for sending this one in. Video below.

Continue reading “The Most Self-Replicating RepRap Yet”