These Projects Bent Over Backward To Win The Flexible PCB Contest

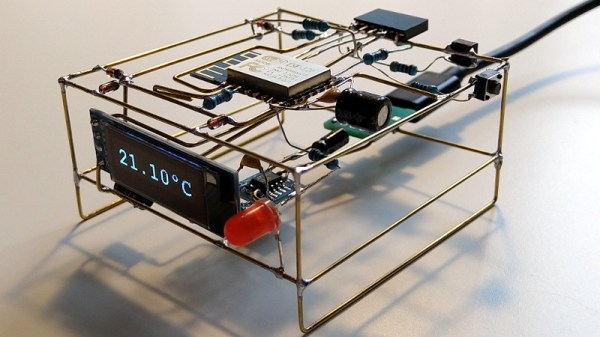
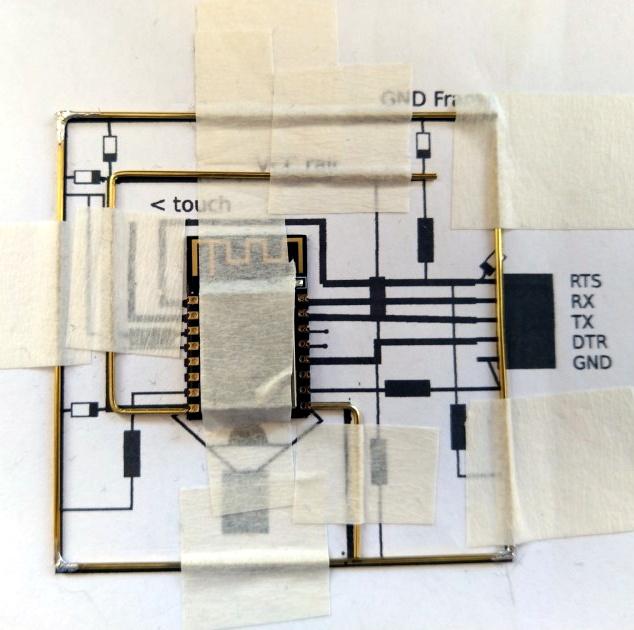
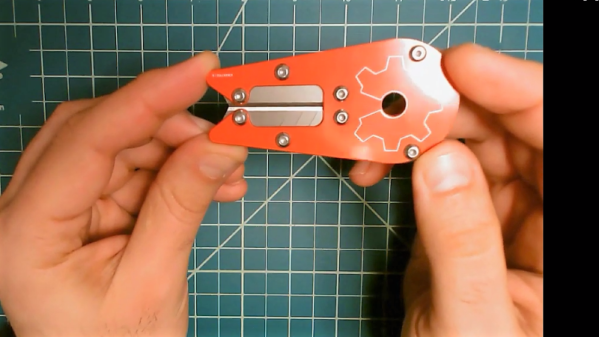
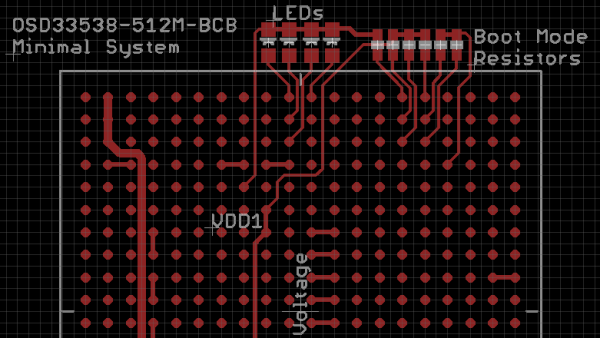
Back in March, the call went out: take your wiggliest, floppiest, most dimensionally compliant idea, and show us how it would be better if only you could design it around a flexible PCB. We weren’t even looking for a prototype; all we needed was an idea with perhaps a sketch, even one jotted on the legendary envelope or cocktail napkin.

When we remove constraints like that, it’s interesting to see how people respond. We have to say that the breadth of applications for flex PCBs and the creativity shown in designing them into projects was incredible. We saw everything from circuit sculpture to wearables. Some were strictly utilitarian and others were far more creative. In the end we got 70 entries, and with 60 prizes to be awarded, the odds were ever in your favor.

Now that the entries have been evaluated and the winners decided, it’s time to look over the ways you came up with to put a flexible PCB to work. Normally we list all the winners in our contest wrap-ups, but with so many winners we can’t feature everyone. We’ll just call out a few of the real standout projects here, but you really should check the list of winning projects to see the full range of what this call for flexibility brought out in our community.

Continue reading “These Projects Bent Over Backward To Win The Flexible PCB Contest”

Freeform ESP8266 Network Attached Data Display

Like many of us, [Josef Adamčík] finds himself fascinated with so-called “freeform” electronic designs, where the three dimensional circuit makes up sections of the device’s structure. When well executed, such designs really blur the line between being a practical device and an artistic piece. In fact his latest design, an ESP8266 MQTT client, would seem to indicate there might not be much of a “line” at all.

The inspiration for this project actually comes from something [Josef] had worked on previously: an ESP8266-based environmental monitoring system. That device had sensors to pick up on things such as humidity and ambient light level, but it didn’t have a display of its own; it just pushed the data out onto the network using MQTT. So he thought a companion device which could receive this environmental data and present it to him in a unique and visually appealing way would be a natural extension of the idea.

As the display doesn’t need any local sensors of its own, it made the design and construction much easier. Which is not to say it was easy, of course. In this write-up, [Josef] takes the reader through the process of designing each “layer” of the circuit in 2D, printing it out onto paper, and then using that as a guide to assemble the real thing. Once he had the individual panels done, he used some pieces of cardboard to create a three dimensional jig which helped him get it all soldered together.

On the software side it’s pretty straightforward. It just pulls the interesting bits of information off of the network and displays it on the OLED. Right now it’s configured to show current temperature on the display, but of course that could be changed to pretty much anything you could imagine if you’re looking to add a similar device to your desktop. There’s also a red LED on the device which lights up to let [Josef] know when the batteries are getting low on the remote sensor unit; a particularly nice touch.

If you’d like to see more of these freeform circuits, we’d advise you to checkout the finalists for our recently concluded “Circuit Sculpture” contest. Some of the finalists are truly beyond belief.

The $50 Ham: Dummy Loads, Part 2

In the last installment of “The $50 Ham” I built a common tool used by amateur radio operators who are doing any kind of tuning or testing of transmitters: a dummy load. That build resulted in “L’il Dummy”, a small dummy load intended for testing typical VHF-UHF handy talkie (HT) transceivers, screwing directly into the antenna jack on the radio.

As mentioned in the comments by some readers, L’il Dummy has little real utility. There’s actually not much call for a dummy load that screws right into an HT, and it was pointed out that a proper dummy load is commercially available on the cheap. I think the latter observation is missing the point of homebrewing specifically and the Hackaday ethos in general, but I will concede the former point. That’s why at the same time I was building L’il Dummy, I was building the bigger, somewhat more capable version described here: Big Dummy.

Continue reading “The $50 Ham: Dummy Loads, Part 2”

KiCad Community Shines At First Ever KiCon

Last weekend was KiCon, a gathering of hardware developers from all over the world who use KiCad open source EDA software. This included many of the software engineers who drive development, people who use KiCad in their business, and those who simply love it for being a professional quality tool available for anyone to use.

From hardware show-and-tell, to the lineup of talks, and the social events each evening, there was so much packed into two (plus) days. Join me after the break for a whirlwind tour of the people and the hardware found at 2019 KiCon.

Continue reading “KiCad Community Shines At First Ever KiCon”

These Wire Strippers Are Made From PCBs

The rise in cheap PCB fabrication has made old-school prototyping methods such as wire wrapping somewhat passé, but it still has its place. And if you’re going to wire wrap, you’re going to want a quick and easy way to strip that fine Kynar-insulated wire. So why not use PCB material to make this handy wire-wrapping wire stripper?

The tool that [danielrp] built is pretty simple – just a pair of razor blades held together so as to form a narrow slot to cut insulation while leaving the conductor untouched. The body of the tool is formed of two PCBs, between which the blades are sandwiched. [danielrp] designed the outline of the PCBs in DraftSight, then exported a DXF into EAGLE to make the Gerbers. The fabricated boards needed a little post-processing, including tapping the holes on one side to accept the screws that hold the tool together. We were surprised that FR4 took the threads at all, but it seems to work for this low-torque application. The disposable snap-type blades were sandwiched between the PCBs and the gap between them adjusted for nick-free stripping. The video below shows the design and build process.

We always appreciate homemade tools, and the fact that you can get a stack of PCBs for almost nothing makes us wonder what else we could use them for. We recently saw them used in a unique word clock, and even turned into a folding circuit sculpture.

Continue reading “These Wire Strippers Are Made From PCBs”

Hackaday Podcast 014: Keeping Raspberry’s SD Card Alive, We Love MRRF, And How Hot Are Flip Chips?

Elliot Williams and Mike Szczys take a look at advances in photogrammetry (building 3D models out of many photographs from a regular camera), a delay pedal that’s both aesthetically and aurally pleasing, and the power of AI to identify garden slugs. Mike interviews Scotty Allen while walking the streets and stores of the Shenzhen Electronics markets. We delve into SD card problems with Raspberry Pi, putting industrial controls on your desk, building a Geiger counter for WiFi, and the sad truth about metal 3D printing.

Take a look at the links below if you want to follow along, and as always, tell us what you think about this episode in the comments!

Take a look at the links below if you want to follow along, and as always, tell us what you think about this episode in the comments!

Direct download (60 MB or so.)

Continue reading “Hackaday Podcast 014: Keeping Raspberry’s SD Card Alive, We Love MRRF, And How Hot Are Flip Chips?”

Octavo Systems Shows Off With Deadbug Linux Computer

Once upon a time, small Linux-capable single board computers were novelties, but not anymore. Today we have a wide selection of them, many built around modules we could buy for our own projects. Some of the chipset suppliers behind these boards compete on cost, others find a niche to differentiate their product. Octavo Systems is one of the latter offering system-in-package (SiP) modules that are specifically designed for easy integration. They described how simple it would be to build a minimal computer using their SC335x C-SiP, and to drive the point home they brought a deadbug implementation to Embedded World 2019. [Short video after the break.]

Most of us encounter Octavo modules as the heart of a BeagleBoard. Their increasing integration made tiny wonders like PocketBeagle possible. But bringing out all those pins for use still required a four-layer circuit board. Octavo’s pitch for hardware professionals center around how easy integration saves time for faster time to market, and fortunately for us easy integration also translates to a more accessible device for our projects. It’s one thing to publish a document describing a hypothetical single-layer PCB for an Octavo module, it’s quite something else to show that concept in action with no PCB at all.

Of course, this little machine only has access to a fraction of the module’s functionality, and it is certainly overkill if the objective is just to blink a few LEDs. If so, we’d just use 555 timers! But it does show how simple a bare bones “Hello World” machine can be built, removing intimidation factor and invite more people to come play.

One of the three top winners in our circuit sculpture contest was a wireframe Z80 computer. There’s quite a jump from a Z80 to an Octavo SC335x, but we’ve already seen one effort by [Zach] over Supercon 2018 weekend to build a deadbug computer with an Octavo module. It won’t be long before someone one-ups this minimalist LED blinker with something more sophisticated and we can’t wait to see it. Continue reading “Octavo Systems Shows Off With Deadbug Linux Computer”